Documentation
Unicorn Panel Documentation
Guides for installing, configuring, and operating Unicorn Panel across your fleet.
Installation Guide
Thank you for choosing Unicorn Panel (UPCP). Installing it is a single command.
UPCP is a multi-server web hosting control panel built for Alpine Linux. Every server in your fleet is managed from one of them, the Primary Control Panel. Adding another server later means copying the install command the Primary generates for it and pasting that into the new box.
Hardware requirements
- A blank (no other software) VPS or bare metal server.
- Alpine v3.20 or above. We recommend the latest version of Alpine Linux.
- A minimum of 500MB RAM and 5GB storage.
Everything UPCP stores lives under /opt/upcp, and customer data specifically under /opt/upcp/containers. Either path can be its own partition if you want to give the server more room.
Two roles store their data elsewhere. Mailboxes from the Email role go to /opt/upcp/services/upcp-ues/data, and the Backup role writes to /backups, which can be a partition, a network mount, or external storage.
Installation steps
UPCP is free to install and needs no license key to run. The free tier covers 2 servers and 2 accounts, and everything else is unlimited: as many websites, databases, mailboxes and DNS zones as those servers will carry, with every engine and role available. A license key raises the server and account limits when you outgrow them. See pricing for what that costs.
- Log in to your new Alpine Linux server as root.
- Copy and paste the installation command into the terminal:
wget -qO- https://unicornpanel.com/install | sh - Press Enter to start the installation.
- Wait for it to finish. It ends by printing a link and the login details for your administration account.
- If that link does not open, check that your firewall allows port
8727. - Once logged in, navigate to My Account (click your user icon, bottom left) -> Password to update your details and change the password. We highly recommend navigating to Login Security in this section to enable 2FA or Passkeys. Please note, Passkeys will only work on a fully qualified domain name.
- If you forget your admin password, type
unicorn root reset-admin-passwordin your terminal to generate a new password. - If you have a license key, go to Settings -> License Key and enter it. Once it validates, the server and account limits lift to whatever your key covers.
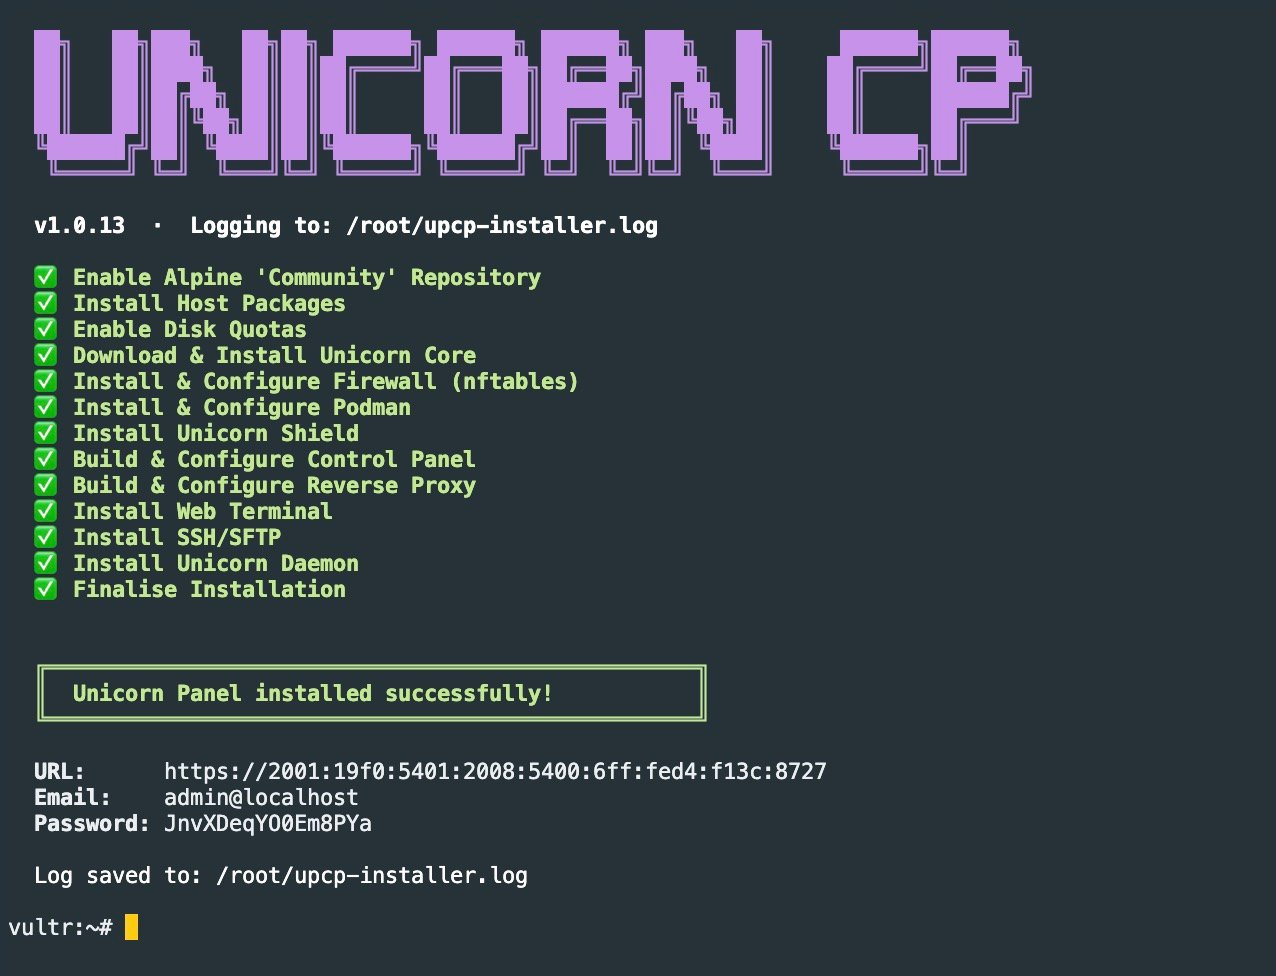
/root/upcp-installer.log, so closing the terminal before you copy them is not a problem.Unicorn Panel is now installed and running. Give it a few minutes for CPU usage to settle.
Firewall Ports to Allow
The installer opens the ports UPCP needs, and each role you add opens its own. These are the ports UPCP uses:
UPCP
Port 8727 TCP must be open on all UPCP servers.
Applications
- 80
TCP - 443
TCPUDP - 22
TCP(SSH)
Database
- 3306
TCP - 3307
TCP(Used when a second database role is installed) - 3308
TCP(Used when a third database role is installed) - 5432
TCP(PostgreSQL)
DNS
- 53
TCPUDP
- 25
TCP - 143
TCP - 465
TCP - 587
TCP - 993
TCP
After Installation
With the Primary Control Panel installed, these are the things worth setting up next:
- Set up SMTP: The Primary Control Panel needs to send emails (forgot password, various notifications, etc). You can set these settings at Settings -> SMTP Settings.
- Set a Control Panel Domain Name: A vanity domain lets your customers log in without the port number in the URL. Once you set this domain name, the port 8727 is no longer used, but keep the port open in the Firewall. You can set this at Settings -> Control Panel Domain. If you intend to use an IP Address, please read the next point.
A vanity domain is worth setting up: the panel turns on passkey support automatically, and browsers stop withholding the newer features they hold back on a bare IP address, so the panel is quicker for your customers. - Enable SSL at the Control Panel: By default, a self-signed SSL Certificate will be used. If you plan on using a vanity domain name, you can simply Set a Control Panel Domain Name (as above) and a free SSL Certificate will be generated. If you plan to use an IP address instead, that can be secured through Let's Encrypt too: go to Settings -> Tools -> Renew CP SSL.
The certificate will be valid, but passkeys stay unavailable on an IP address and some browser features remain limited. - Set up Branding: Change the panel's colors, icons and names. You can set these options at Settings -> Branding.
- Set up another Server: Navigate to Servers and click the Add server button to start the new server set up.
- Set up Roles: Roles (web engines, databases, DNS, mail and so on) are installed per server. Go to Servers -> |server| -> Roles to add them.
- Set up DNS: Enable the Heimdall DNS role on one or more servers first. A Settings -> Nameservers (DNS) option then appears, where you set up your own branded nameservers.
- Set up Email: Enable the Hermes Mail Suite role on one or more servers first. A Settings -> Hermes Mail Suite option then appears, covering outgoing spam scoring, automatic suspension and the rest of Hermes.
Overview
The Websites page lists every site your account can see. Each site is its own container with its own files, PHP runtime, databases (if Mimir is used), and resource caps. What shows up in the list depends on your role:
- Owners and Super Administrators see every website in the fleet.
- Support accounts see every tenant site (Reseller, Customer, Collaborator).
- Resellers see every website created under their account, by themselves or their Customers.
- Customers see sites they own, plus sites their Collaborators have created on their behalf.
- Collaborators see only the sites their parent Customer has granted them.
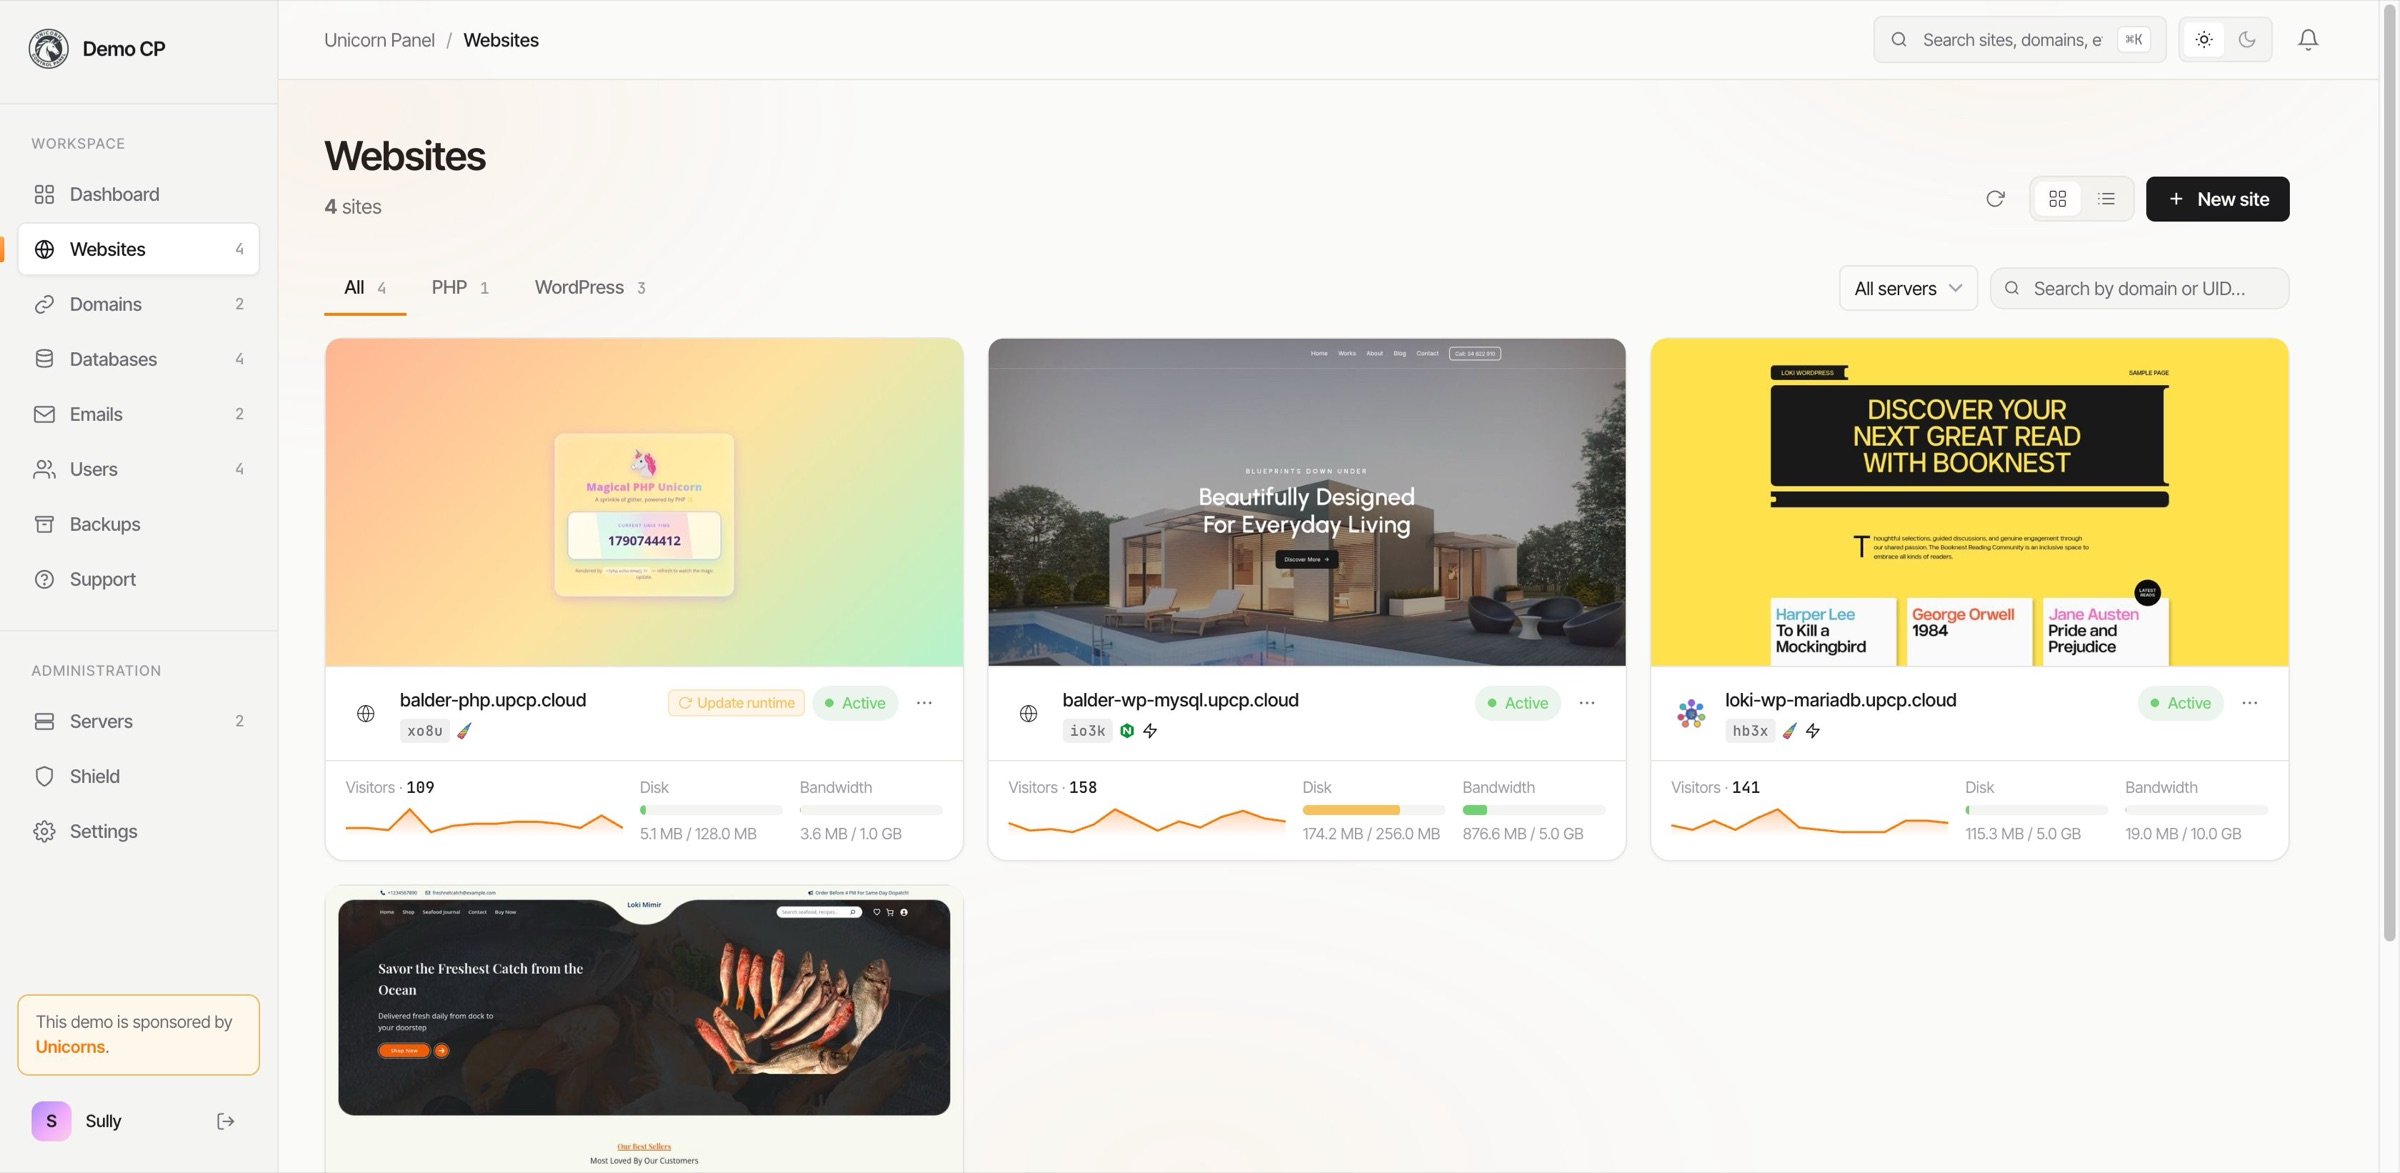
You can switch between card view and list view with the toggle in the toolbar. Use the search box to filter by domain, uid, or server name. The counts next to each site (CPU, memory, visitors) refresh every few seconds while the page is open.
Create a new website
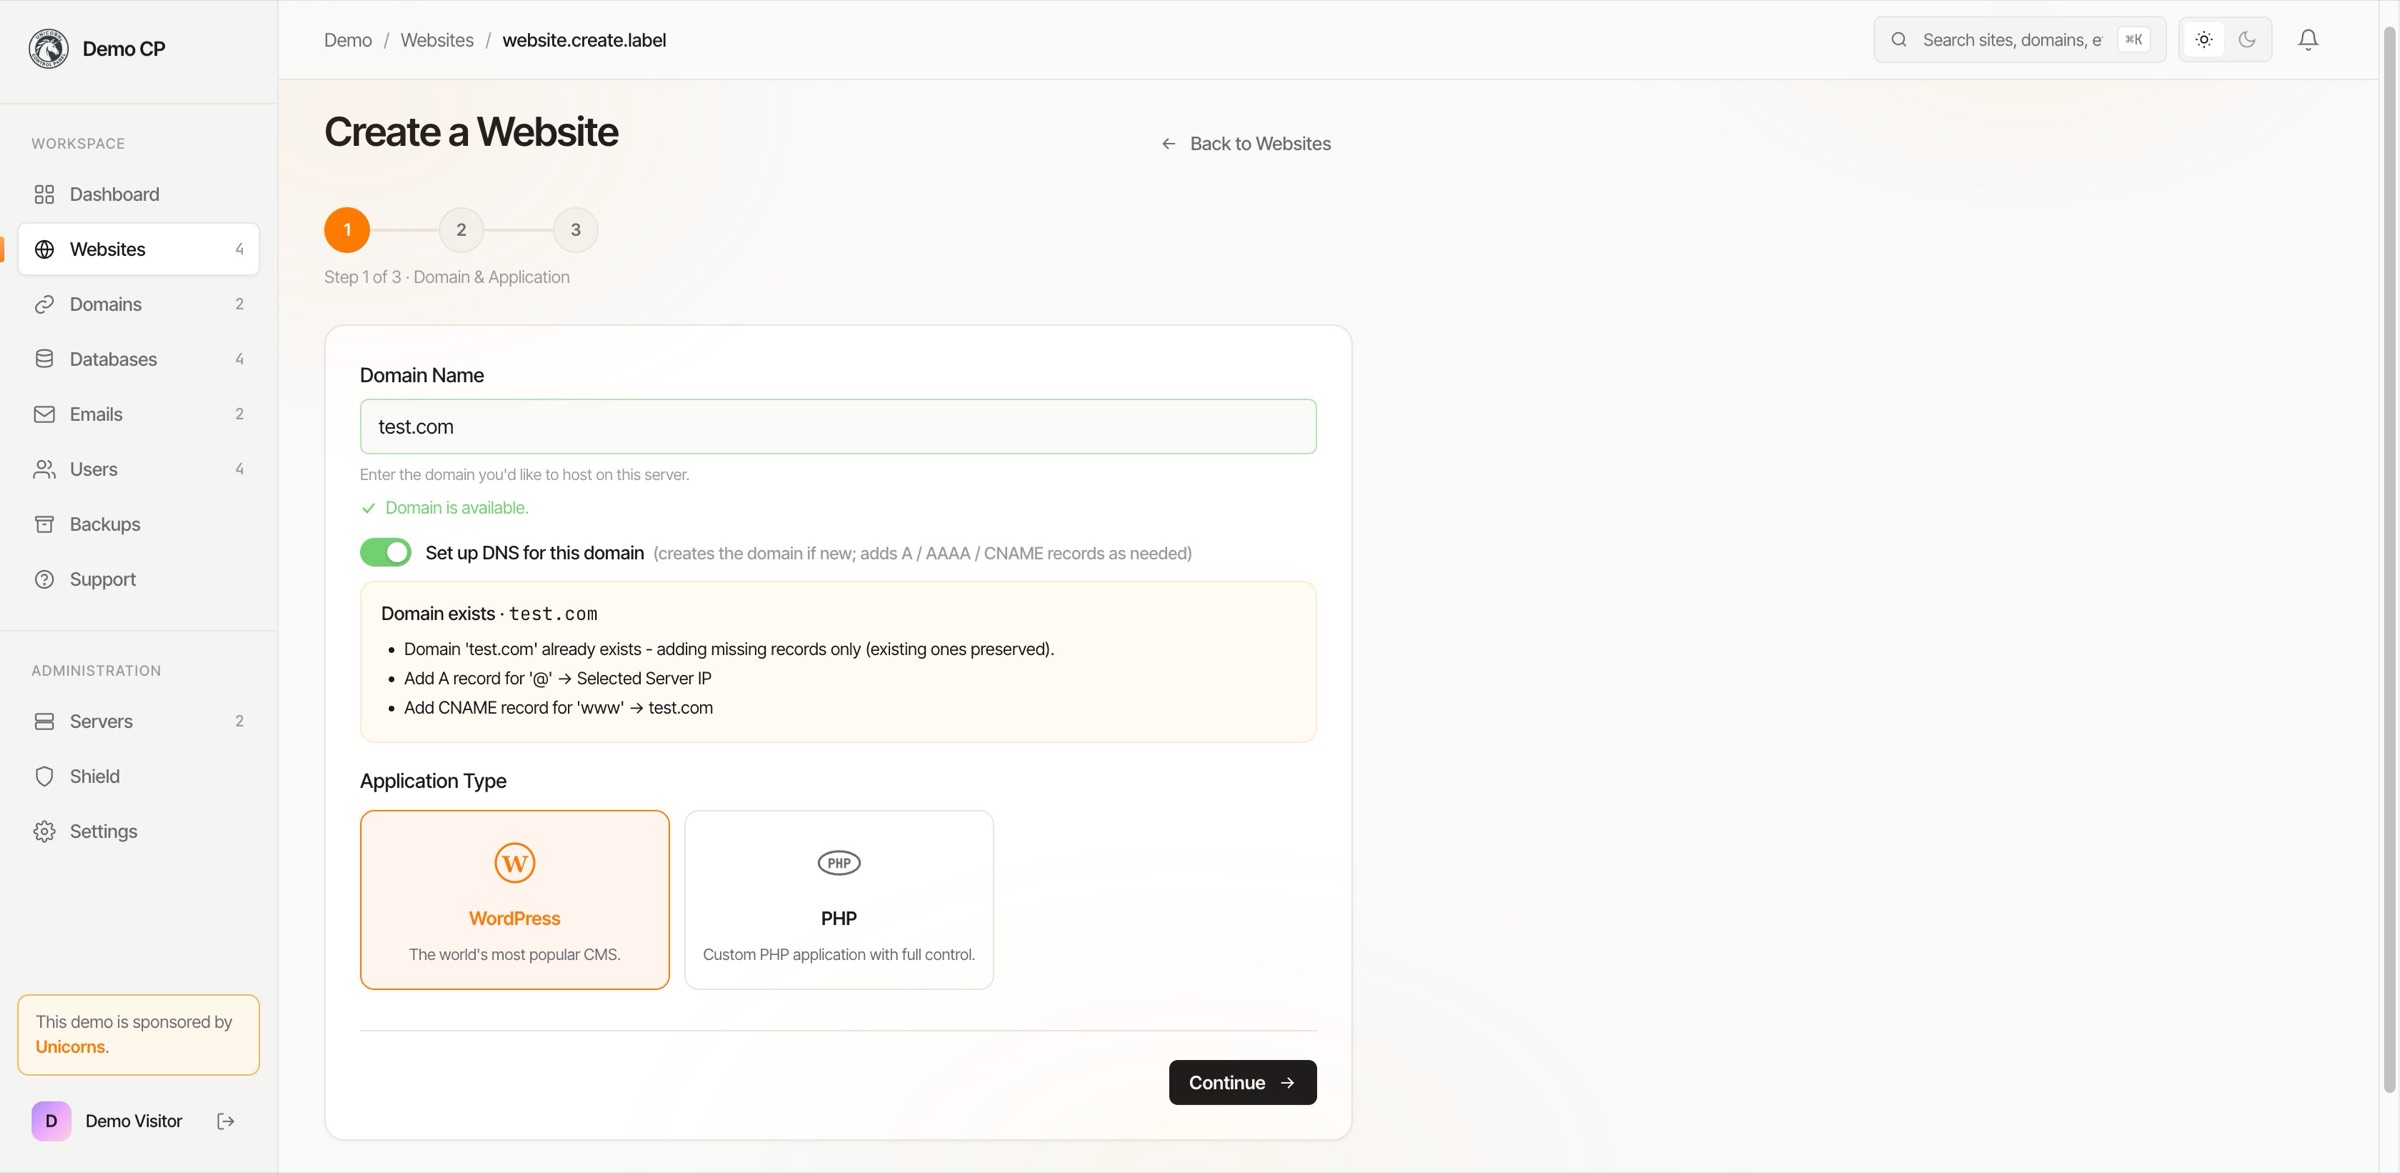
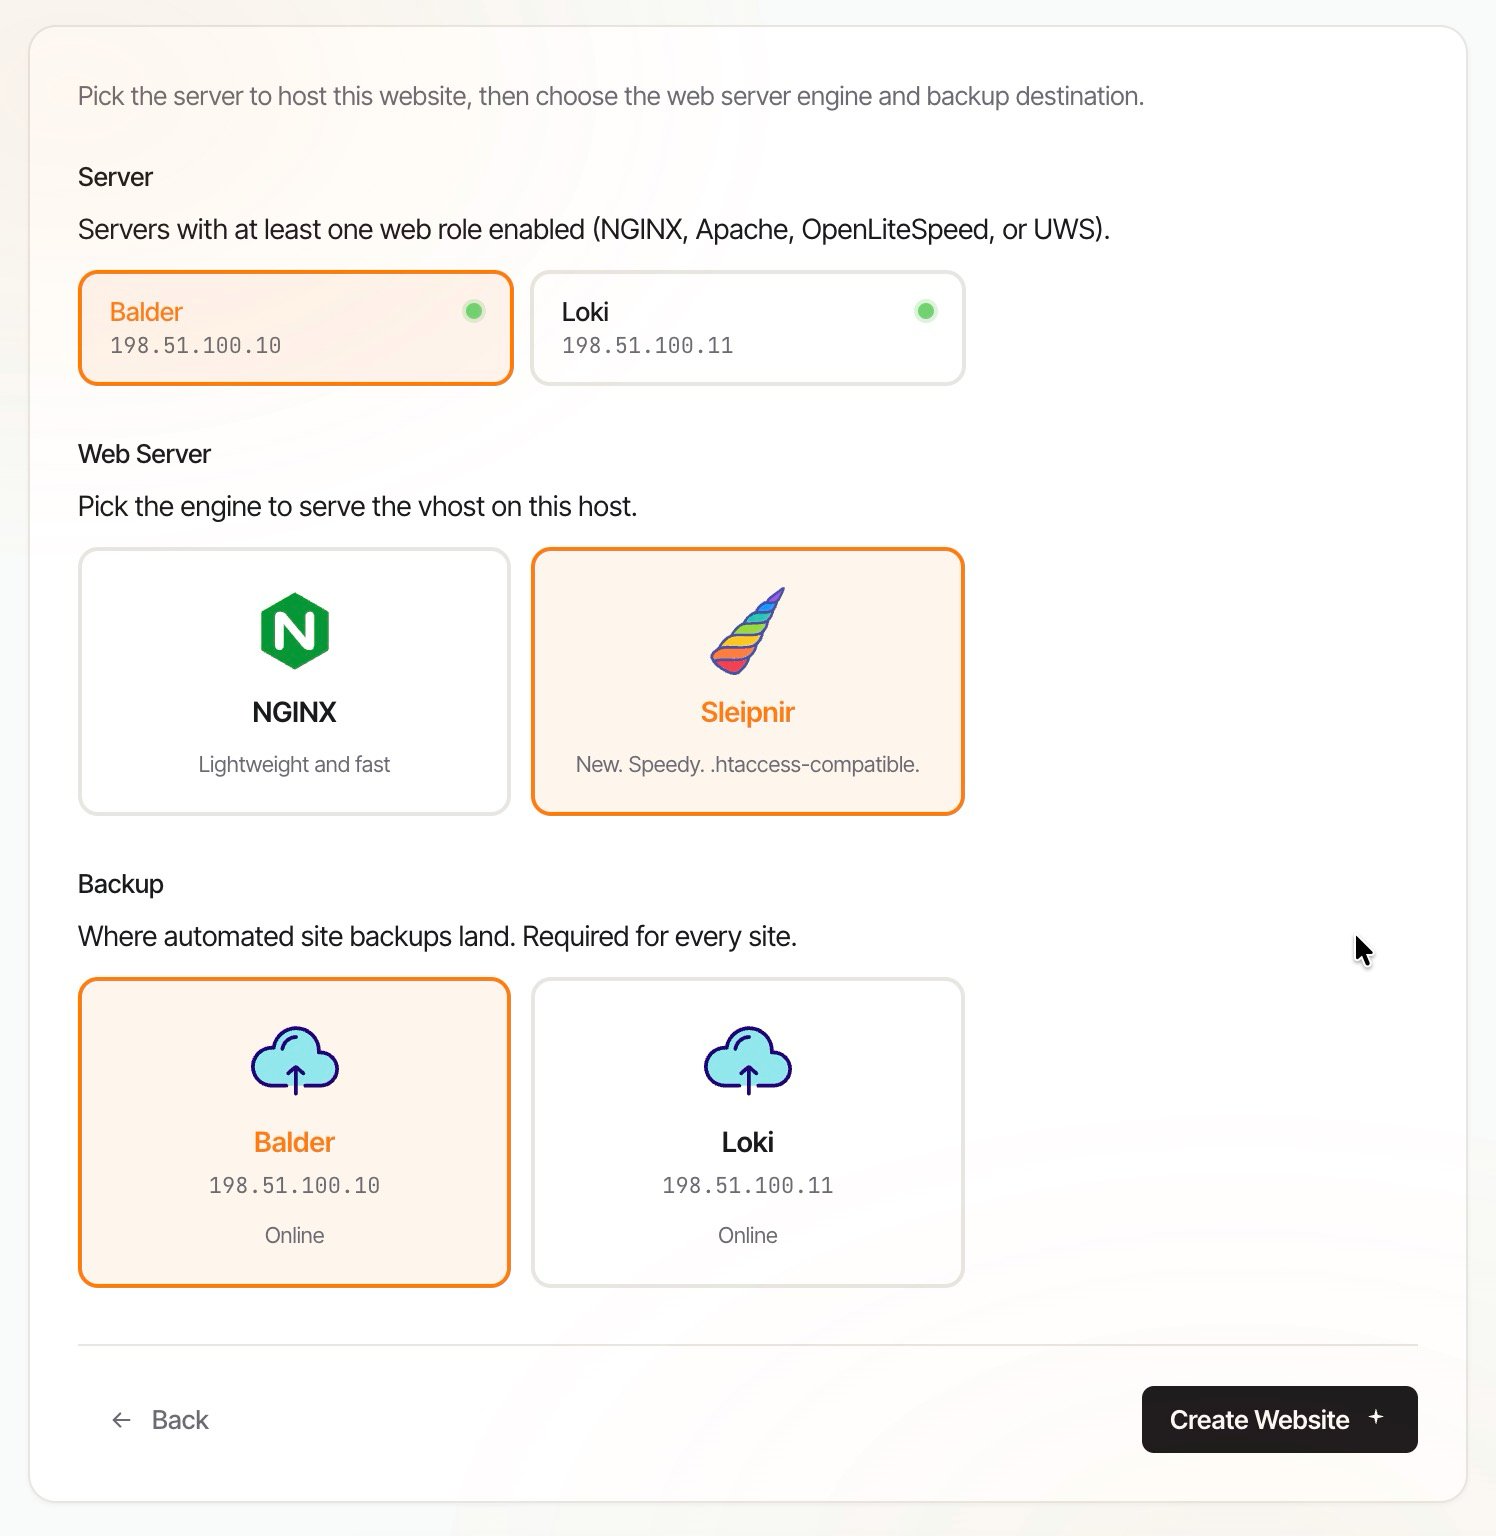
Click New site on the toolbar to open the create wizard. The wizard only offers you options you can actually use. If no server in the fleet has a web server role enabled yet, you will see a hint pointing you at the Servers page instead of three choices that would all fail at save time.
- Pick an application type. Static HTML, PHP, or WordPress. The list reflects which roles are enabled on at least one server.
- Pick a PHP version (if applicable). Only versions actually installed on the fleet appear.
- Pick a server. Filtered by your package's placement rules and by which servers have the required roles. If you only have access to one server for the resource type you picked, that one is pre-selected.
- Pick a web server. NGINX, Apache, OpenLiteSpeed, or Sleipnir, whichever the chosen server has enabled.
- Set the domain. The wizard checks availability as you type, including subdomains of other panel sites. If you select Set up DNS, the panel creates the matching zone on your DNS server.
- WordPress only: set the admin user and email. You can also opt into the Cache Helper mu-plugin so cache clears automatically on content changes.
The kebab menu
Every site in the list has a kebab menu on the right. Common actions:
- Open the public site in a new tab.
- Manage the site (opens the Manage pages described below).
- File manager for the site's home directory.
- Web terminal for a shell session inside the site's container.
- Favorite to pin the site to the top of your list.
Owners, Super Administrators, Support, and Resellers also see:
- Set Resources, Disable, Transfer Ownership, Move to another server, Delete.
Managing a website
Clicking Manage opens the per-site page, with its tabs listed down the left. Each tab is covered in its own section below.
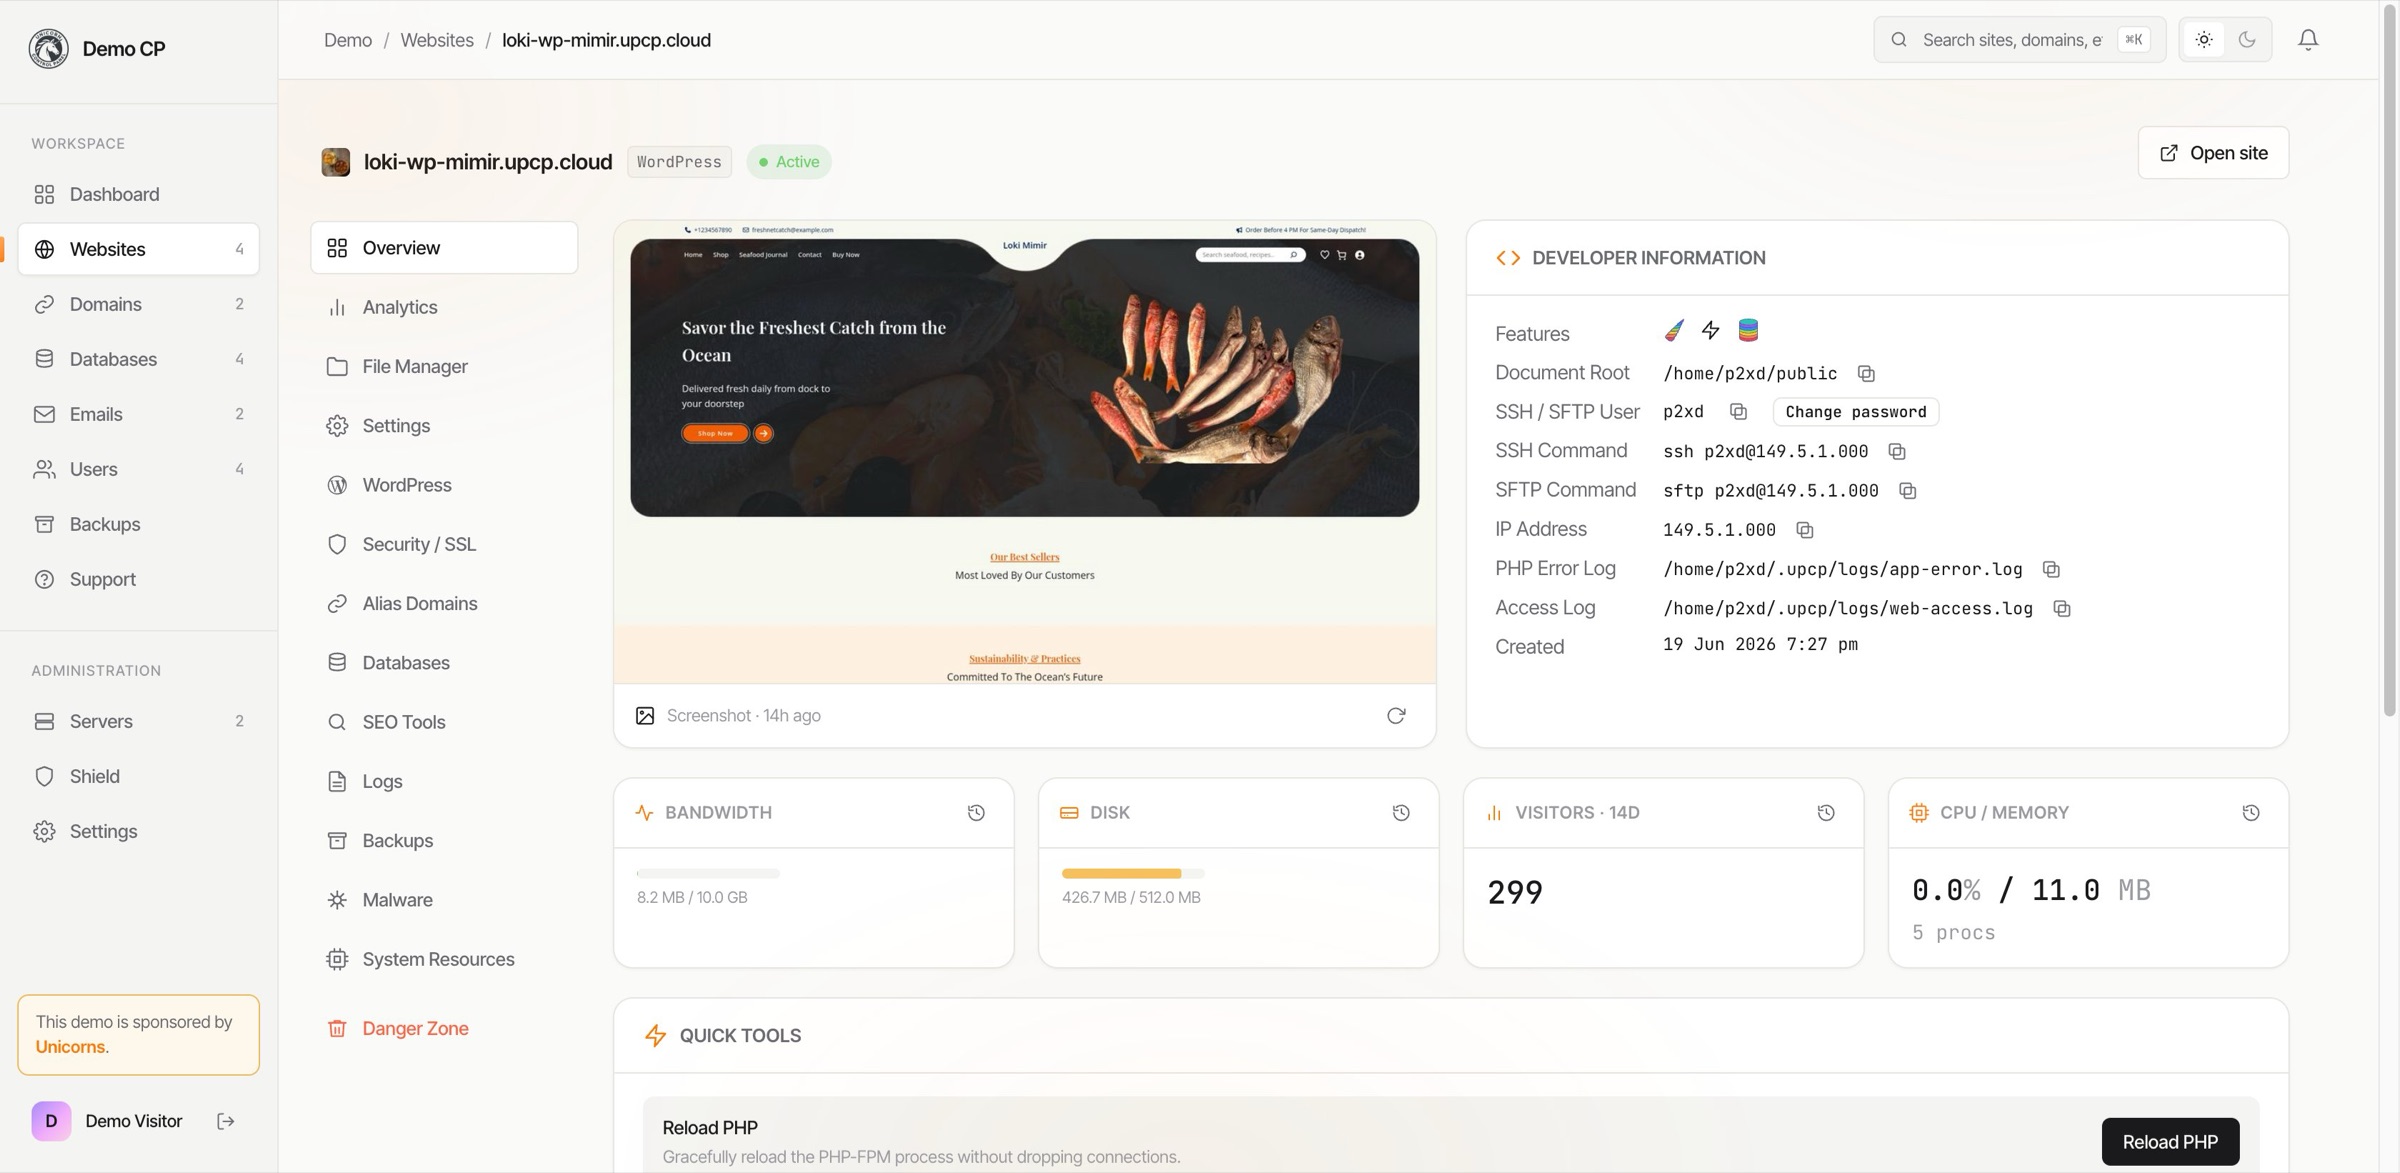
Overview tab
Lists the site's domain, aliases, server, web server, PHP version, SSL status, and container uptime, alongside a live screenshot of the site and a Developer Information card: document root, SSH and SFTP user and commands, IP address, and the paths to the PHP error and access logs. Bandwidth, disk, visitors, and CPU and memory are summarised beside it. Quick Tools gives you one-click Reload PHP, Restart Mimir (if the site uses Mimir databases), and screenshot refresh.
Logs
Access and error logs for the site's web server and PHP, streamed live from the container. Toggle between log types and tail depth with the controls at the top. You can download the current window as a plain text file.
Linked Databases
Databases tied to this site. One-click opens Adminer, phpMyAdmin, or phpPgAdmin for that database (whichever is installed on the fleet). Clicking a database on this tab also opens its usage history and size trend.
File Manager
Browse, upload, download, and edit files inside the site's container. Supports drag-and-drop upload, bulk delete/move/copy, archive extract, and remote URL download. Downloads stream through a dedicated service so even multi-GB files do not blow up PHP memory.
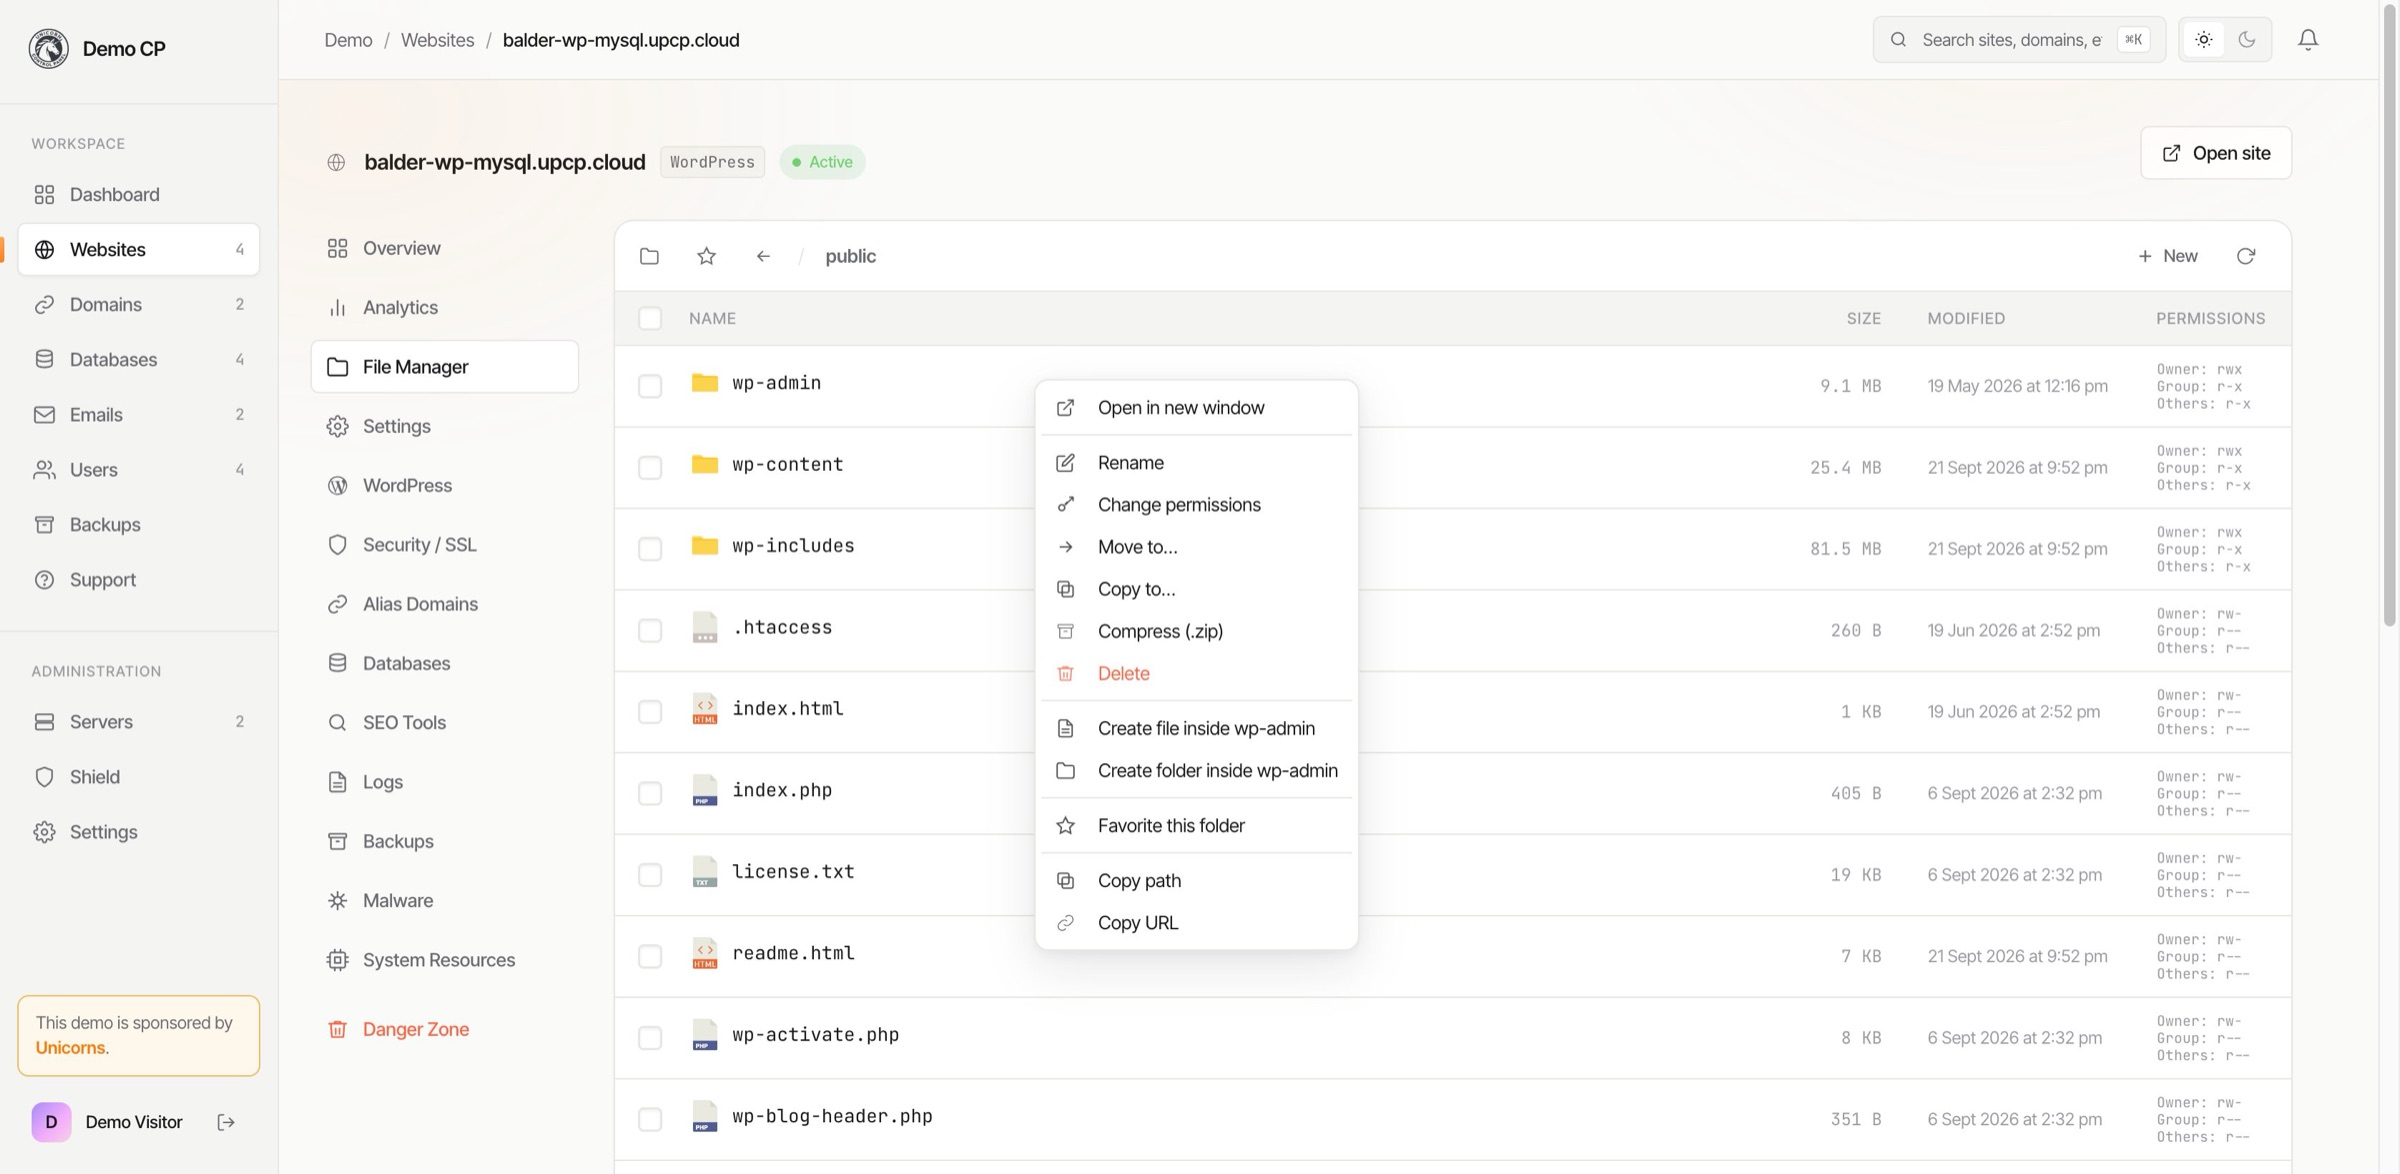
Settings
The site's own runtime settings, in two cards. Nothing here touches any other site or the host.
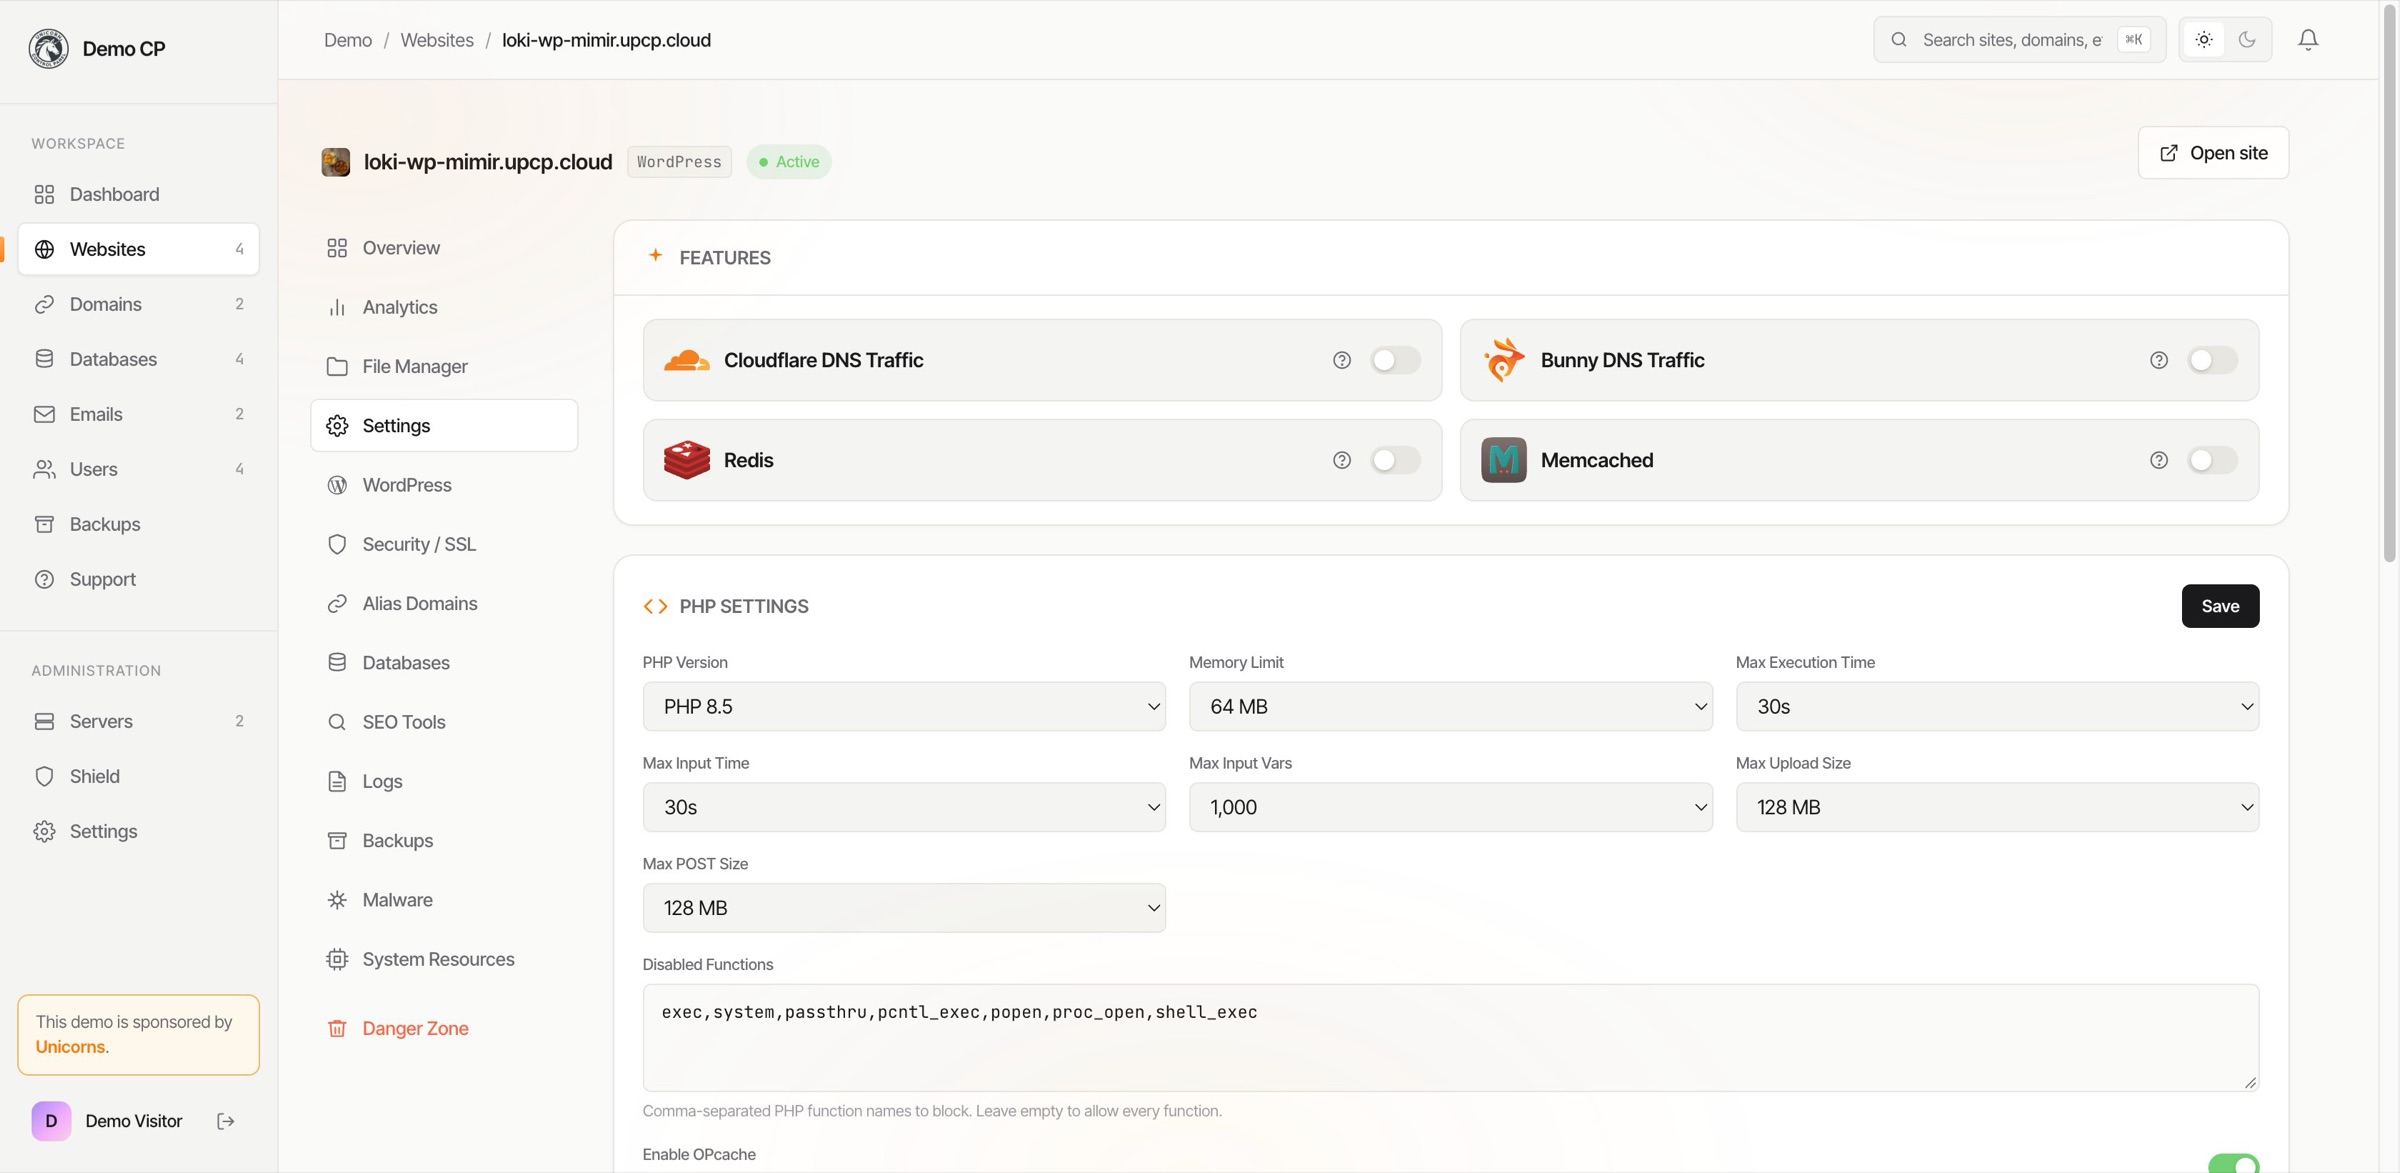
Features
Optional services for this site, each a toggle with a help icon that explains what turning it on does:
- Cloudflare DNS Traffic and Bunny DNS Traffic, for sites whose traffic arrives through those networks.
- Redis and Memcached, each running inside the site's own container rather than shared across the host.
PHP settings
The PHP runtime for this one site, set from the panel instead of by editing a server-wide php.ini. Save applies the change to this site alone.
- PHP Version, picked from the versions installed on the host.
- Memory Limit, Max Execution Time, Max Input Time, and Max Input Vars.
- Max Upload Size and Max POST Size, which usually want raising together.
- Disabled Functions: a comma-separated list of PHP functions to block. The shipped default blocks
exec,system,passthru,pcntl_exec,popen,proc_open, andshell_exec. Leaving it empty allows every function. - Enable OPcache, on by default.
SEO Tools
Per-site toggles and inputs that affect how the site is served. All changes rewrite the proxy config and reload NGINX in place.
Force HTTPS
Every plain-HTTP request is 301-redirected to the HTTPS version of the same URL. Turn this on once SSL has issued successfully.
Preferred Domain
Pick between www.yoursite.com, yoursite.com, or neither. The non-preferred version 301-redirects to the preferred one. Set to neither if you want both to resolve independently.
Block AI crawlers
Returns 403 to crawlers that identify themselves as AI training agents (OpenAI, Anthropic, Google-Extended, Perplexity, Meta-ExternalAgent, and others). Does not affect regular search engines.
Show the full list of blocked AI user agents
- OpenAI:
GPTBot,ChatGPT,OpenAI,GPT-4,GPT-5 - Anthropic:
Claude-Web,Anthropic,ClaudeBot - Google:
Google-Extended,GoogleOther,Google-LLM - Meta:
FacebookBot,Meta-ExternalAgent,MetaBot - Other AI crawlers:
Bytespider,CCBot,Diffbot,360Spider,YandexDataCollector,Amazonbot,DataForSeoBot,CensusBot - AI tools and generators:
AI2Bot,AIEngine,AISEO,AIWriter,KomoBot - Data-collection frameworks matched here too:
Omgili,Scrapy,Crawlera,Nutch,Dataminr
Matching is case-insensitive and done on substring of the User-Agent header, so a crawler advertising itself as Mozilla/5.0 (compatible; GPTBot/1.2; ...) is caught by the GPTBot entry.
Block bad bots
A curated denylist of scraper and vulnerability-scanner user agents. Updated with the panel.
Show the full list of blocked bad-bot user agents
- SEO crawlers:
PetalBot,MJ12bot,DotBot,BLEXBot,ZoominfoBot,SEOkicks,SeznamBot,linkdexbot,Sitebulb,Lighthouse,Majestic,OpenLinkProfiler,LinkpadBot,RankActiveLinkBot,Nibbler,Pagespeed,SEOlytics,SEOENGBot - Generic HTTP clients and scrapers:
curl,wget,python-requests,aiohttp,httpx,libwww-perl,Scrapy,HTTrack,ApacheBench,URLGrabber,Feedly,Go-http-client,okhttp,RestSharp,Java,phpcrawl,WinHTTP,Mechanize,Crawlera - Site rippers and email harvesters:
EmailCollector,EmailSiphon,EmailWolf,ChinaClaw,WebCopier,Download Ninja,Teleport,WebZIP - Reputation and marketing crawlers:
DataMiner,NetcraftSurveyAgent,CheckMarkNetwork - Empty or missing User-Agent header (common for lazy scrapers and spoofed clients)
curl/8.1 is caught by the curl entry even though their real request started with a different word.Redirects
Panel-managed redirects per site. Add a from-path, a to-URL, and a status code (301, 302, 307, 308). Written as one-line location = /from { return 301 https://to/; } blocks at proxy reload.
Alias Domains
Serve the same site on multiple domains. Each alias gets its own Let's Encrypt certificate automatically. Add a domain, hit Save, and the site is reachable at the new name as soon as DNS points at your server.
Website Cache
Enables proxy-level HTML caching. When on, repeat requests for the same page are served from memory without touching PHP, which dramatically reduces load.
- Excluded Pages, Cookies, Query Strings: comma-separated lists. Supports
.*wildcards. Entering/cart.*excludes/cartand anything under it. - WordPress Cache Helper: installs a mu-plugin that automatically purges the cache when you publish, edit, or delete a post, change a theme, or activate a plugin. A Web Cache dropdown also appears in the WP admin toolbar for manual purges.
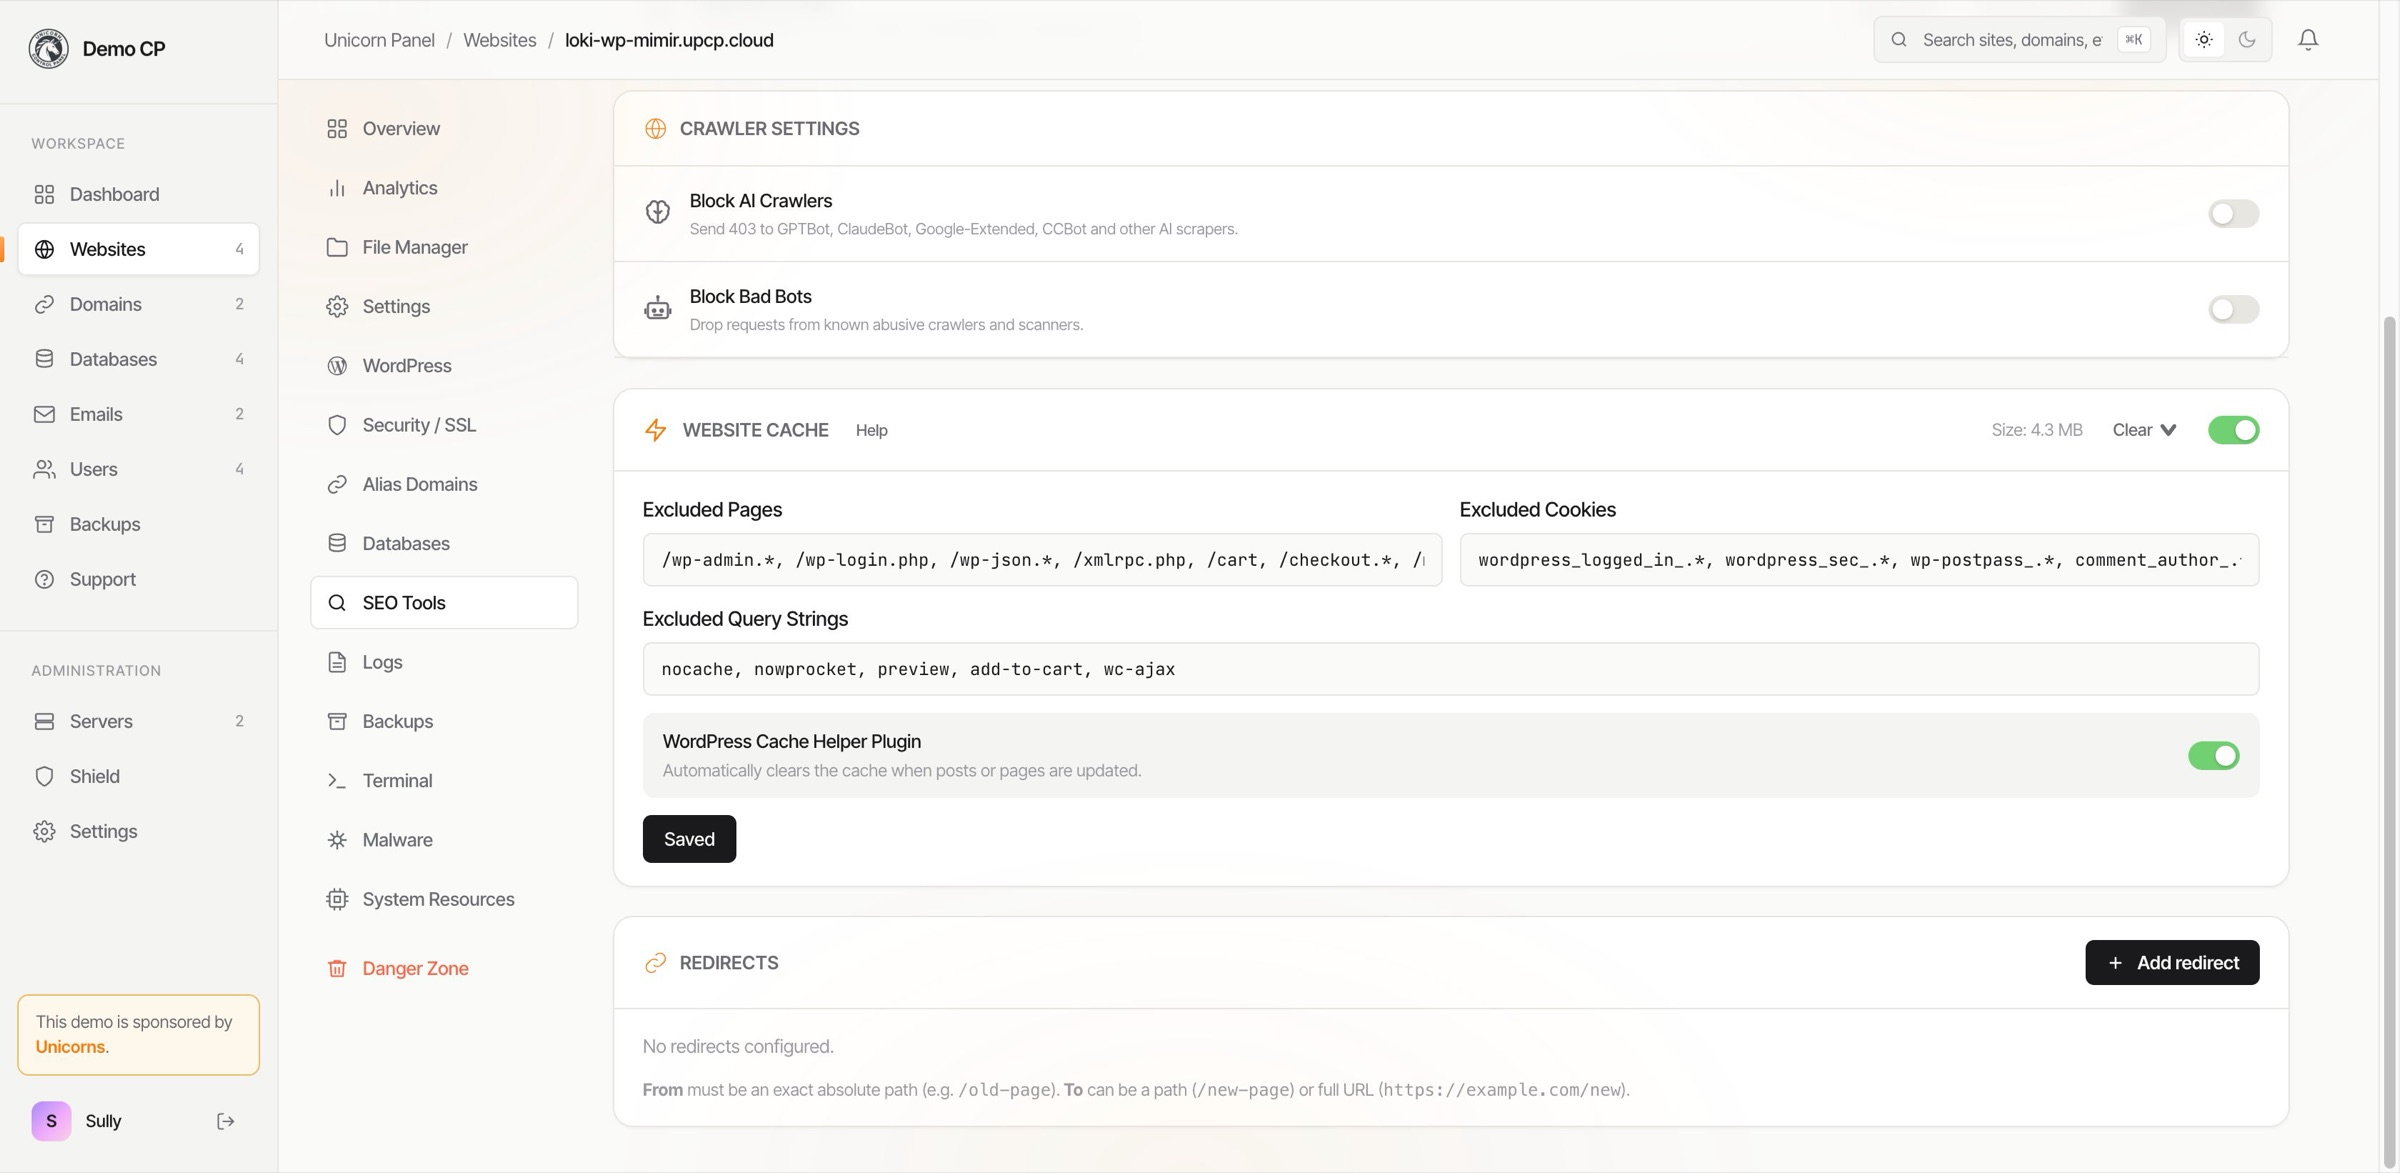
Clearing the cache
The Clear button is a dropdown with two options:
- Clear All: wipes every cached entry for the site.
- Custom: opens a modal where you can paste URL patterns, one per line. Patterns support
*as a wildcard and are matched against the full cached URL. Examples:/cartmatches that exact page on any domain./products/*matches every page under/products/./wp-content/uploads/*.jpgmatches all JPEGs in uploads.example.com/*matches everything onexample.com.*.example.com/*matches every subdomain ofexample.com.
PURGE request to https://yourdomain.com/purge/[path-to-purge].Analytics
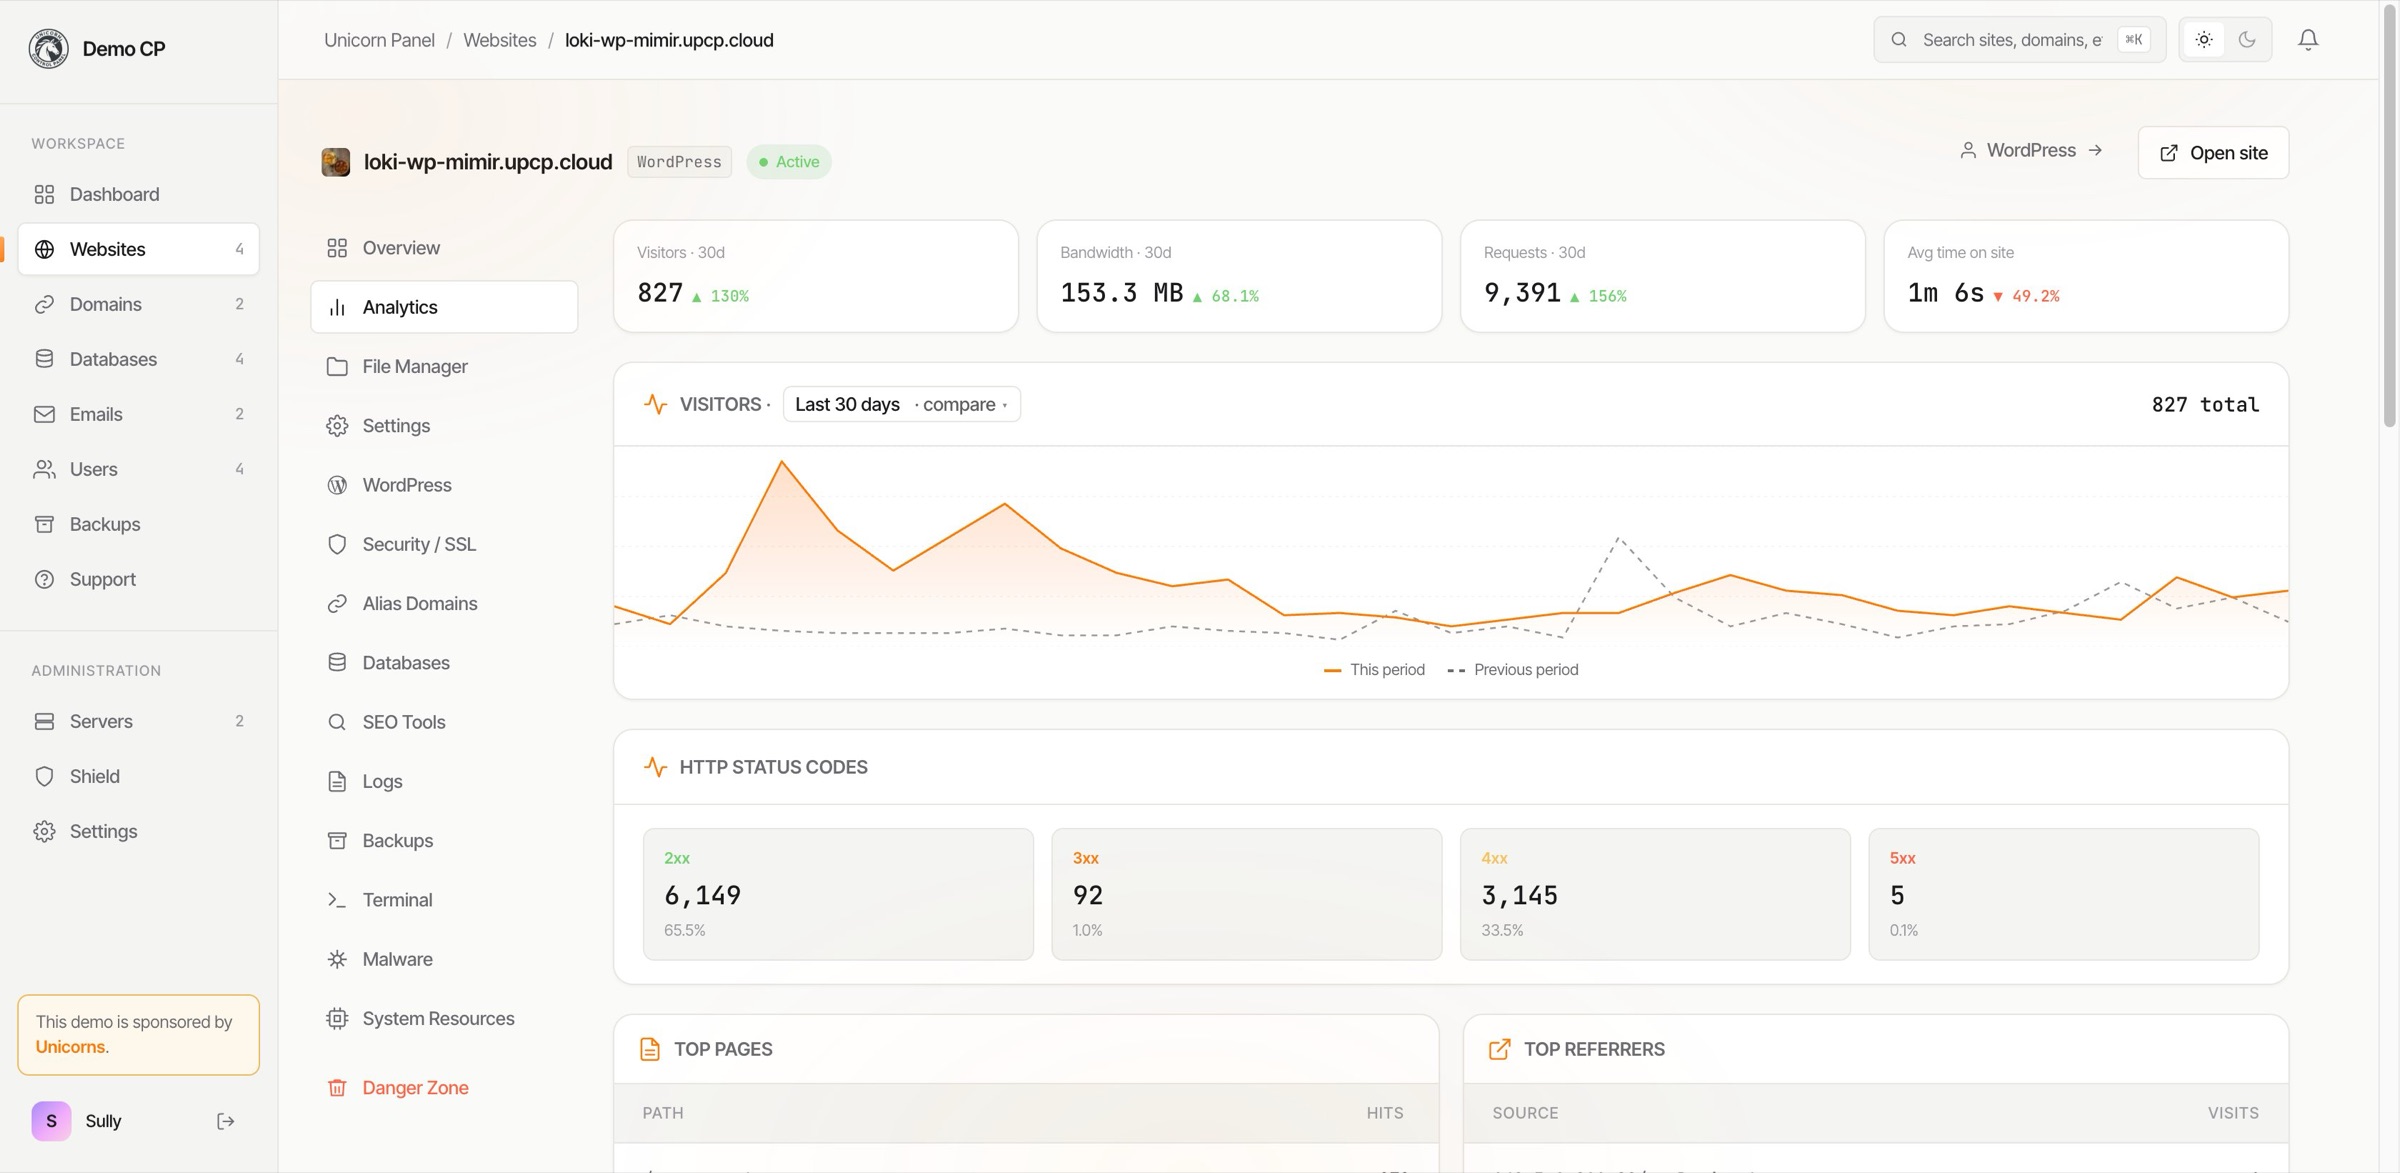
Per-site visitor stats sampled from the proxy's access log. The dashboard shows visitors, pageviews, bandwidth, top pages, top referrers, and country breakdown.
- Compare mode: tick the Compare box to see this period next to the one before it, with a percentage change on each stat.
- Custom date range: pick any start and end date.
- Hover for the raw number on any point of the line chart.
Backups
Per-site backup schedule and restore. Backups cover the site's files plus any linked databases. Weeklies are self-contained; dailies are incrementals that chain back to the last weekly.
Restore
Pick any backup and put it back. Two shapes:
- Whole site: restores the site to exactly how it was on the backup's date. The panel walks the chain from the last full backup up to the one you picked, applies each in order, and your site ends up at that exact state.
- Selective files: the file picker shows every file that was on your site as of the backup date, not just files that changed in the specific archive. Restoring one unchanged file only reads the single older archive that contains it, not every archive since.
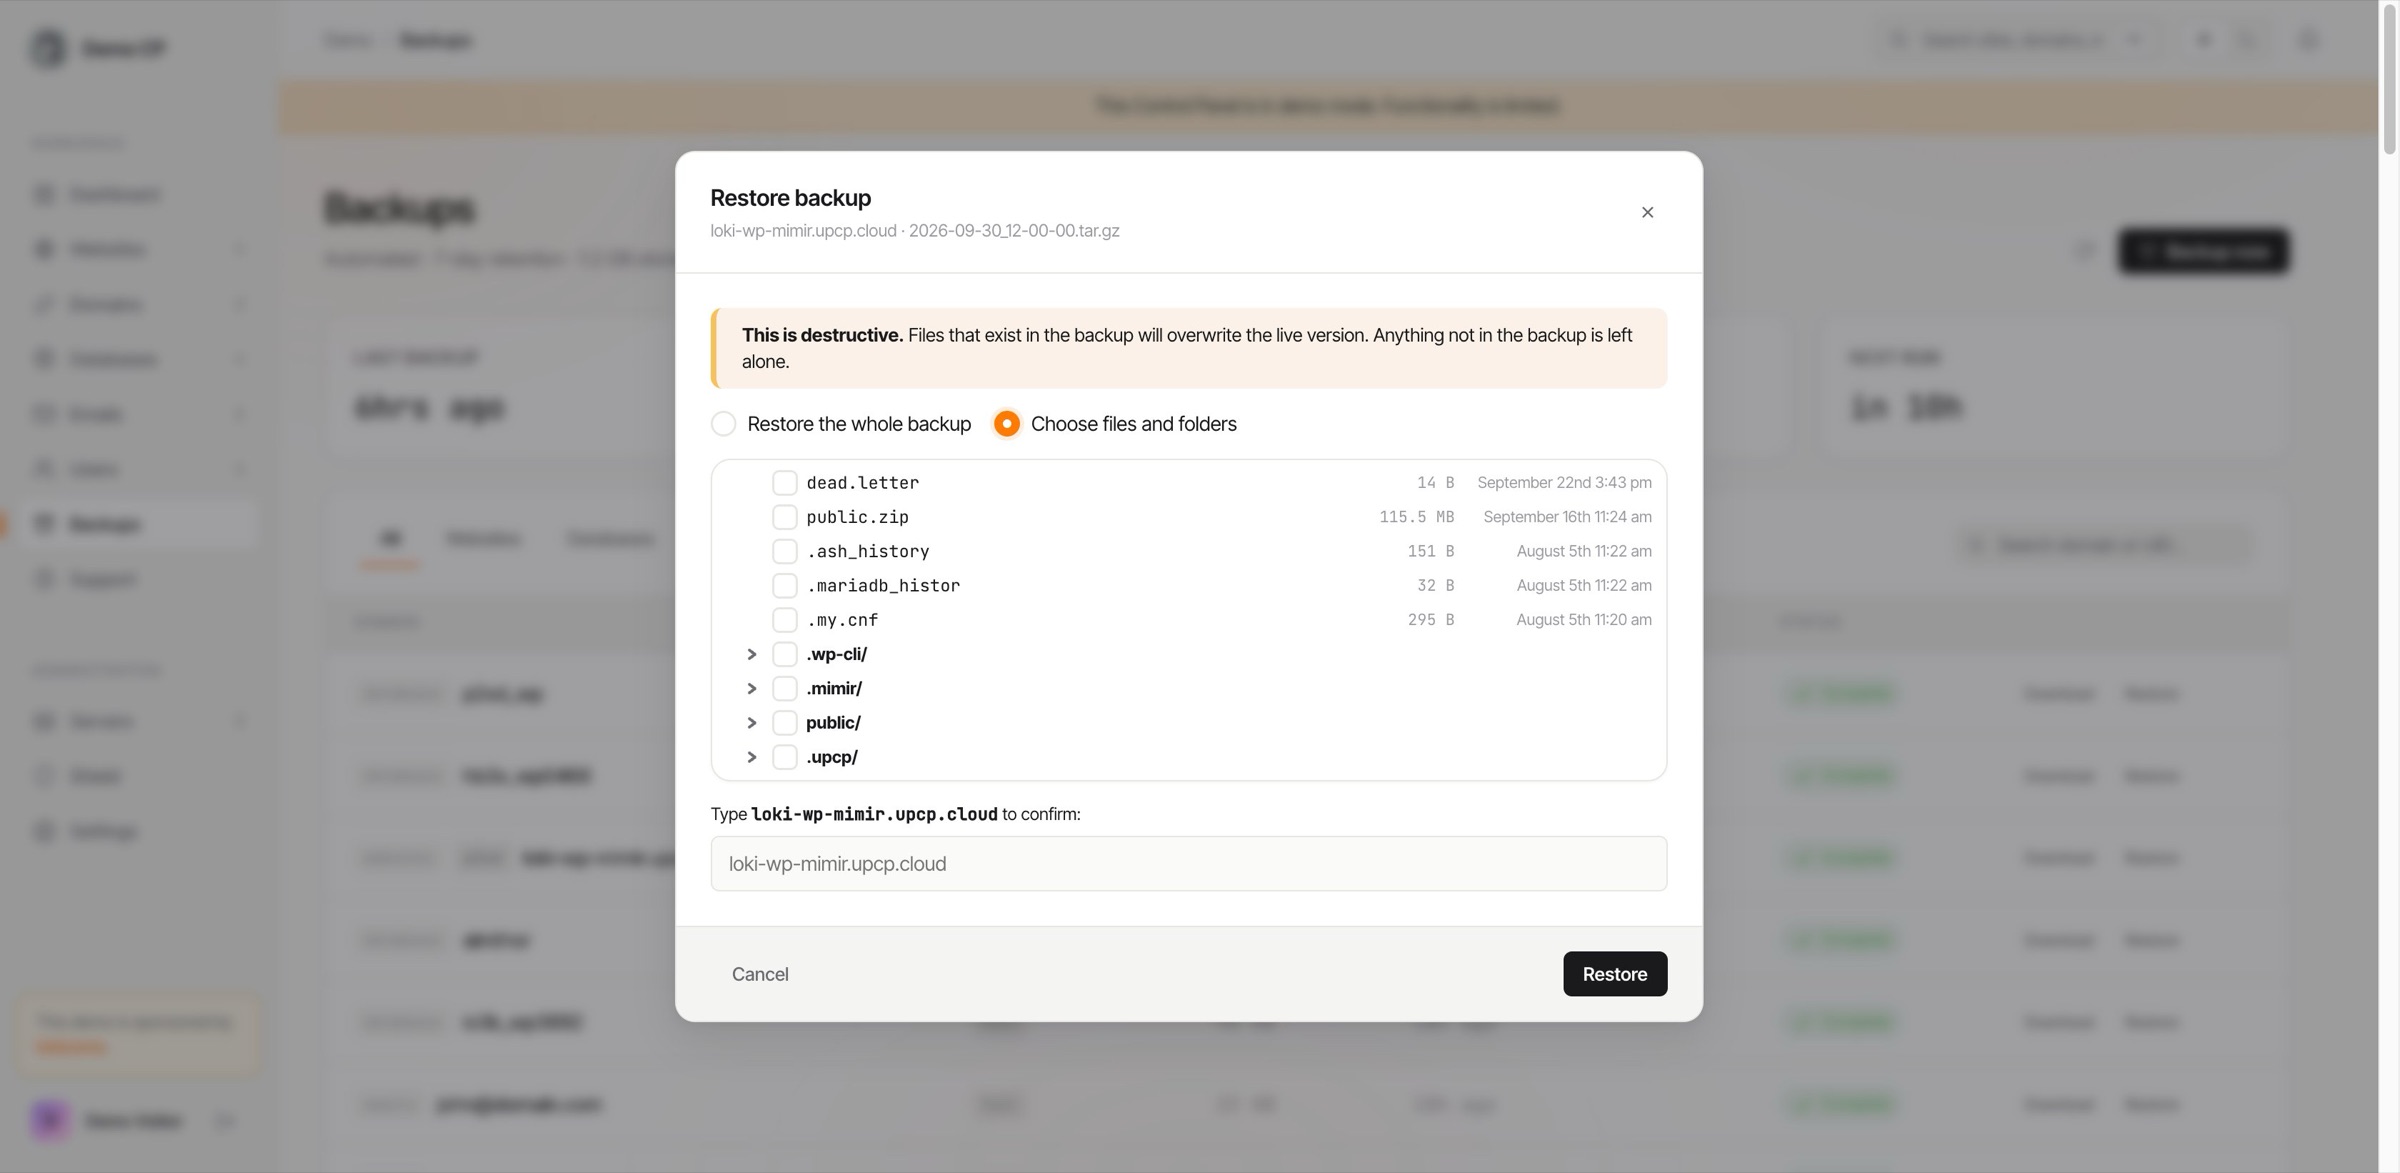
If the archive has already been purged locally (because you turned on Delete local files after remote transfer), the panel fetches it back from your configured remote target (S3, SFTP, or rsync) and streams the restore from there.
Web SSH Terminal
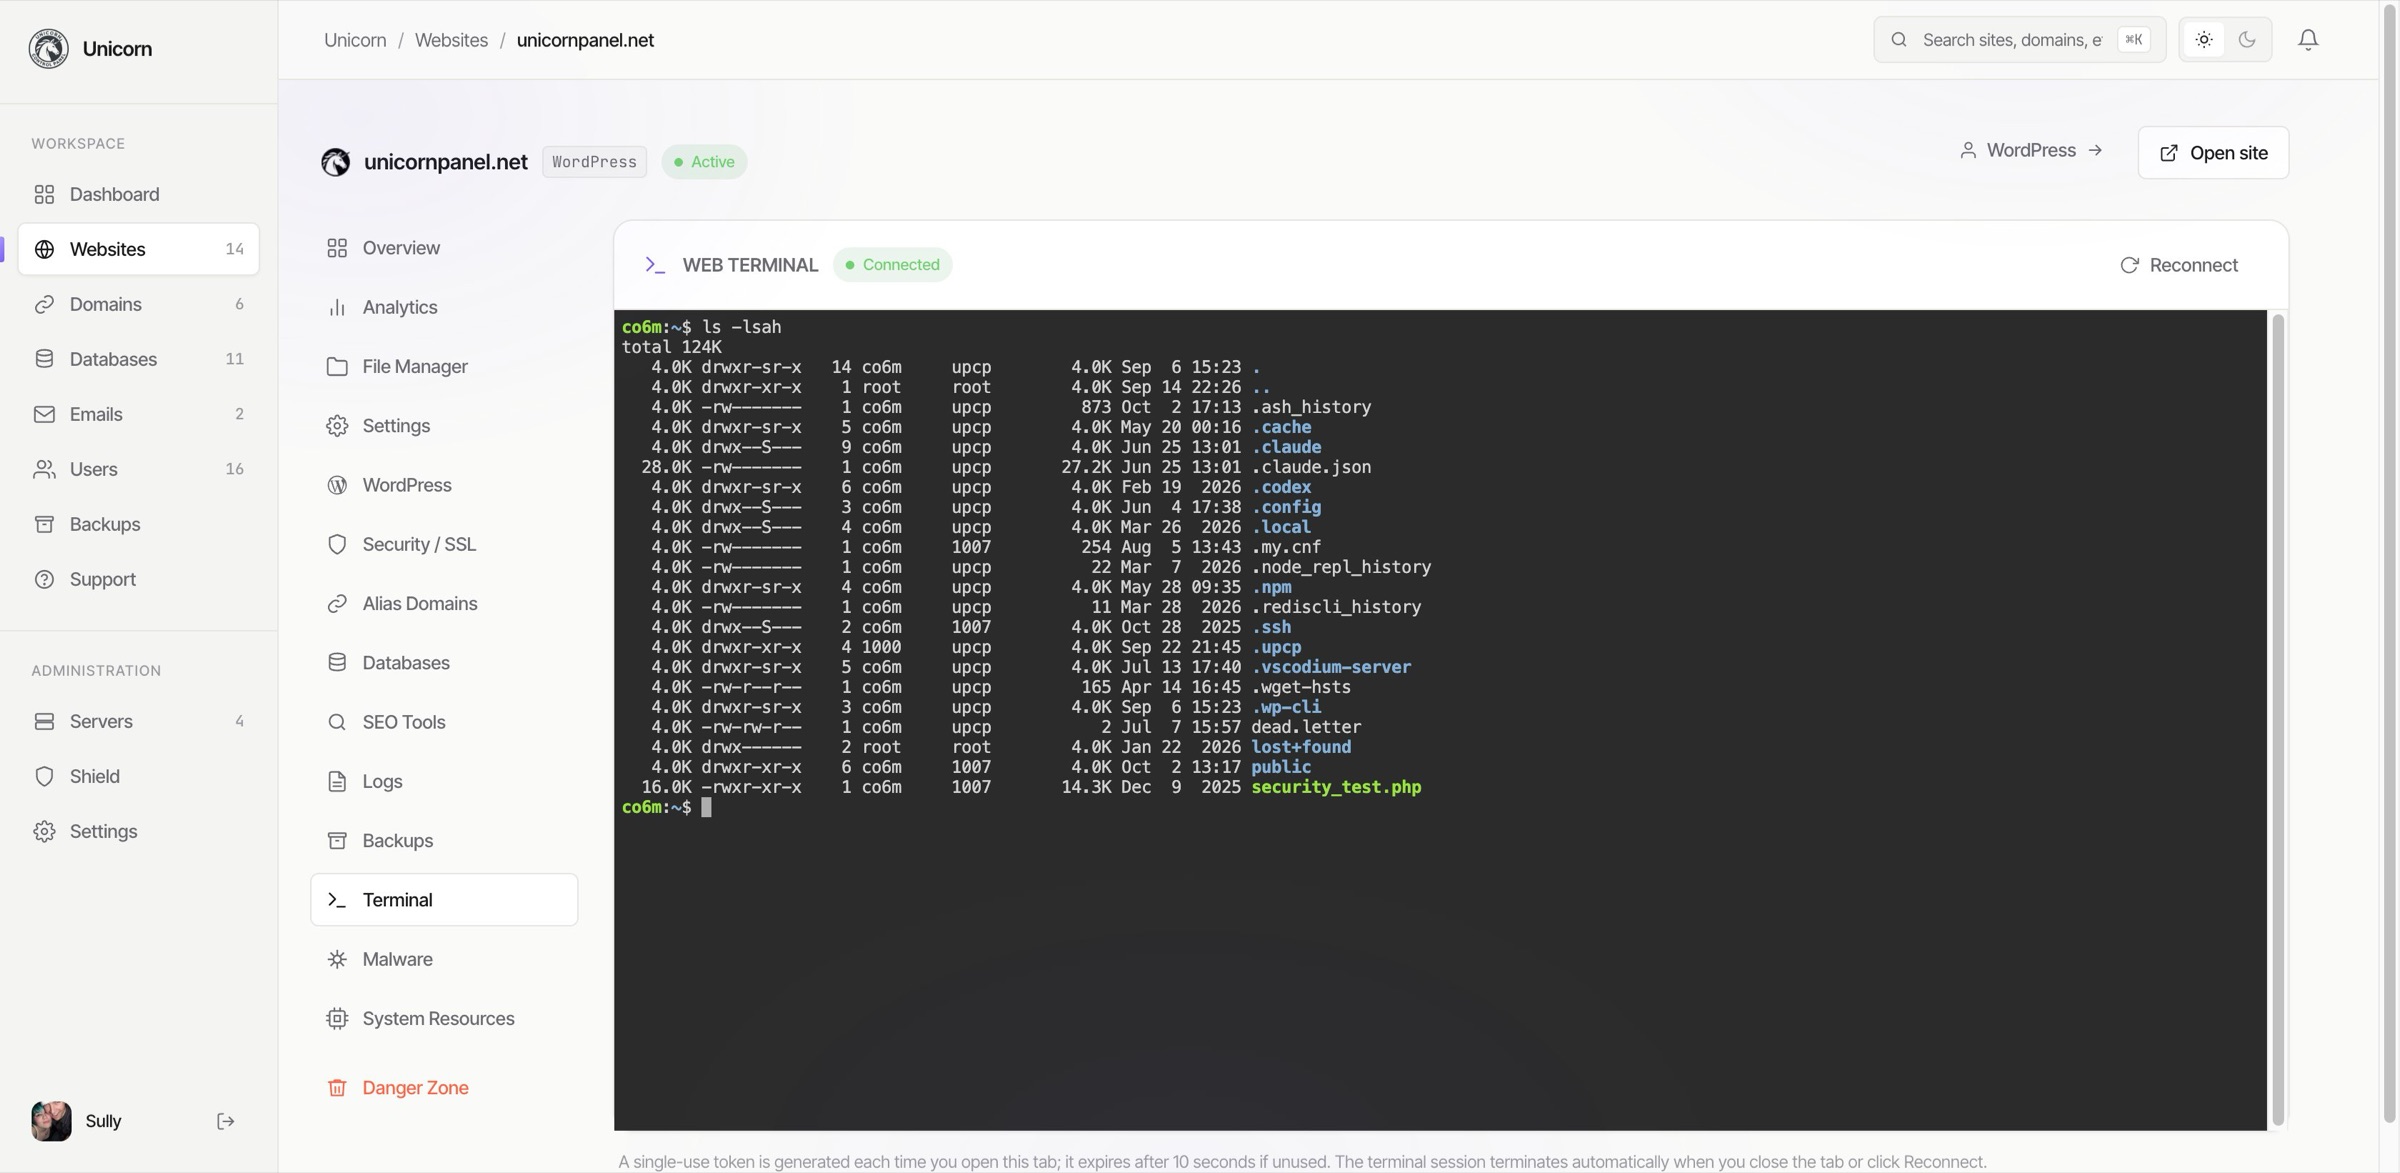
Opens a shell session inside the site's own container. From there you can run composer, npm, wp-cli, ffmpeg, git, and any other tool the base image ships. You cannot leave the container, so there is no way to touch another site's files or any system-level config.
Disabling the terminal
Owners can disable the Web SSH Terminal for customers from any package at Settings > Packages. Look for the SSH Terminal checkbox under Files and Container. Unticking it removes the Terminal option from the kebab for every site on that package.
WordPress Toolkit
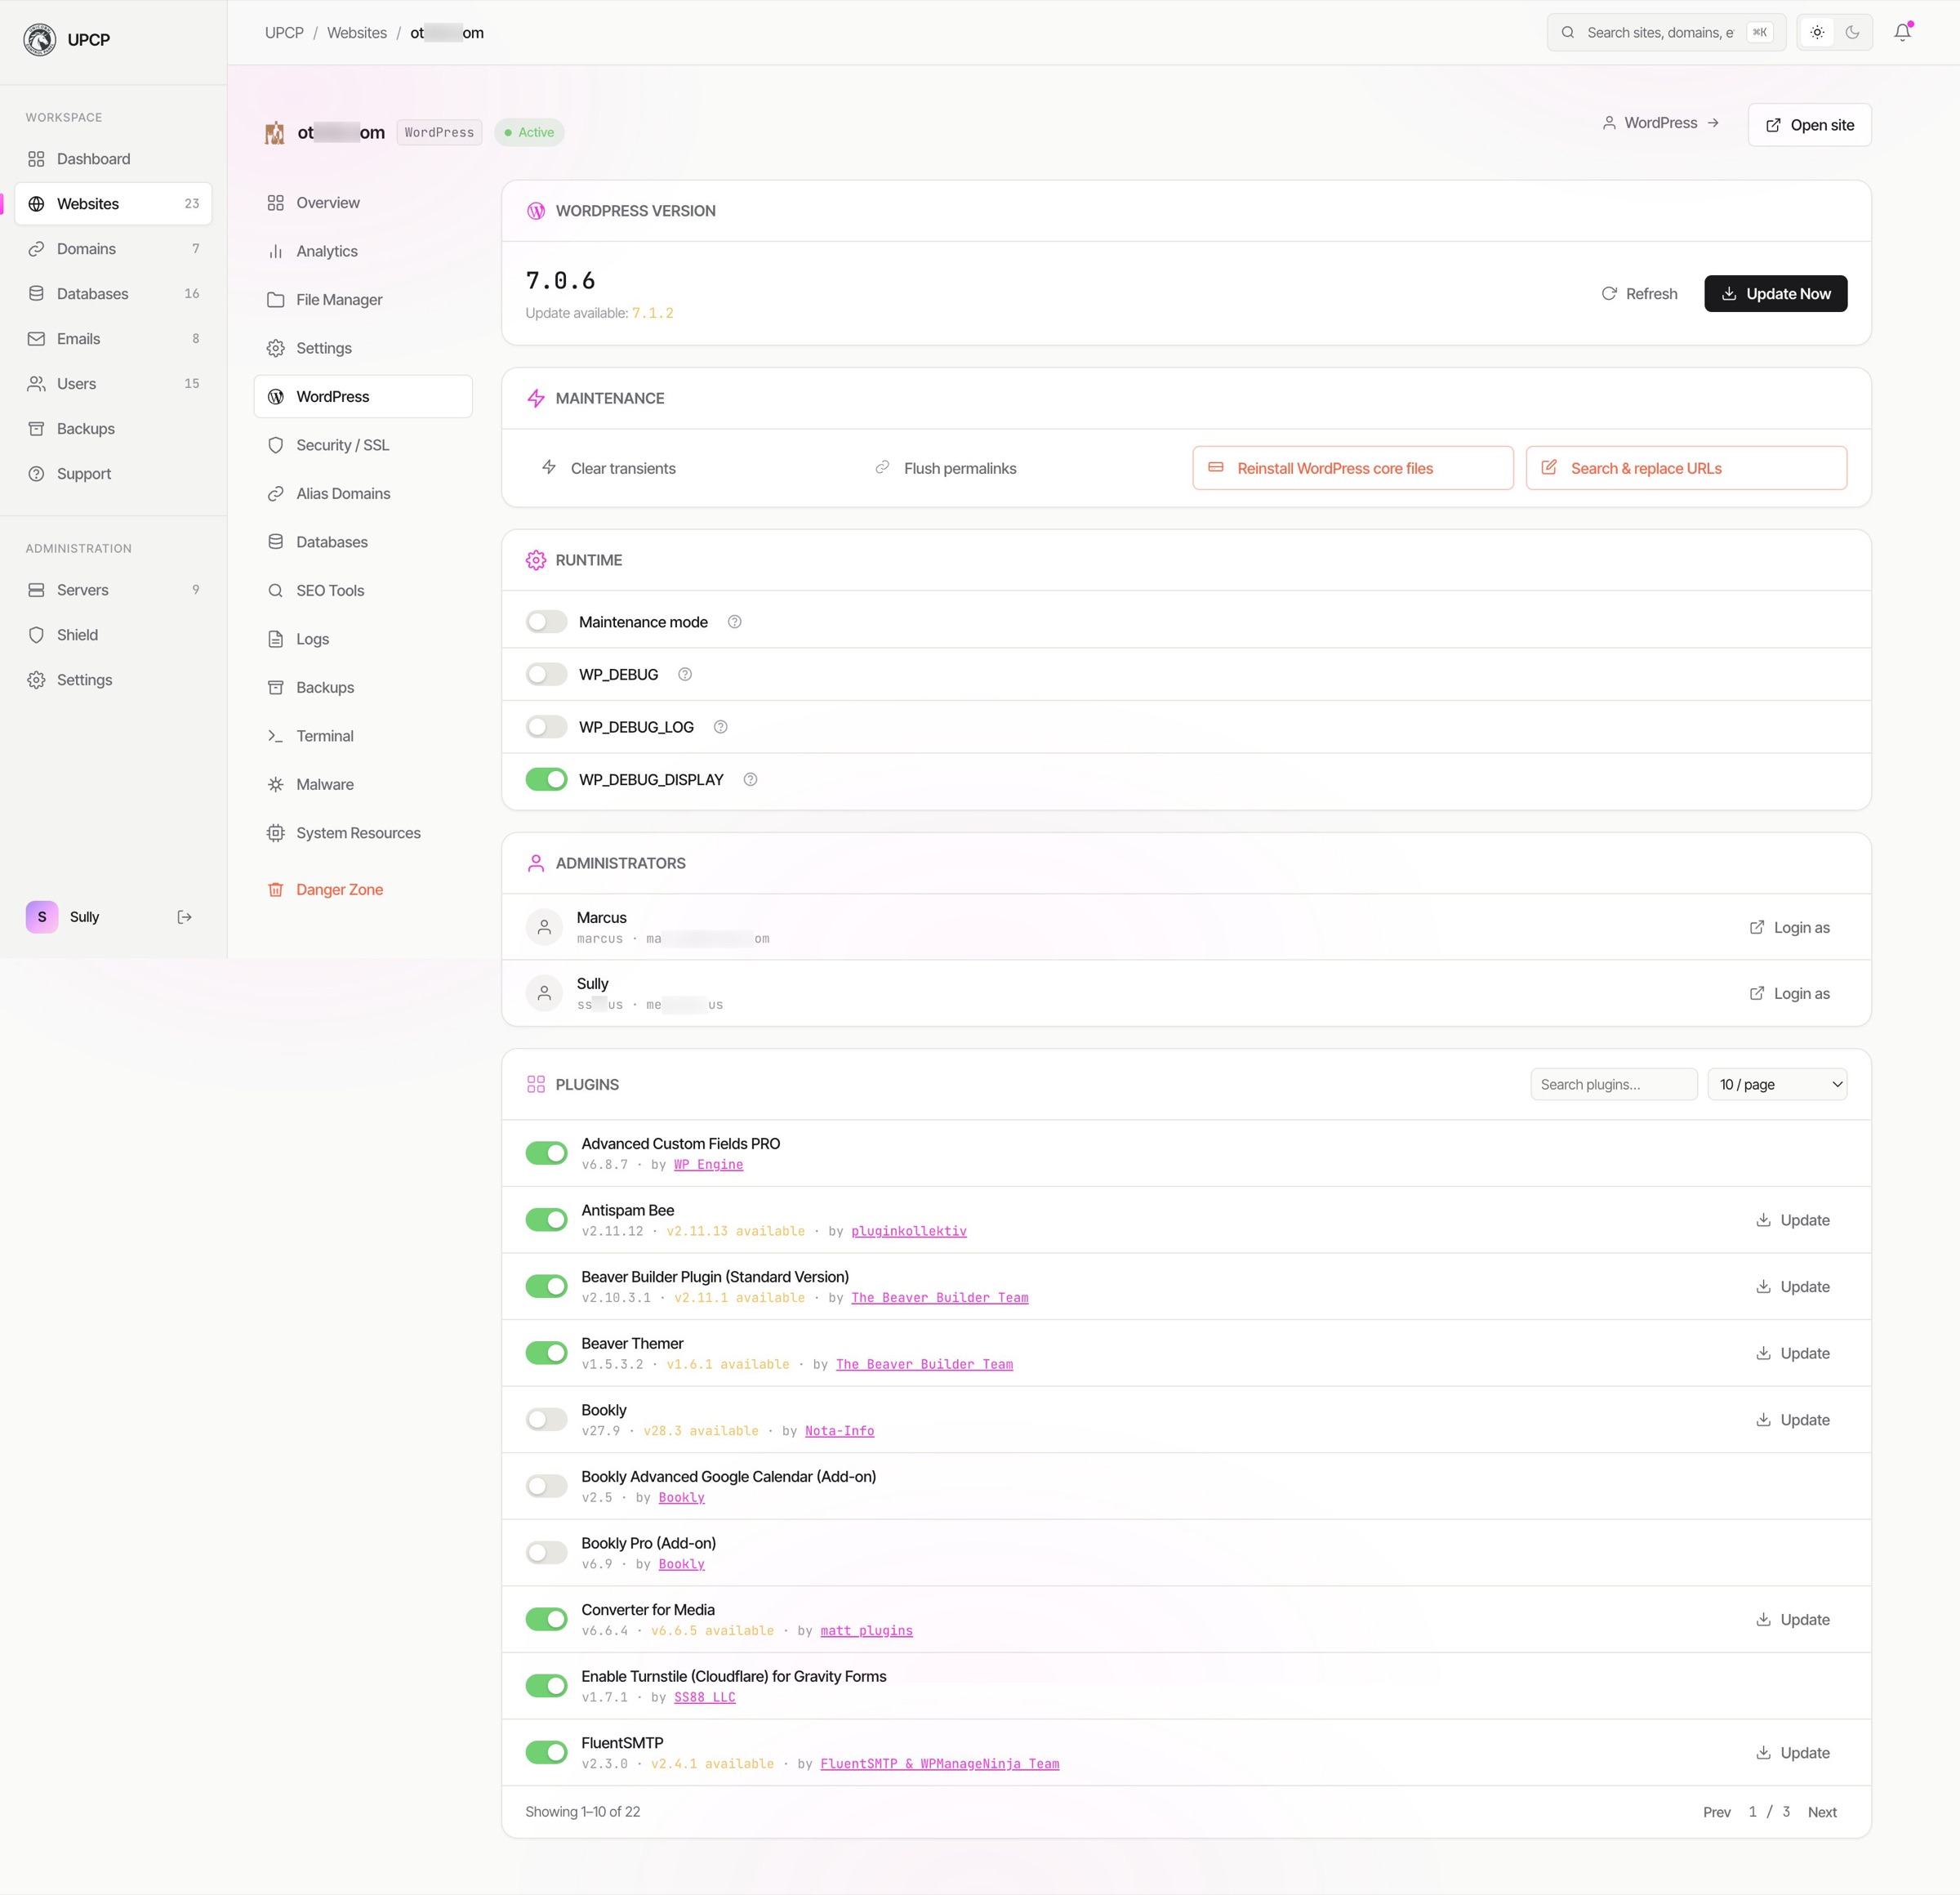
WordPress sites get a dedicated WordPress tab with the common admin tasks you would otherwise do by SSHing in or logging into wp-admin.
- Core: current version, one-click update, Reinstall Core.
- Cache tools: clear all caches, clear transients, flush permalinks.
- Search & Replace URLs: safe bulk rewrite for site moves.
- Plugins: activate, deactivate, update, search, delete. Install from the WordPress.org directory inline.
- Administrators: list every WP admin account on the site. Each has a Login button that signs you straight into wp-admin as that user, no password needed.
- Runtime toggles: Maintenance Mode, WP_DEBUG, Debug Log, Debug Display. Each toggle has a plain-English explainer.
Malware
Per-site malware scanning, started from the site's Malware tab. Each scan runs two engines one after the other, Linux Malware Detect and then ClamAV, so a file has to get past both to be considered clean.
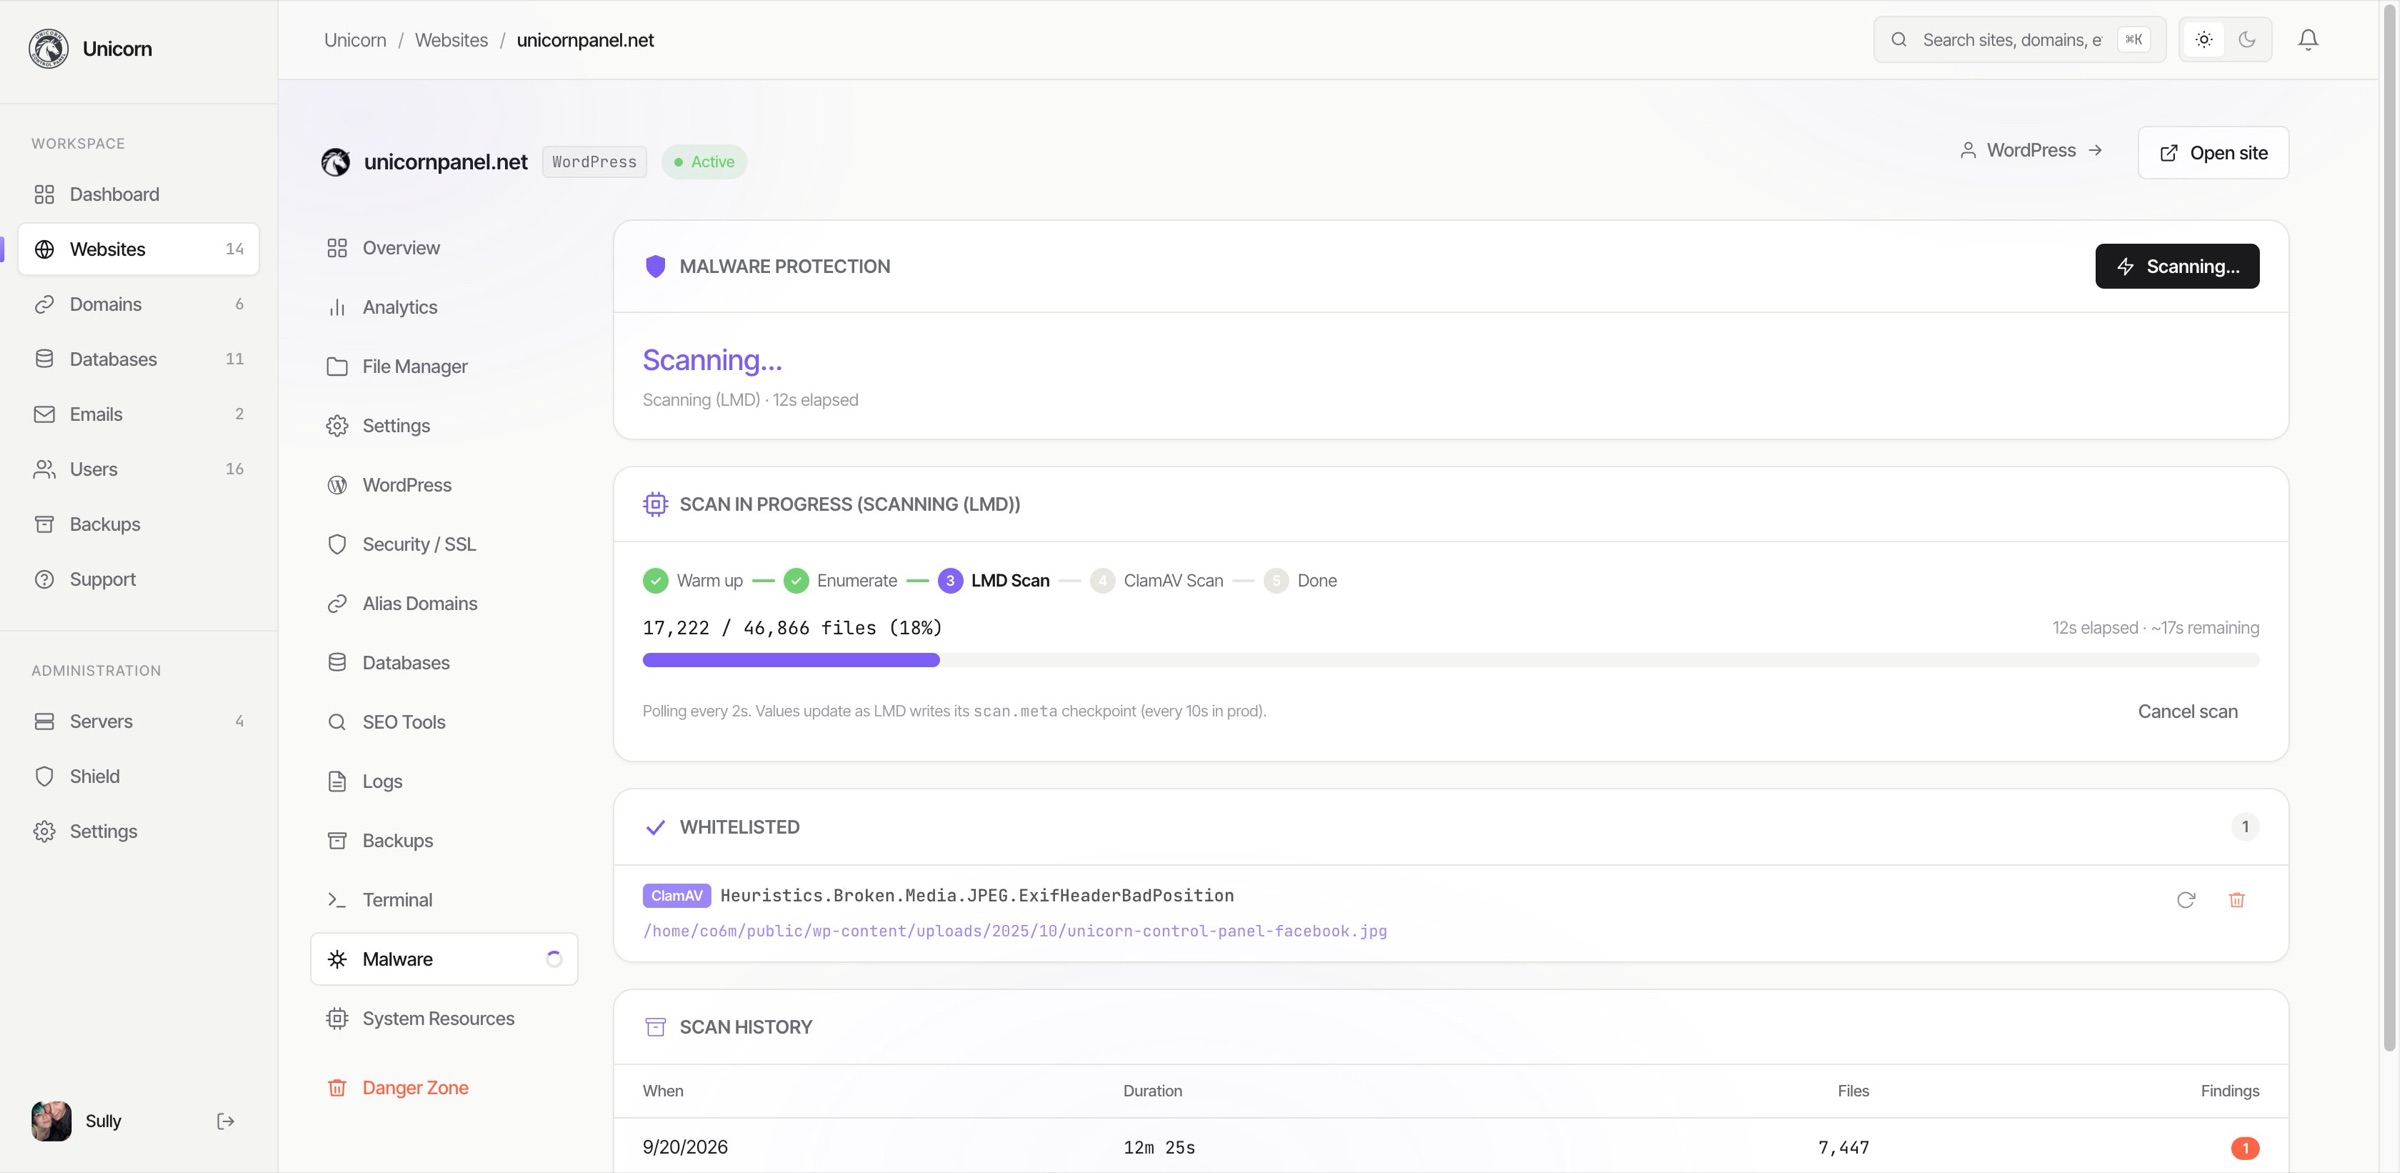
While a scan runs, the tab reports the stage it has reached (warm up, enumerate, the LMD pass, then the ClamAV pass) along with how many files it has covered out of the total, how long it has been going, and roughly how long is left. A long scan can be canceled part way without waiting for it to finish.
Whitelisting a finding
Not every hit is something you want removed. A false positive can be whitelisted, and the entry records both the signature that fired and the exact file it fired on, so whitelisting one image does not excuse the same signature elsewhere on the site. Whitelist entries are listed on the same tab and can be re-checked or deleted later.
Scan history
Every completed scan is kept with the date it ran, how long it took, how many files it covered, and how many findings it produced, so you can see whether a site is getting hit repeatedly or was clean the last few times.
System Resources
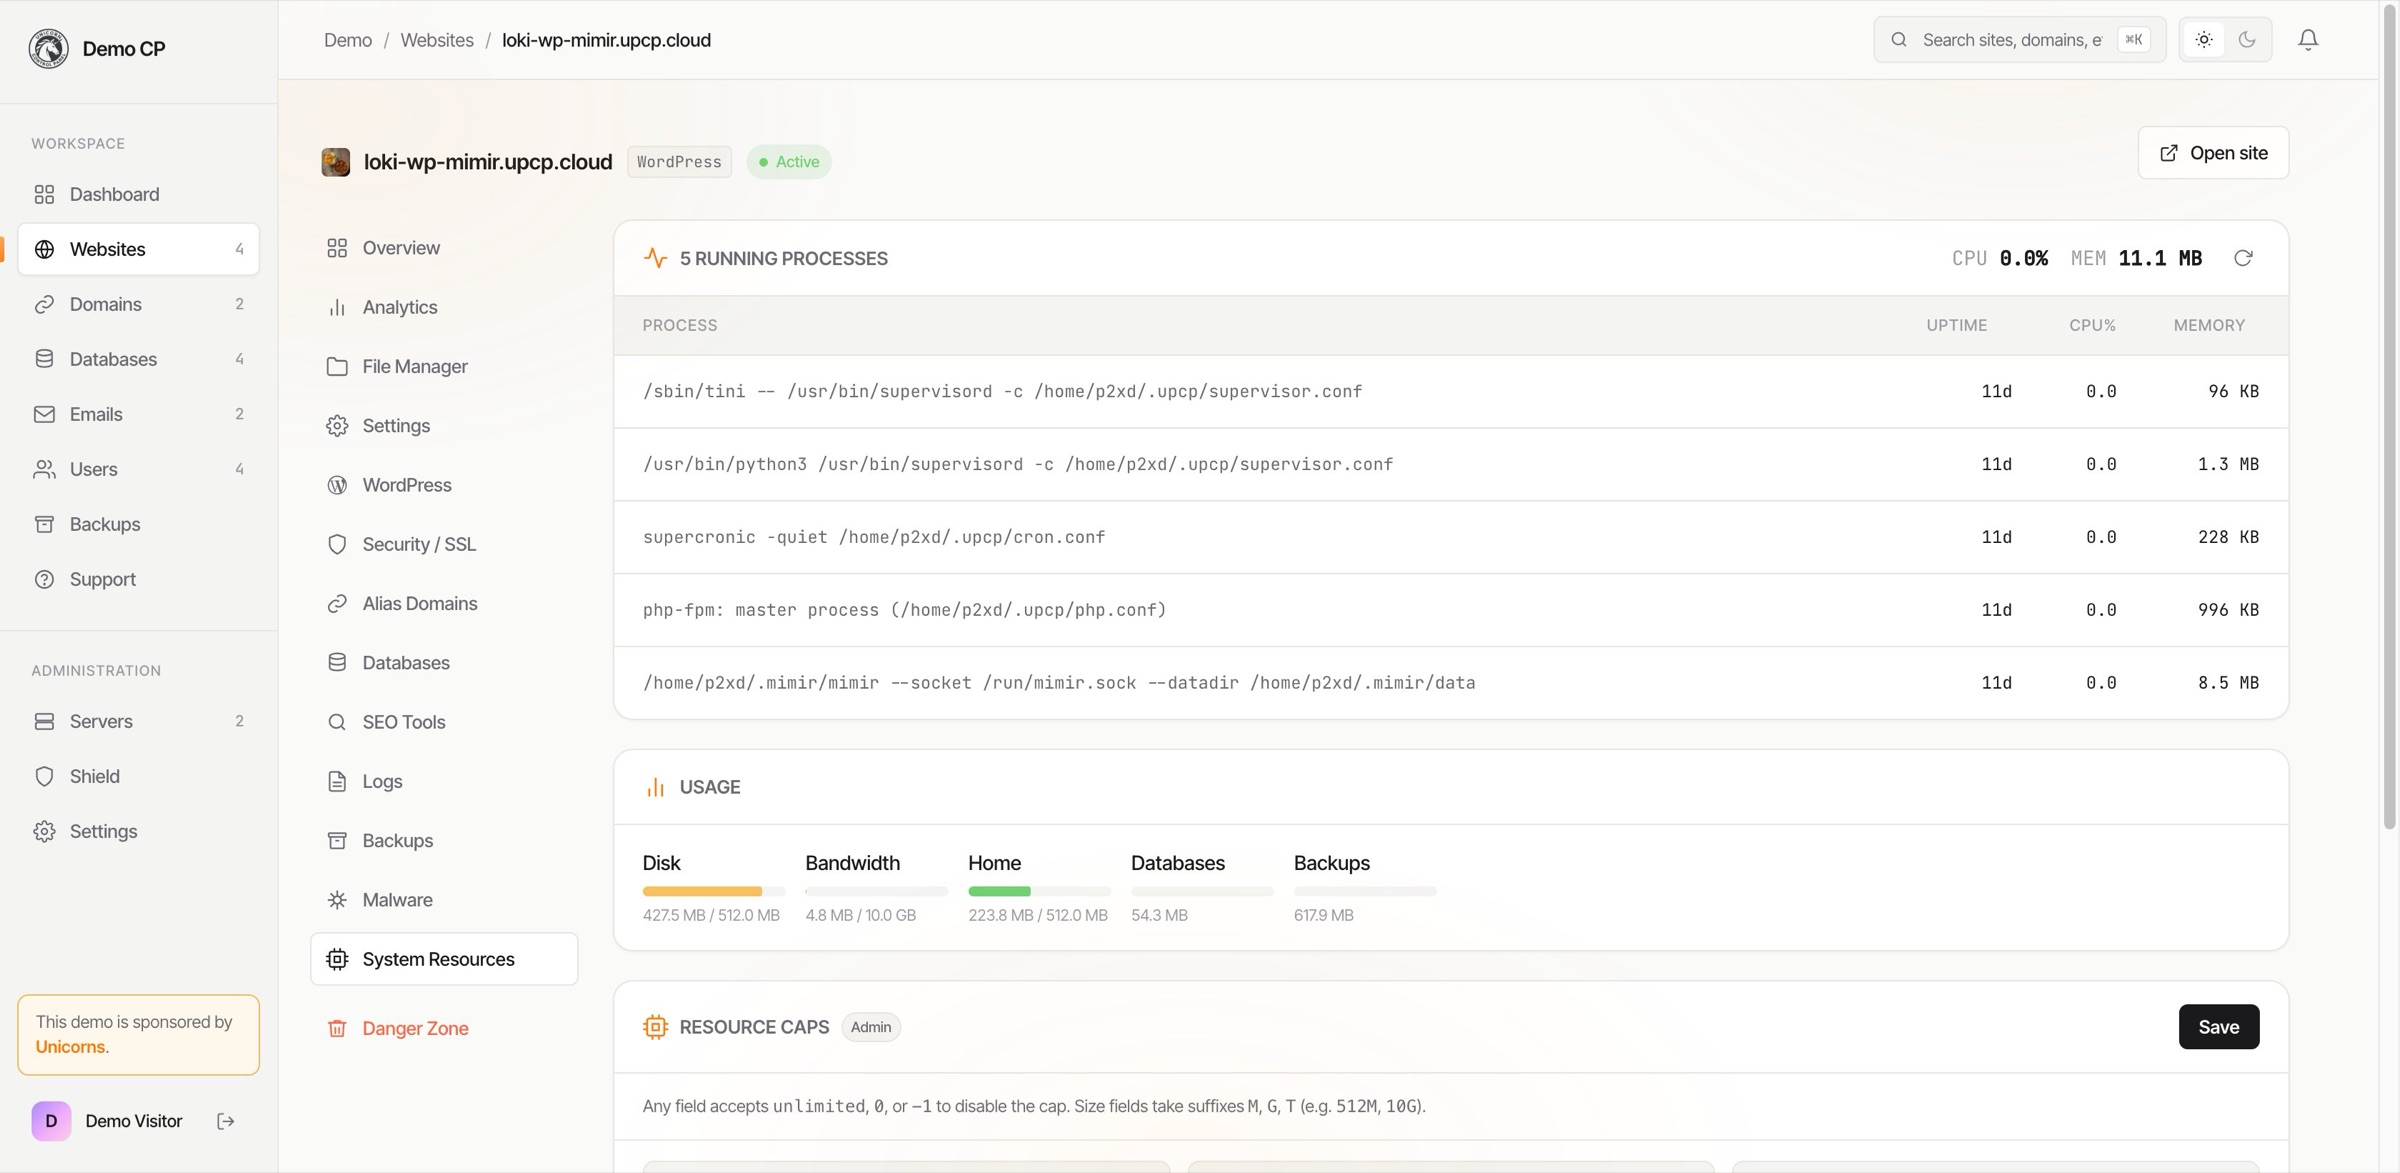
Shows what the site is using right now and where its caps are. The processes list, disk, bandwidth, database size, and backup usage are all taken from one reading of the container, so the numbers always agree with each other.
Resource Limits
Per-site caps for CPU and memory, enforced by the container runtime. One busy site cannot starve its neighbors on the same host.
Security
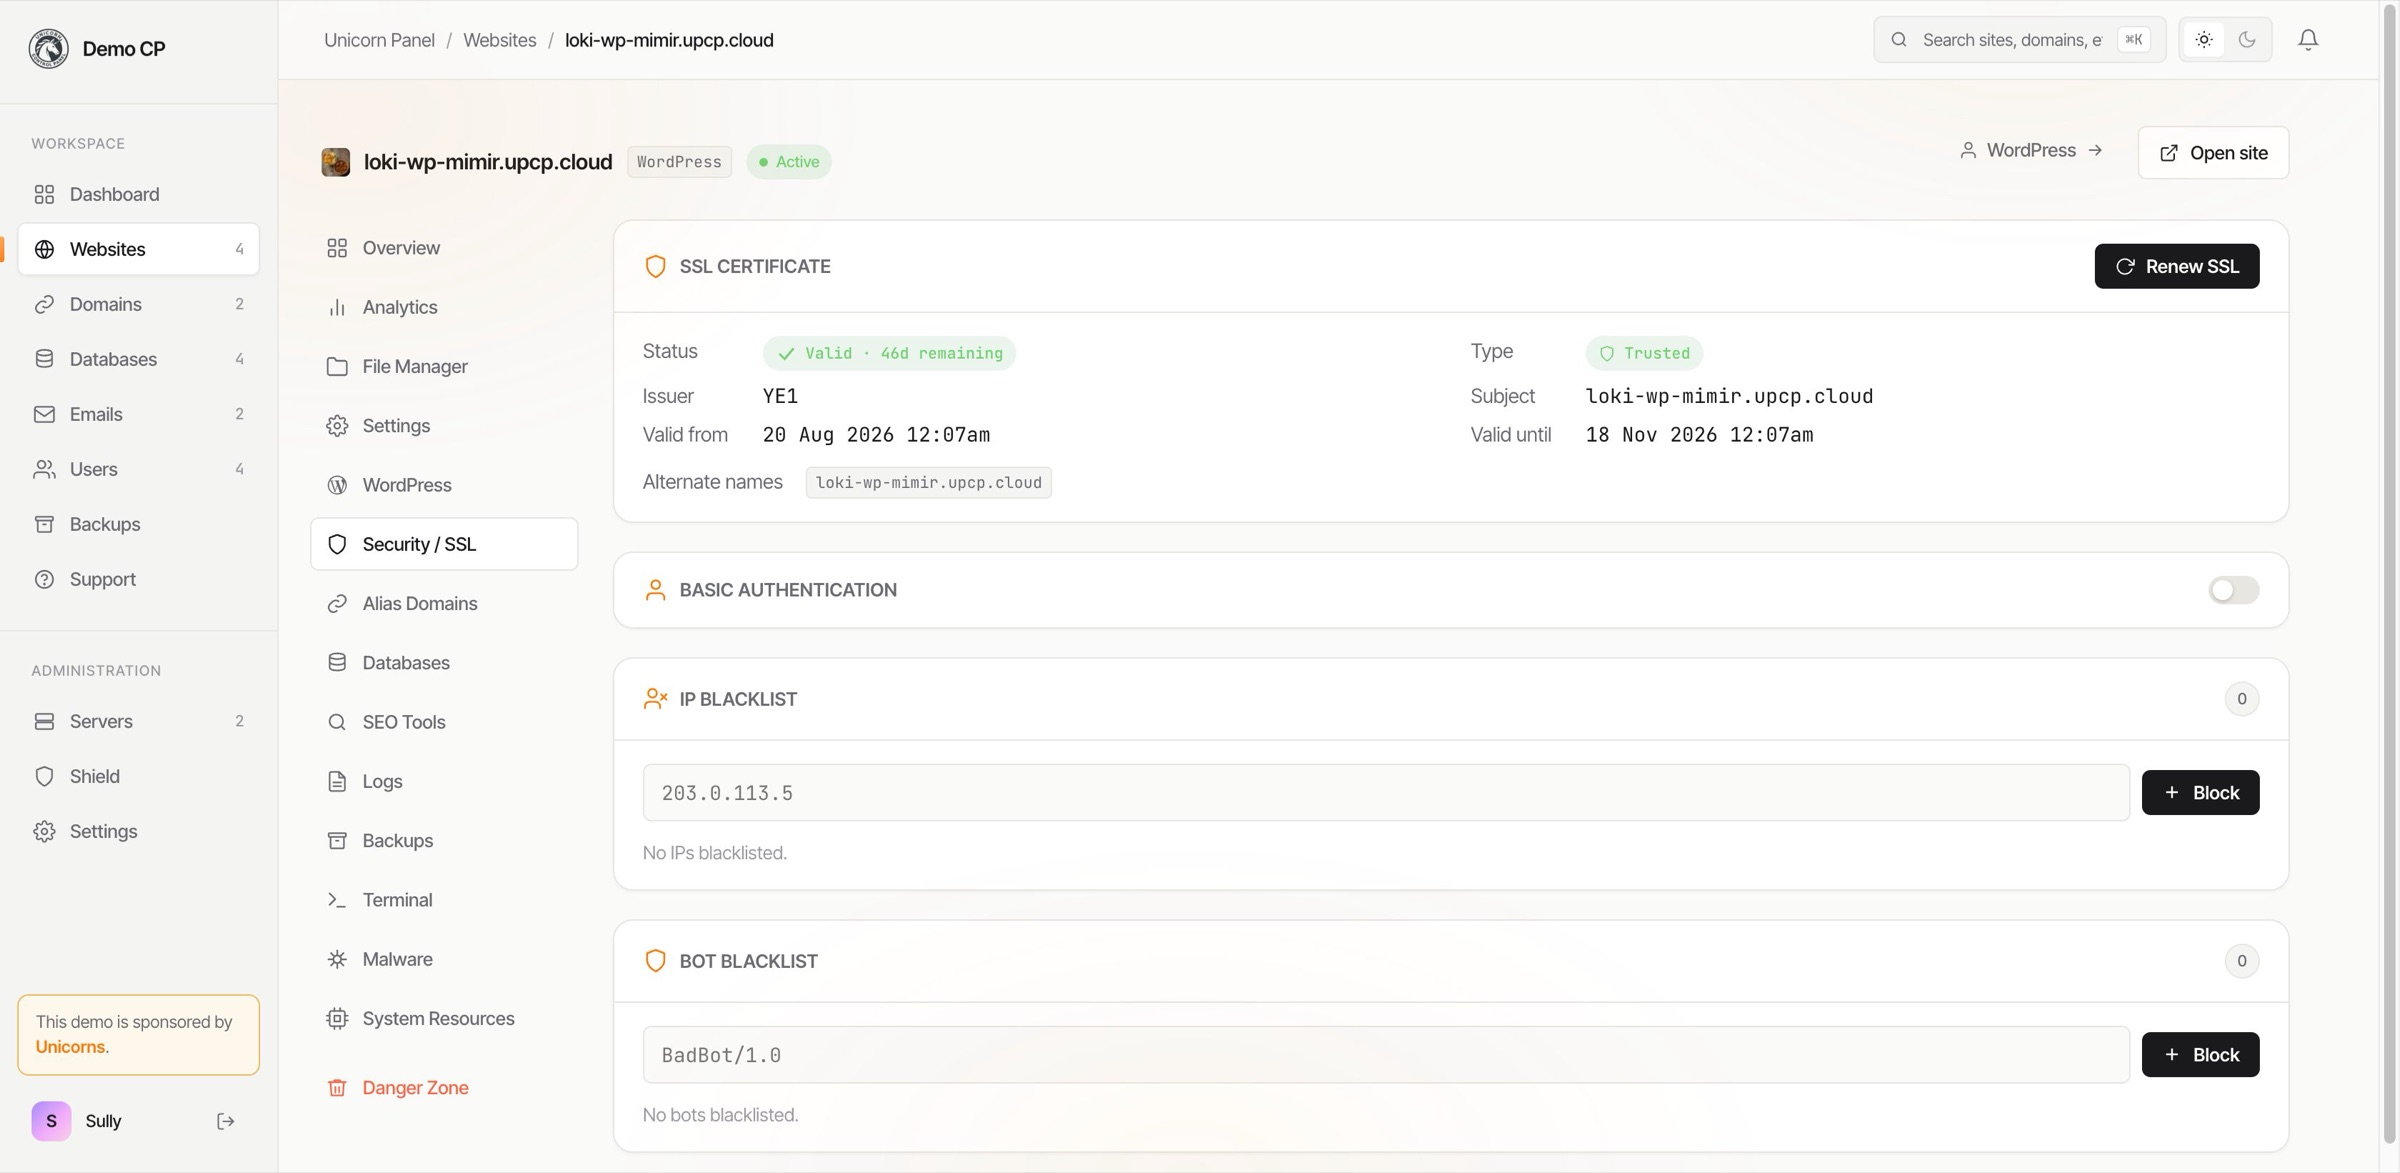
One tab for everything that guards the site: its certificate, the Basic Authentication prompt, and the per-site IP and bot blacklists.
IP and Bot Blacklist
Block visitors by IP address or by bot user agent. Entries added here apply only to this site, not globally. Add the value, click Ban, and the proxy returns 403 to matching requests from the next reload onwards.
Basic Authentication
Protect the entire site behind a username and password prompt. Useful for staging sites and private review environments. You can add specific IP addresses that bypass the prompt, so your office or a client's IP can reach the site without typing credentials.
SSL Certificate
View the current certificate's issuer, subject, validity window, and expiry countdown. Click Renew to force a renewal; the panel refuses renewal requests outside the renewal window to avoid rate-limit hits.
Transfer Ownership
Move a site from one account to another without recreating it. The site's uid, files, databases, backups, and DNS records all move together.
Disable and Enable
Disable serves a polite "temporarily offline" holding page instead of the site, and tells search engines not to de-index via response headers. SSL keeps working, the domain keeps resolving, and the site returns the moment you re-enable it. Useful for taking a site down for maintenance or non-payment without actually removing anything.
Delete a website
Removes the container, its files, and the panel row. Linked databases and backup rows are swept too so they do not appear in the Users-page counts as orphans.
Domains & DNS
UPCP has provided the facility for you to create your own nameservers and host/manage the domains. Some great features are:
- For Owners, they will see every domain.
- For Customers, they will only see what they have either created or been assigned.
Setting up a second DNS
We've made it super easy to set up another DNS using UPCP. Follow these steps to get set up:
- On the first server with DNS enabled, make sure its Server Type is set to Master.
- To create a second DNS, simply install UPCP again on a fresh server. Take note of its IP address.
- Register your private nameservers (often referred to as glue records) with your domain registrar.
- Now on the first server, if you have not already, then add your domain.
- Once your domain is added, create two A records within that domain that correspond to your private nameservers. Usually, these are
ns1andns2. Make surens1points to your first server's IP Address andns2points to your second server's IP Address. - On the first server, on the Domains screen, enter your full nameserver into the corresponding field i.e. Master Server =
ns1.myhosting.comand 2nd Nameserver =ns2.myhosting.com. The system will attempt to validate and retrieve the IP address of the records. If successful, the system will update all the DNS records and use the nameservers going forward. If this fails, please try re-adding them again later. - On the second server, set the Server Type to Slave and add the Master Nameserver.
- If successful, DNS will take over and start synchronizing records between the servers. Synchronization can take 60 seconds.
Import Zones
Simply drag/drop or copy/paste (while the pop-up is present) your zone file and UPCP will attempt to parse and import the file. Please double-check the records after import, because some records may not be compatible.
Force synchronization
Click the link Synchronize Zones to force a synchronization of all records. Please note, this can take ~60 seconds.
Disable DNS
Use the toggle on the Domains screen to disable the DNS role.
Overview
For the database server, we use MariaDB. The Databases screen provides an overview of what databases are on the system. They include:
- The database name
- The database size
- The ability to download the database
- The ability to upload into the database
Historical data is only kept for 2 weeks to minimize the monitoring database. An average database size for 2 weeks is ~8MB.
How to open DB Admin
Database administration is a primary part of any system; for this, we use Adminer. To access Adminer, click the icon next to any database.
Overview
When something is not working as expected, this section collects the checks and commands that resolve the most common issues.
unicorn cron check-common-server-issues to grep through the logs and surface the most frequent problems automatically.Hermes Mail Suite
Hermes replaces Postfix, Dovecot, rspamd, and ClamAV with a single privilege-separated mail server written in C. SMTP, IMAP, anti-spam, and antivirus in one suite.
Once you have enabled Hermes, you can find its settings under Settings -> Hermes Mail Suite.
Greylisting
Greylisting temporarily rejects mail from unproven senders and accepts it only when they retry. Legitimate mail servers always retry a temporary failure; most spam-sending bots do not. It's a near-zero-cost filter applied before scoring, on the inbound :25 listener only.
What a deferral looks like
A greylisted message is deferred after DATA (Hermes receives the full message, then defers) with:
451 4.3.0 Temporary failure, try again laterA conforming sending MTA re-queues and retries; on the retry after the delay, the message is accepted. In the logs the action is recorded as greylist, and a msg_greylisted metric is incremented.
Exemptions; who is not greylisted
Greylisting is skipped entirely for:
- SPF-passing senders — an SPF
passproves the sending IP is authorized. - DKIM-passing senders — a valid signature makes the sender accountable.
- Allowlisted senders — any address matched by a mailbox's (or domain's)
allow-sender/allow-domainbypasses spam checks, greylisting included.
The rationale for the SPF/DKIM exemption: greylisting exists to stall bots that never retry, and large providers retry from rotating IP pools that defeat naïve triplet greylisting anyway — deferring them only adds latency. RBL, Bayes, and scoring still apply to those senders; only the greylist step is skipped.
Incoming Spam
Hermes scores each inbound message on :25 and takes one action based on the
total score: deliver, tag (deliver to the user with X-Spam-* headers so a
Sieve rule can file it to Junk), or reject (554, never queued). Each check
below contributes to that score; you enable the checks you want and set the two
thresholds that decide tag vs. reject.
The master switch spam on is required. With it off, none of the checks
below run.
| Feature | What it does |
|---|---|
| Enable anti-spam | Master switch. Must be on for any inbound scoring. |
| Check DNS blacklists (RBL) | Look the connecting client IP up in the configured DNS blocklists. |
| RBL zones | A DNSBL zone to query, e.g. zen.spamhaus.org. Repeatable: add one line per zone. Only used when spam-rbl on. |
| Check URIBL | Extract URLs from the message body and look their domains up in URL blocklists. |
| URIBL zones | A URIBL/SURBL/DBL zone, e.g. dbl.spamhaus.org or multi.uribl.com. Repeatable. Only used when spam-uribl on. |
| Require Forward-Confirmed reverse DNS | Verify the client's PTR record forward-resolves back to the connecting IP (FCrDNS). A mismatch adds to the score. |
| Bayesian filter | Statistical token classifier over headers and decoded body. Trained from Junk-folder moves and umailctl. |
| Heuristic rules | Rule-based structural/header checks (malformed headers, suspicious MIME, envelope/From mismatches, etc.). |
| Fold in upstream verdicts | Parse an upstream filter's header, SpamAssassin (X-Spam-Status / X-Spam-Score) or rspamd (X-Spamd-Result), and fold its score into ours. Only a positive upstream score is added; a negative one is treated as 0, so an upstream "ham" verdict can never pull a message below Hermes's own assessment. |
| Tag-as-spam threshold | At/above this score the message is tagged: delivered with X-Spam-* headers so a Sieve rule (e.g. the default spam→Junk rule) can file it. |
| Reject threshold | At/above this score the message is rejected at DATA with a 554 and never queued. |
Scoring model. Every enabled check adds (or, for authentication passes,
subtracts) points. The running total is compared to the two thresholds:
score < tag → deliver clean; tag ≤ score < reject → tag; score ≥ reject →
reject. Keep spam-tag-score < spam-reject-score. SPF/DKIM/DMARC results are
always evaluated and factored into the score even when the corresponding blocklist
checks are off.
Outbound Spam
Outbound spam control is about containing a compromised account, not filtering a legitimate user's individual message. Authenticated submission is scored on content alone (greylist/RBL don't apply to authenticated senders) in detect-only mode (a message is never blocked) and a mailbox that sustains a burst of spammy messages can be automatically suspended.
| Feature | What it does |
|---|---|
| Scan outbound mail for spam | Score authenticated submission on content and log an outbound-scan … score=… SPAMMY/clean line per message. A message at/above spam-tag-score counts as spammy. Detect-only, never blocks. |
| Auto-suspend on spam burst | When a mailbox exceeds the rate below, suspend it (active no). With this off, the overage is only logged, which is useful for tuning first. |
| Spam threshold (rate) | Spammy messages per hour from one mailbox before it is flagged (and suspended, if the above is on). Range 1–100000. |
Virus Scanning
Hermes scans attachments against ClamAV's official signature databases
(main.cvd / daily.cvd) as hash signatures: no clamd, no ~1 GB resident
daemon. The database is loaded once by the master and shared with every listener
via copy-on-write fork, so enabling scanning on additional listeners costs
essentially no extra RAM.
Hermes has a built-in daily updater which refreshes ClamAV signatures when stale, verify they parse, then hot-reload the scanners.
| Feature | What it does |
|---|---|
| Enable incoming virus scanning | Master switch: load the signature database and scan inbound attachments. |
| Action on detection | What to do with an infected inbound message: reject (554, never accepted), quarantine (deliver to Junk), or tag (deliver with a header). |
| Enable outbound virus scanning | Also scan authenticated submission (:587/:465) so a compromised account can't relay malware. Outbound hits are always rejected, regardless of virus-action. |
clamd
engine and are out of scope.
Smarthost
Route all outbound remote mail through an upstream relay (a provider or your ISP) instead of delivering directly to each recipient's MX. Local delivery is unaffected.
| Feature | What it does |
|---|---|
| Enable smart host | Send every remote message through the relay below instead of MX-routing. |
| Relay host | Hostname (resolved via the built-in resolver) or literal IP. Required when smarthost on; if unset, Hermes logs a warning and falls back to MX delivery. |
| Relay port | Submission port. 587 (STARTTLS) is typical; 25 for an unauthenticated internal relay. Range 1–65535. |
| Auth username | SMTP AUTH user. When set, Hermes authenticates to the relay. |
| Auth password | AUTH password, inline. Prefer the file form below. |
| Auth password file | Read the password from the first line of a root-only file, keeping the secret out of the main config. Overrides smarthost-password when both are set. |
Security model. When a username is set, Hermes requires STARTTLS and verifies
the relay's TLS certificate against smarthost-hostname before sending
credentials; if TLS can't be established, no supported AUTH mechanism (PLAIN/LOGIN)
is offered, or the certificate doesn't verify, the message is deferred:
credentials are never sent in the clear. Use the relay's hostname (not a bare
IP) so certificate verification can succeed. MTA-STS/DANE are bypassed for the
relay hop (it is a trusted, explicitly-configured next hop) but still govern direct
MX delivery when the smart host is off.
The password is stored as plaintext in a root-owned file by design: SMTP AUTH must replay the actual password, so hashing is impossible and local encryption only relocates the secret. Protect it with filesystem permissions, the same model used for the TLS private key.
Mailbox Limits
These set the global defaults for every mailbox. When the multi-domain mailbox
tree is in use, each can be overridden per domain (in a domain's _root.conf) or
per individual mailbox stanza.
| Feature | What it does |
|---|---|
| Quota grace | Percent a mailbox may exceed its quota and still accept mail (soft cushion before hard rejection). E.g. 10 = accept up to 110% of quota. Range 0–1000. |
| Allow subaddressing | Accept user+detail@domain and deliver to user, preserving the +detail tag for filtering. |
| Send limit | Outbound messages per hour per mailbox. |
| Recipient limit | Outbound recipients per hour per mailbox. |
| Auto-suspend multiplier | Auto-suspend a mailbox once its outbound rate reaches this multiple of send-limit/rcpt-limit. Fractional allowed, e.g. 1.5 suspends at 150% of the limit. 0 disables auto-suspend (the limit still throttles). |
How the limits interact
Send limit / Recipient limit throttle a mailbox at
its hourly ceiling. Auto-suspend multiplier is the harder backstop: if a mailbox
blows past its limit by the configured factor, a strong signal of a compromised
account, it is suspended outright rather than merely throttled. Leave the
multiplier at 0 to throttle without ever auto-suspending.
Overview
The Users screen lets owners and resellers manage the accounts that can log in to the panel and the resources each can see.
- For Owners, they will see every user.
- For Customers, they will only see what they have either created or been assigned.
Overview
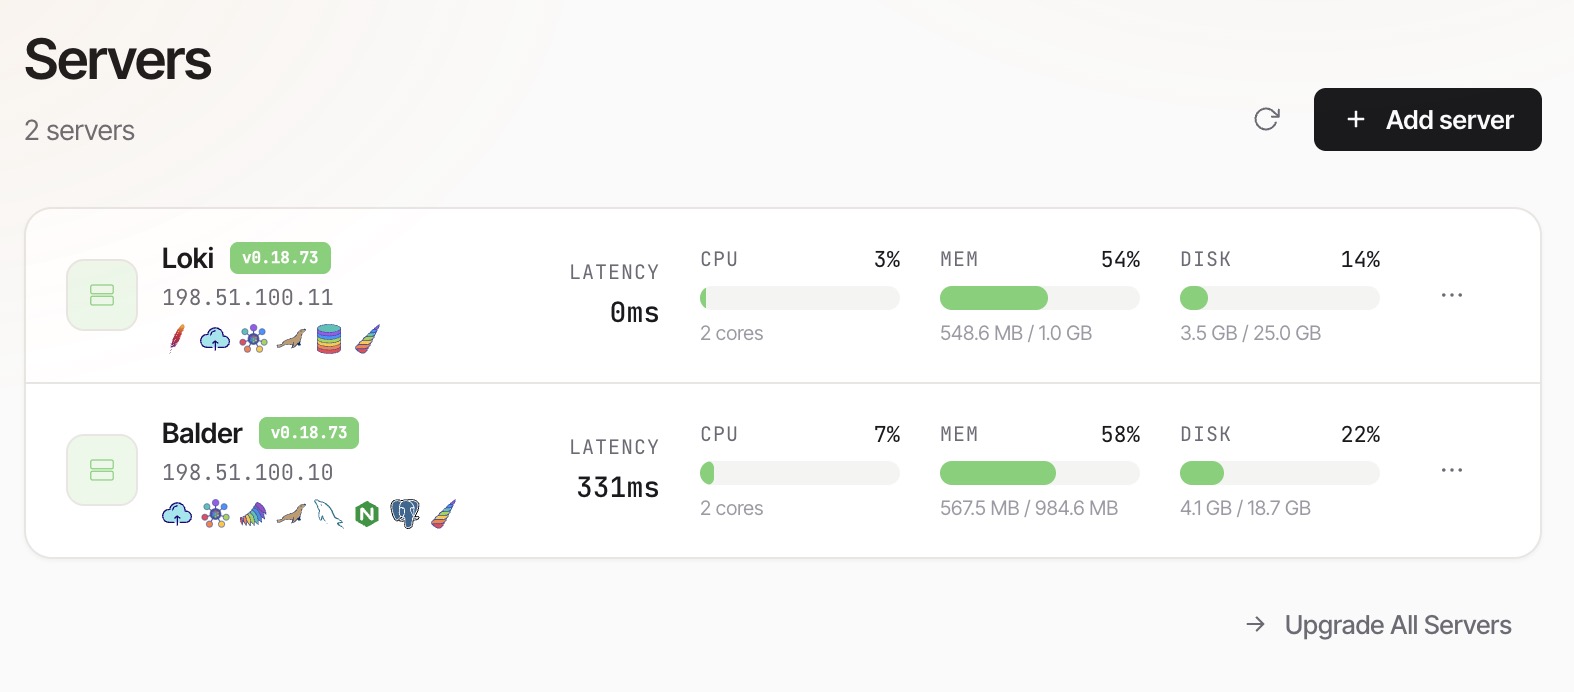
The Servers page is an overview of all current servers within your platform. You can quickly see the following information:
- Server name
- UPCP version
- Roles installed
- IP Address
- Latency, CPU Usage, Memory Usage, and Disk Usage
Kebab Menu
Each server row has a kebab icon (...). When you click this icon, you can access more options:
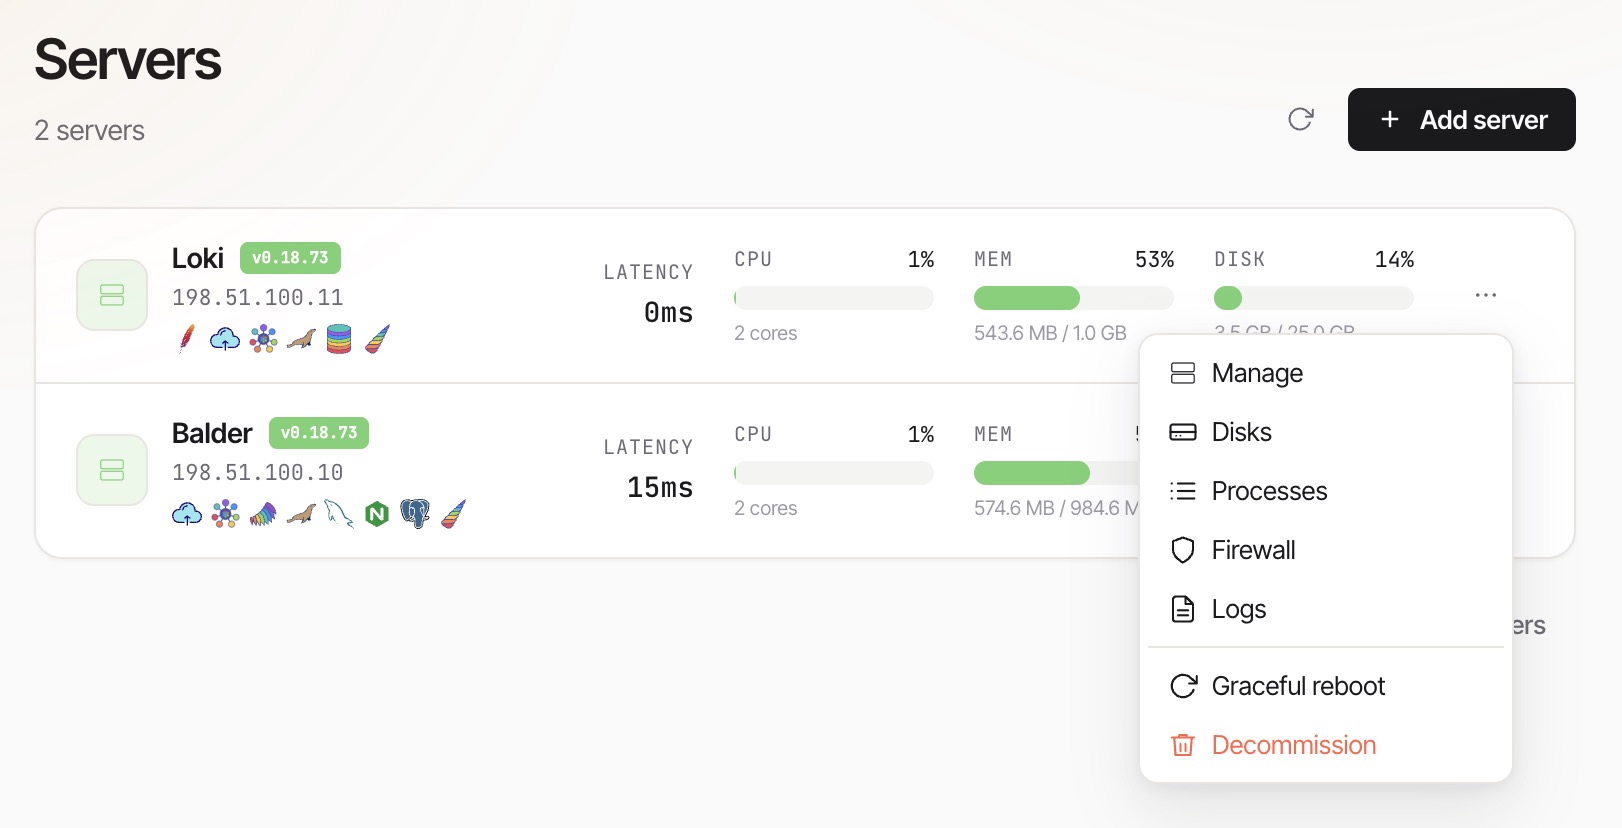
- Manage - To view full details and settings about this individual server
- Disks - View disk information and other disk tools
- Processes - View top CPU and Memory processes as well as all running processes
- Firewall - View blocked IP addresses
- Logs - View all logs for services
- Graceful Reboot - Gracefully reboot the server
- Decommission - Start the Decommission process
More or fewer options may be present depending on the server status or future updates.
Adding a Server
To add a new server to your platform, simply click the Add server button towards the top right of the screen. Upon clicking this button, a new modal will pop up with a unique command you can copy/paste into your new Alpine Linux server.
Once you successfully run this command on another server, the new server will appear in the Server list. The new server's name will appear as Pending Installation until it has been set up successfully. If you make a mistake here, you can also delete the server from this screen using the kebab menu.
Managing a Server
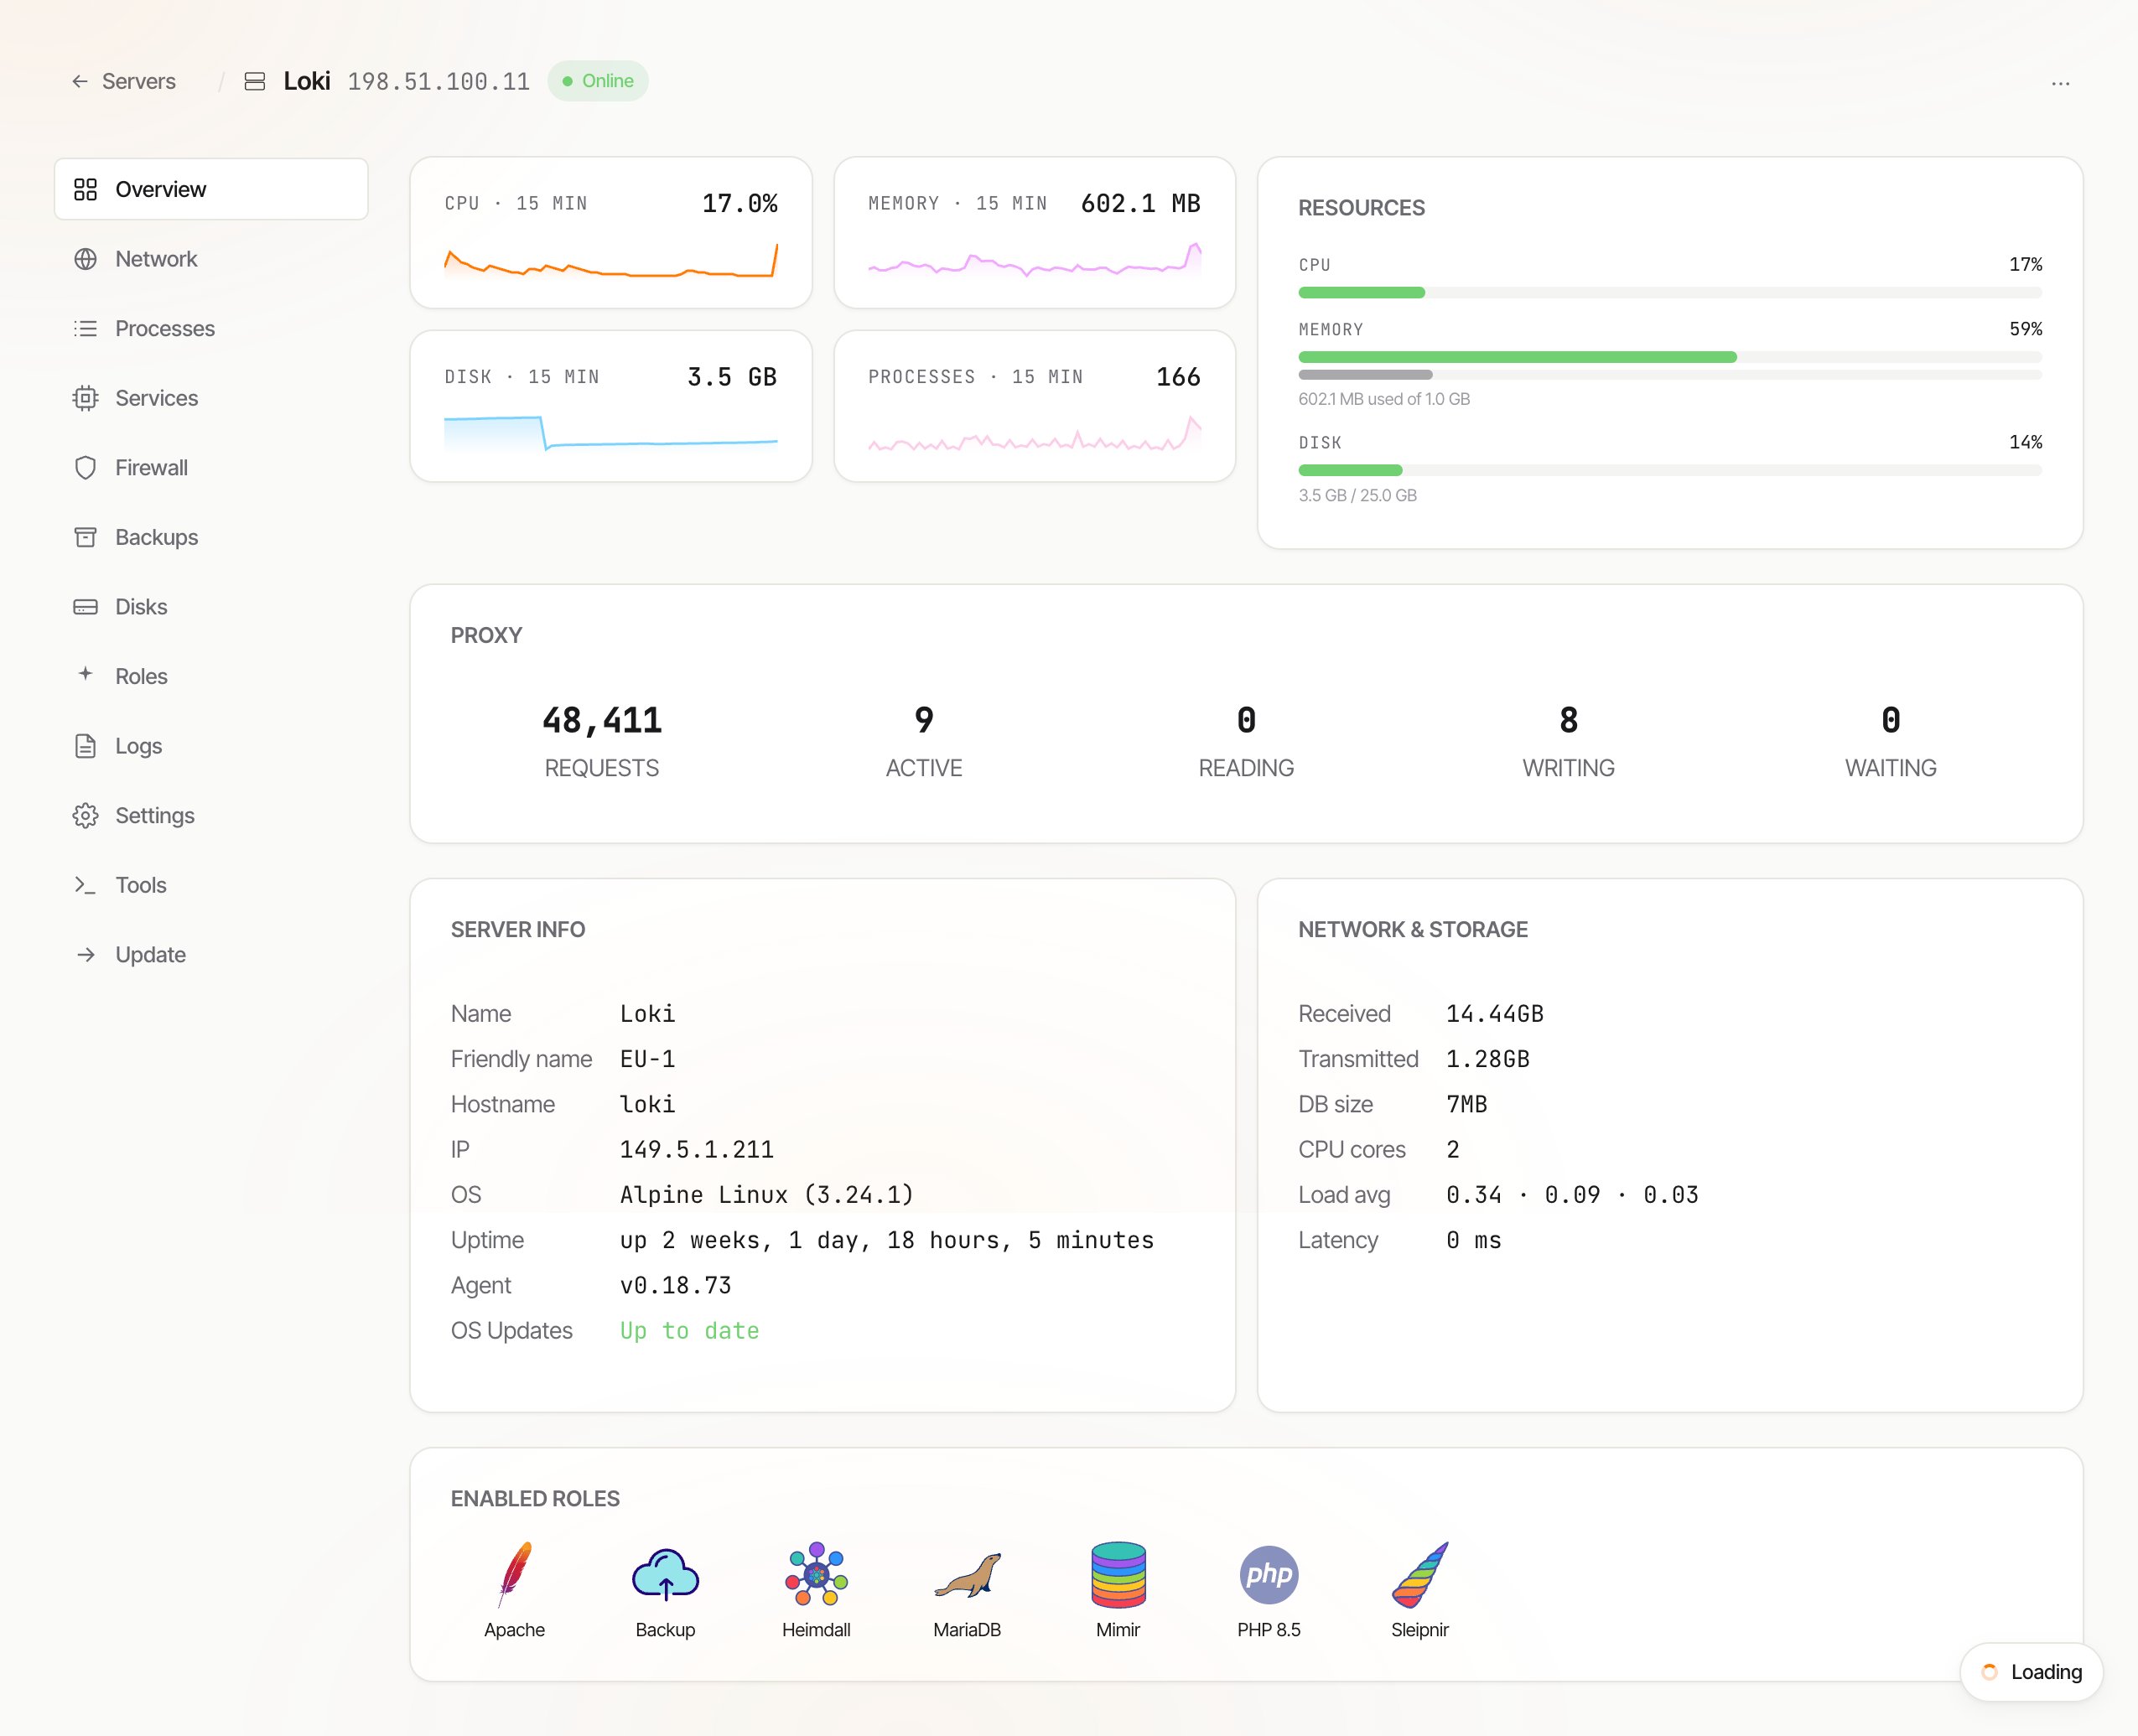
To view full details about a server, set settings, install roles, or manage it, you'll need to access the individual server screen. To do so, navigate to Servers, use the kebab menu and click Manage, or simple click the entire server row on the Servers screen. This will then load the overview screen for that individual server.
Network
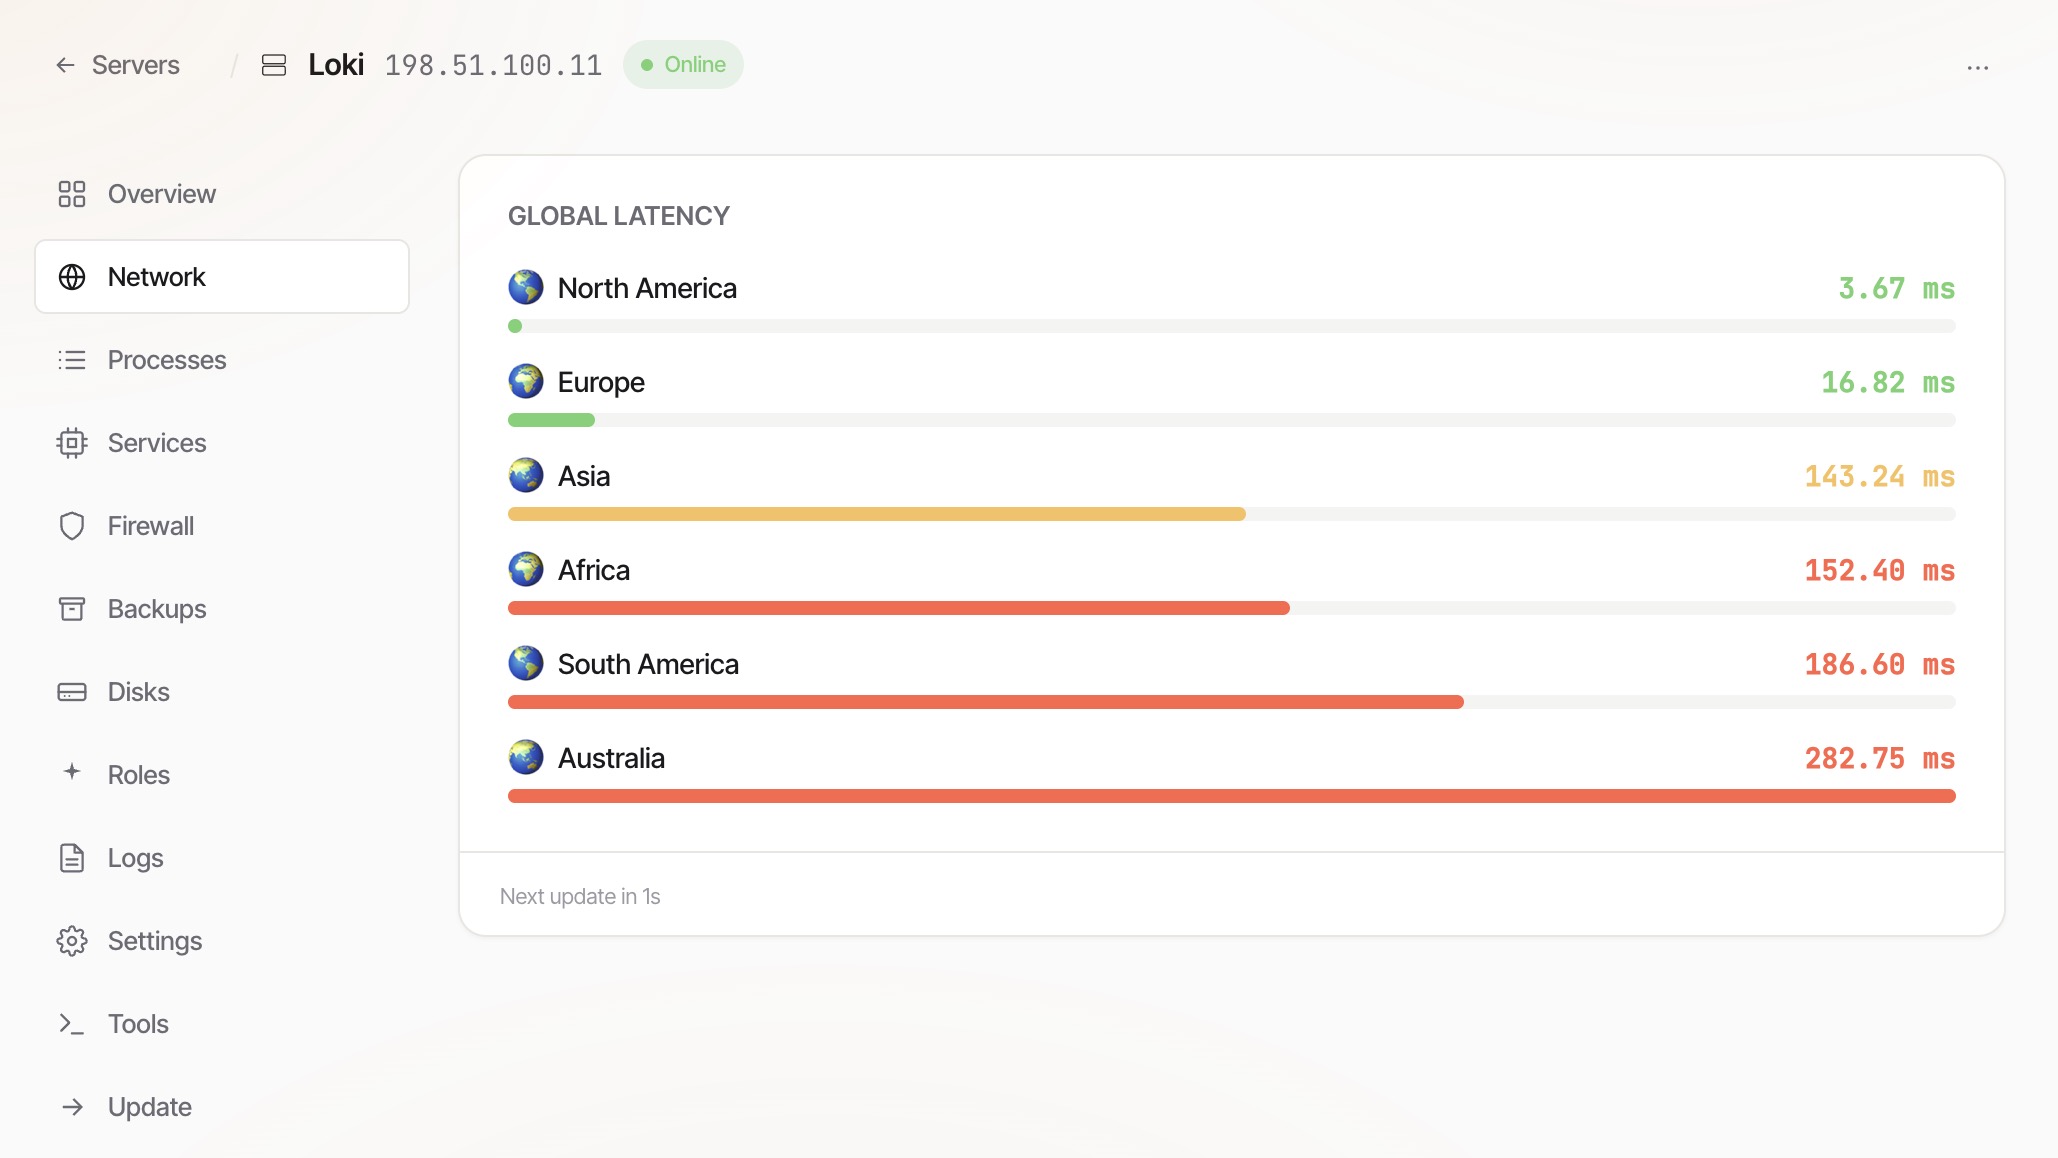
Latency probes from this server to a set of well-known endpoints (Cloudflare, Google DNS, etc). Each row shows the round-trip time in milliseconds. Auto-refreshes every 10 seconds.
Use this page when a customer reports something feels slow; high latency on all rows points at a network or upstream issue rather than the server itself.
Processes
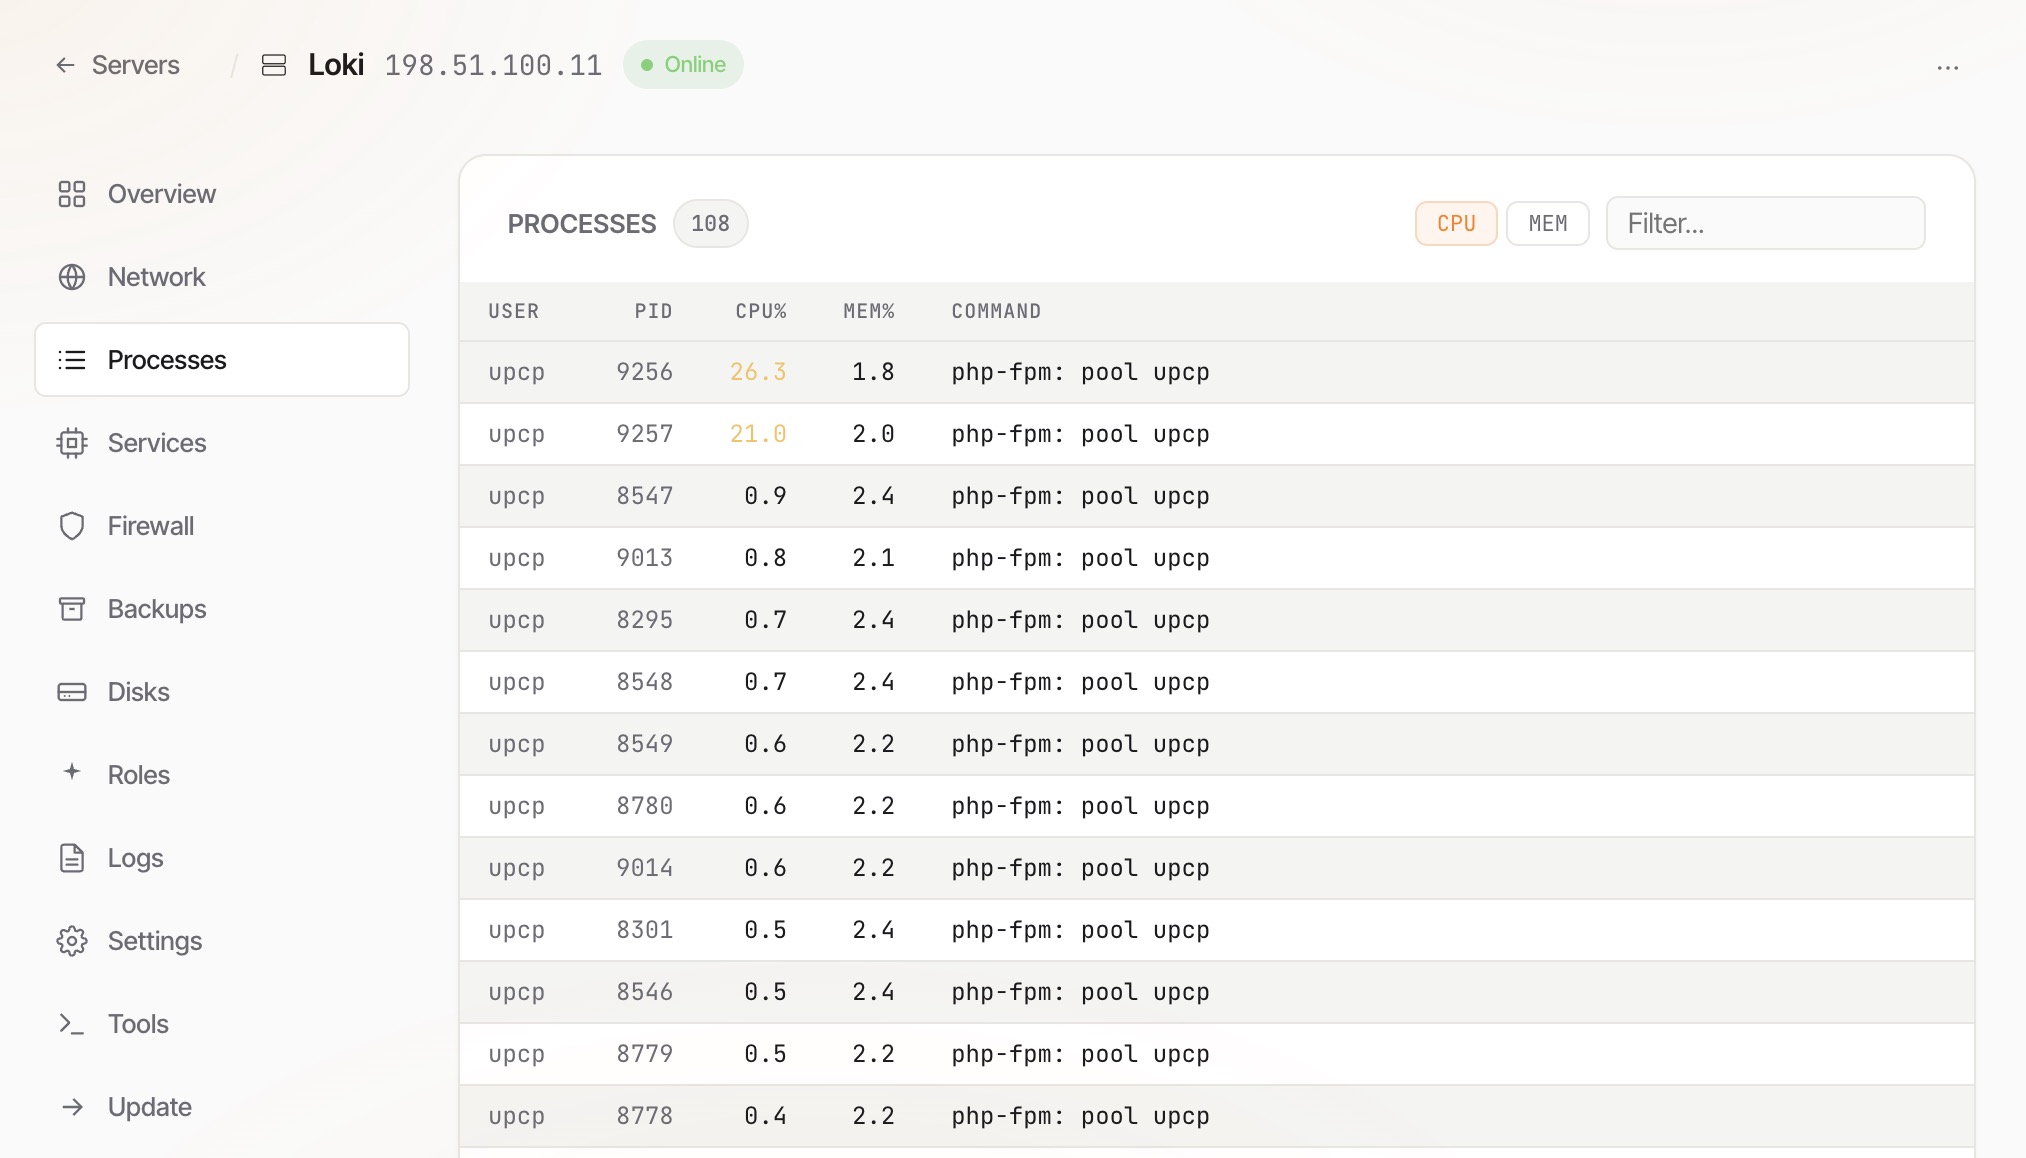
A live process list for the server, sorted by CPU usage by default. Same information as running top or htop over SSH but without needing shell access. Auto-refreshes every 10 seconds.
Handy for spotting a runaway PHP process, a stuck backup job, or a customer container consuming more than it should. Can be sorted via CPU or Memory using the relevant buttons; the search box filters by command name.
Services
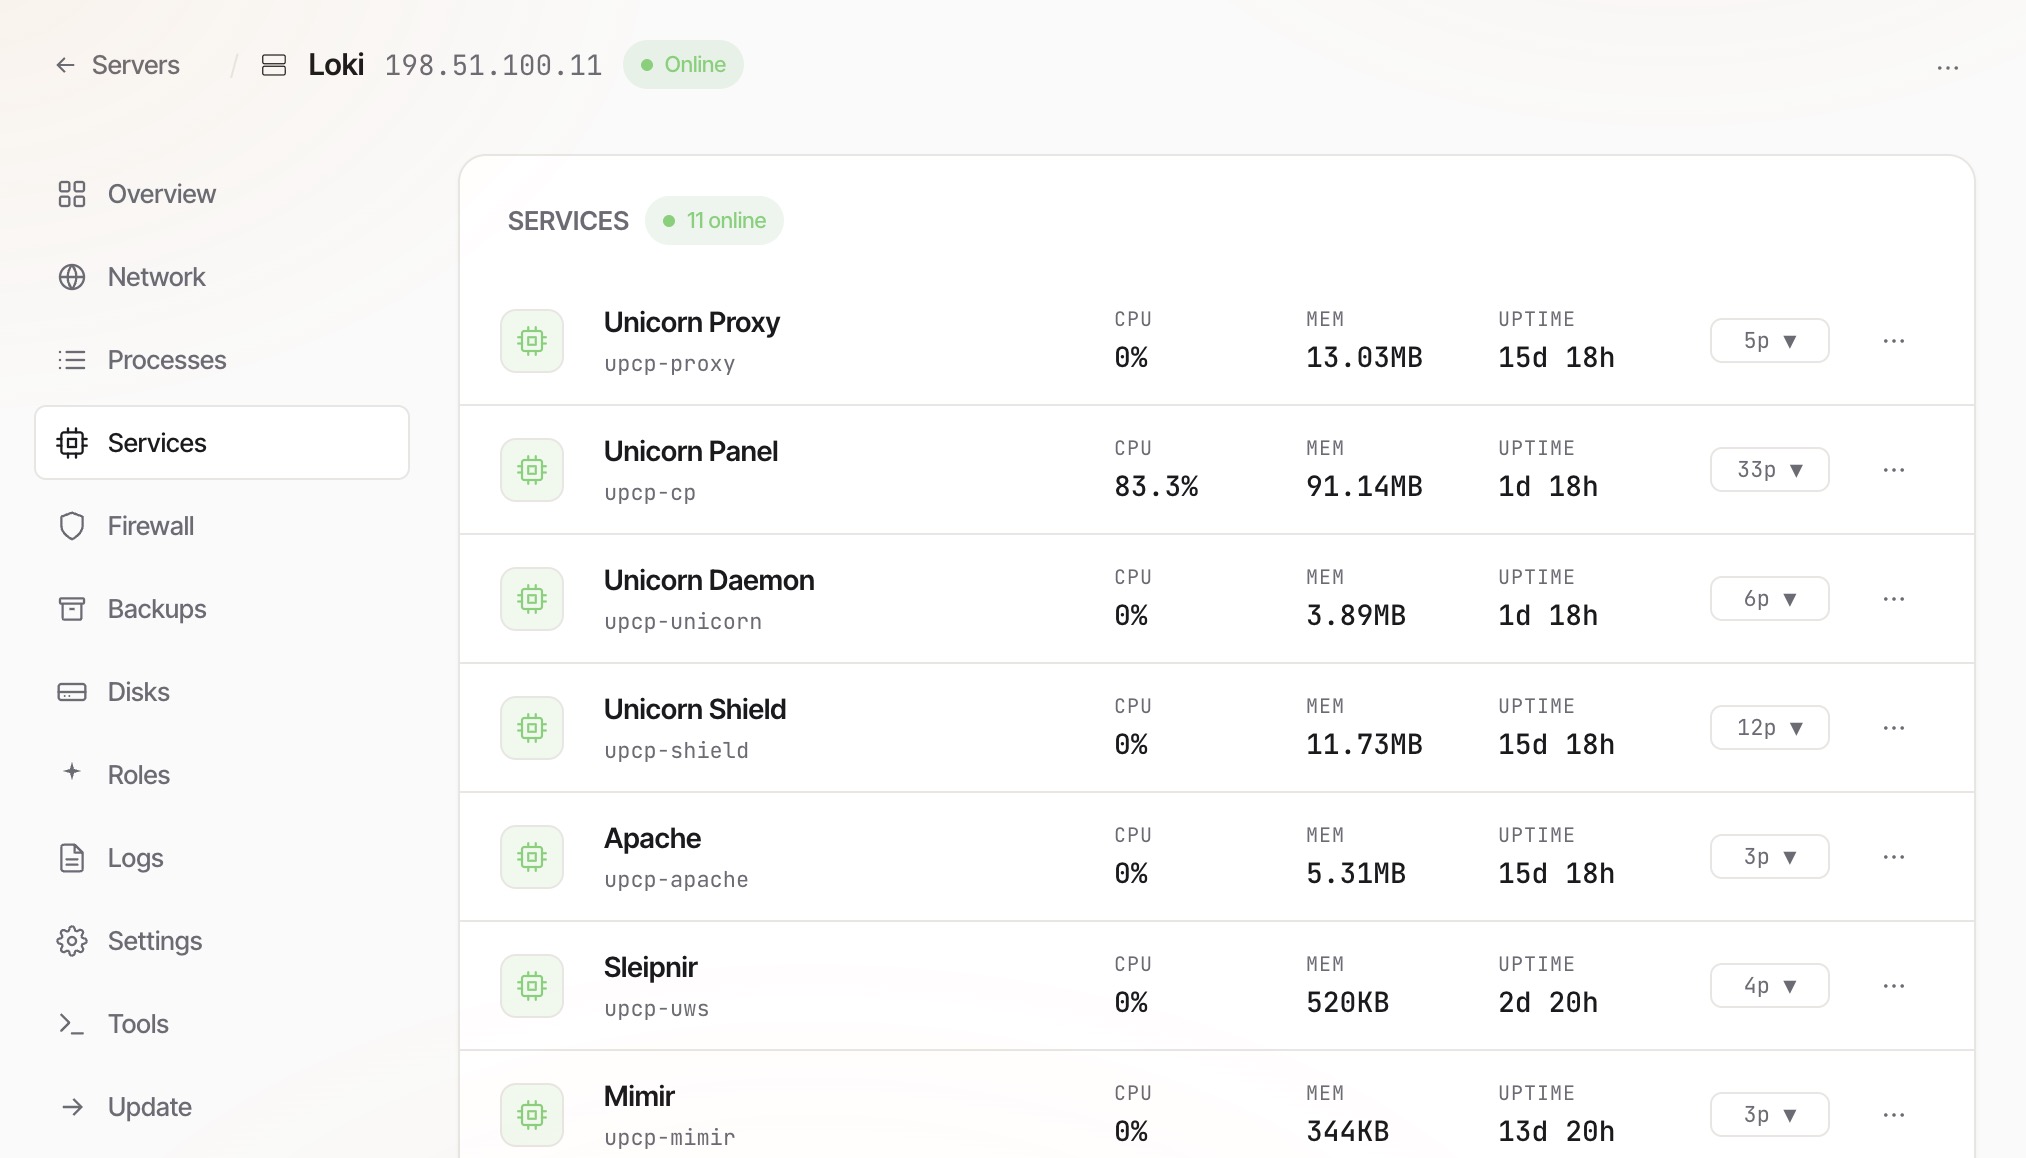
The list of managed background services on this server can include the control panel container, reverse proxy, database engines, mail suite, DNS and so on. Each row shows the service's current status (running, stopped, disabled) plus how long it's been in that state.
Actions on each row let you start, stop, restart or disable a service directly from this screen. Restart is the safe default when a service is misbehaving; stop is intended for maintenance windows only.
Firewall
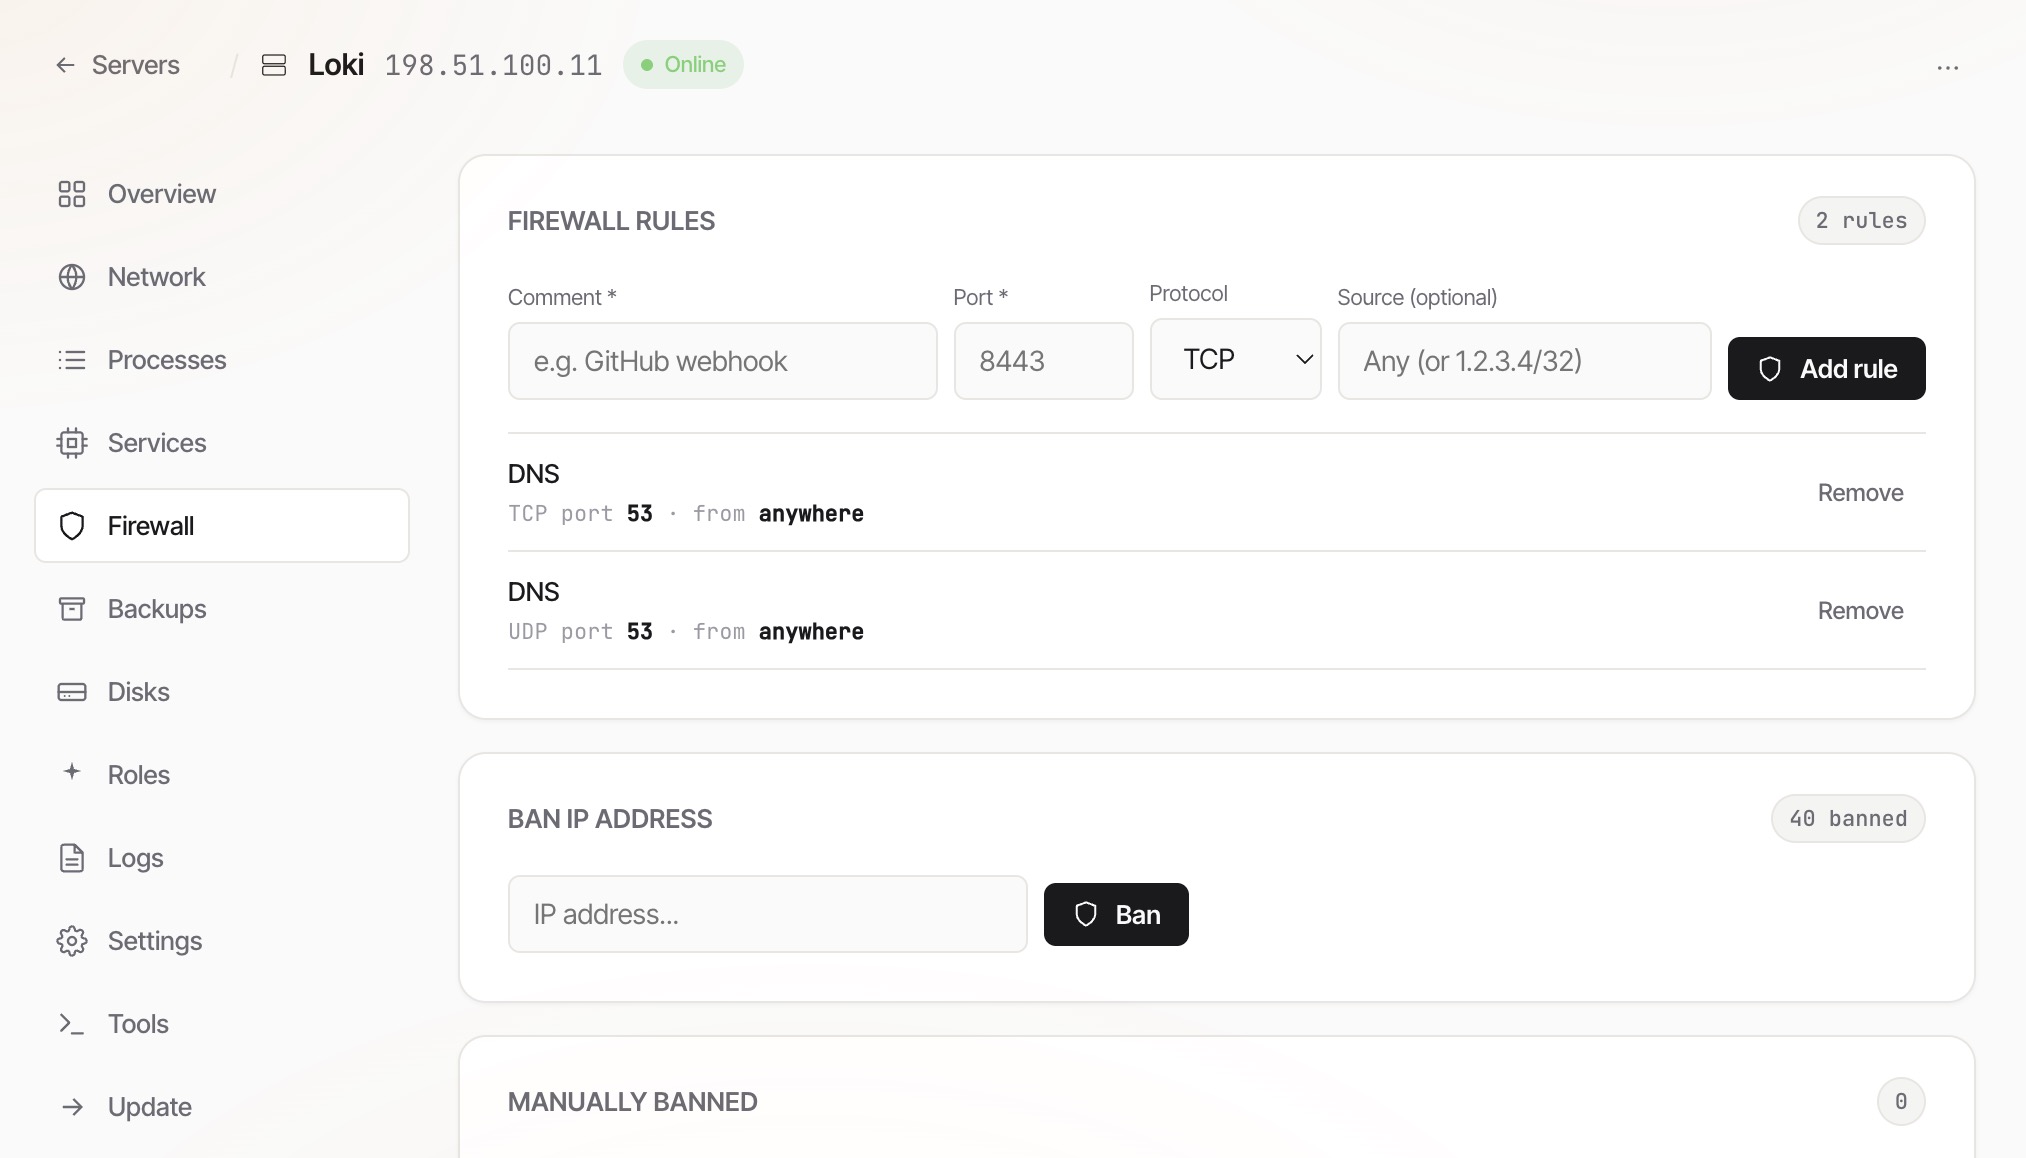
The active firewall state for this server, powered by Unicorn Shield. Shows the current ban list grouped by jail (brute-force SSH, bad bots, manually-banned IPs and so on) along with how many IPs are in each.
Search bans by IP address to see whether a specific address is blocked. Use the Unban button on any row to release an IP. Use Ban IP to add an address to the manual jail. It stays banned until you release it. A prominent notice at the top of the page warns you if your own browser's IP is currently banned on this server.
Backups
Placeholder for a future per-server backups view. The panel's backup management currently lives at Settings → Backups (fleet-wide policy) and on each website's Backups tab (per-site archives). Nothing to configure here yet.
Disks
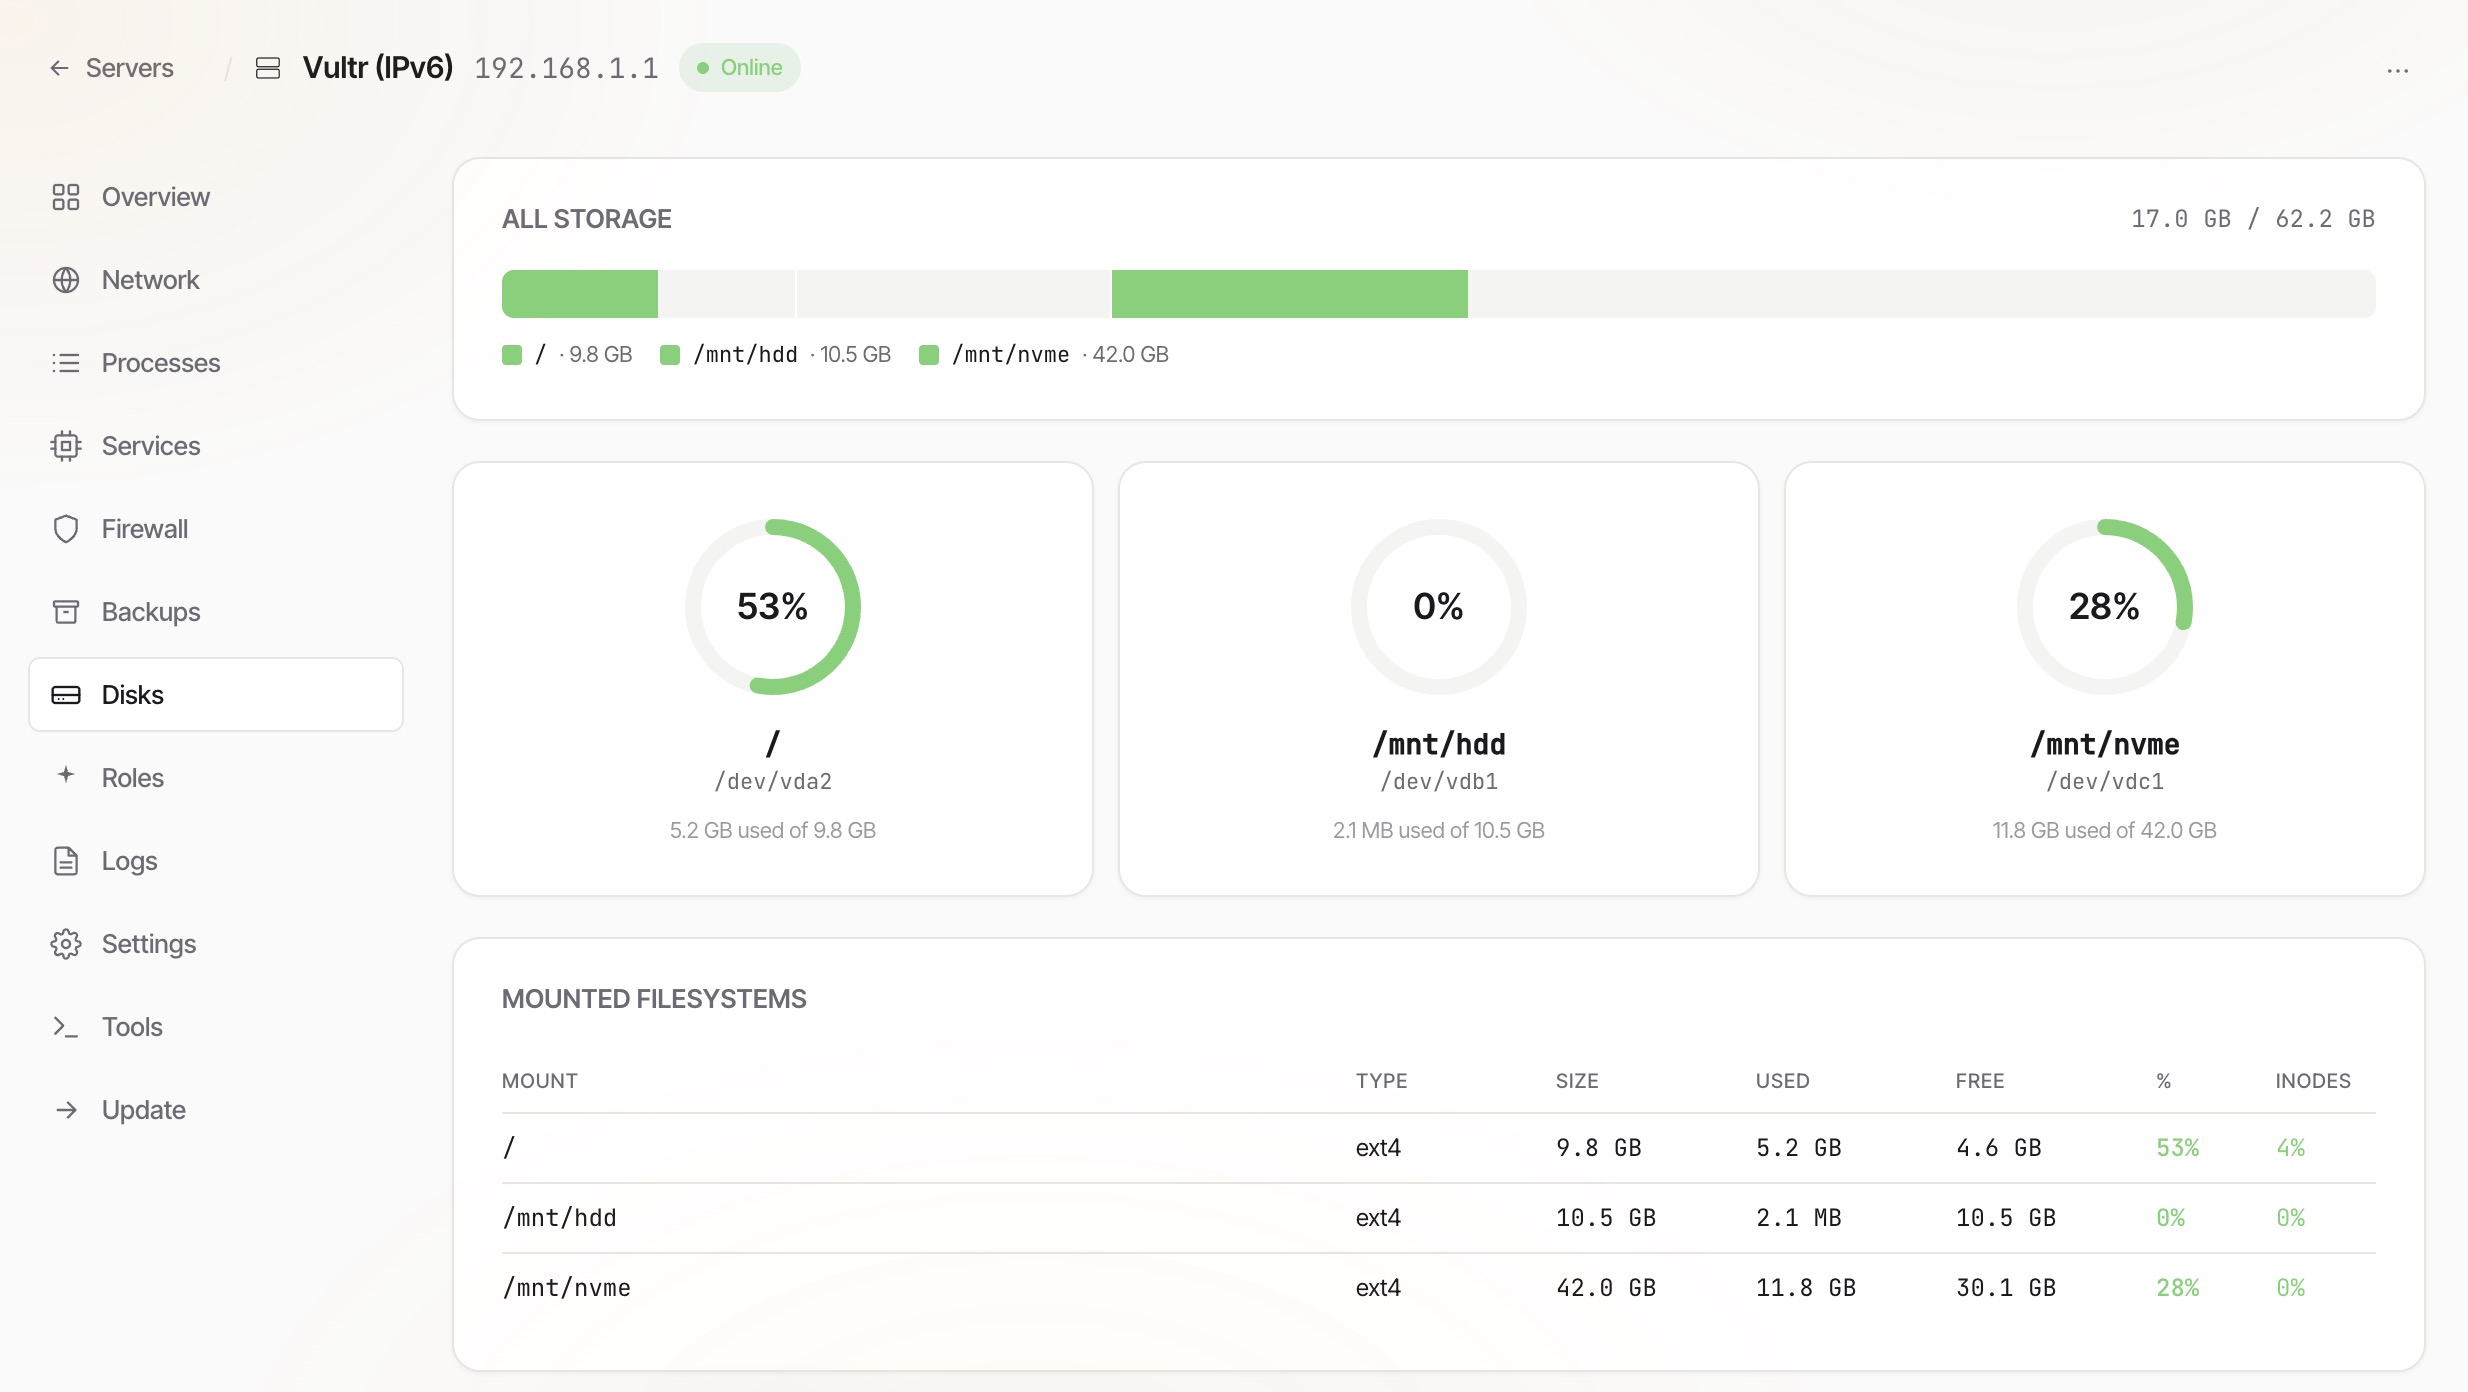
Every mounted disk on the server with its current size, free space and inode usage. Color bars turn amber once a disk crosses 75% and red past 90%, so you can spot storage pressure at a glance.
Also lists the top directories and top files on the primary disk so you can find what's using space when a customer's usage or a runaway log file has bloated the box. The lists refresh on demand: click the reload icon on either card if you've just cleared something out and want to see the new numbers.
Roles
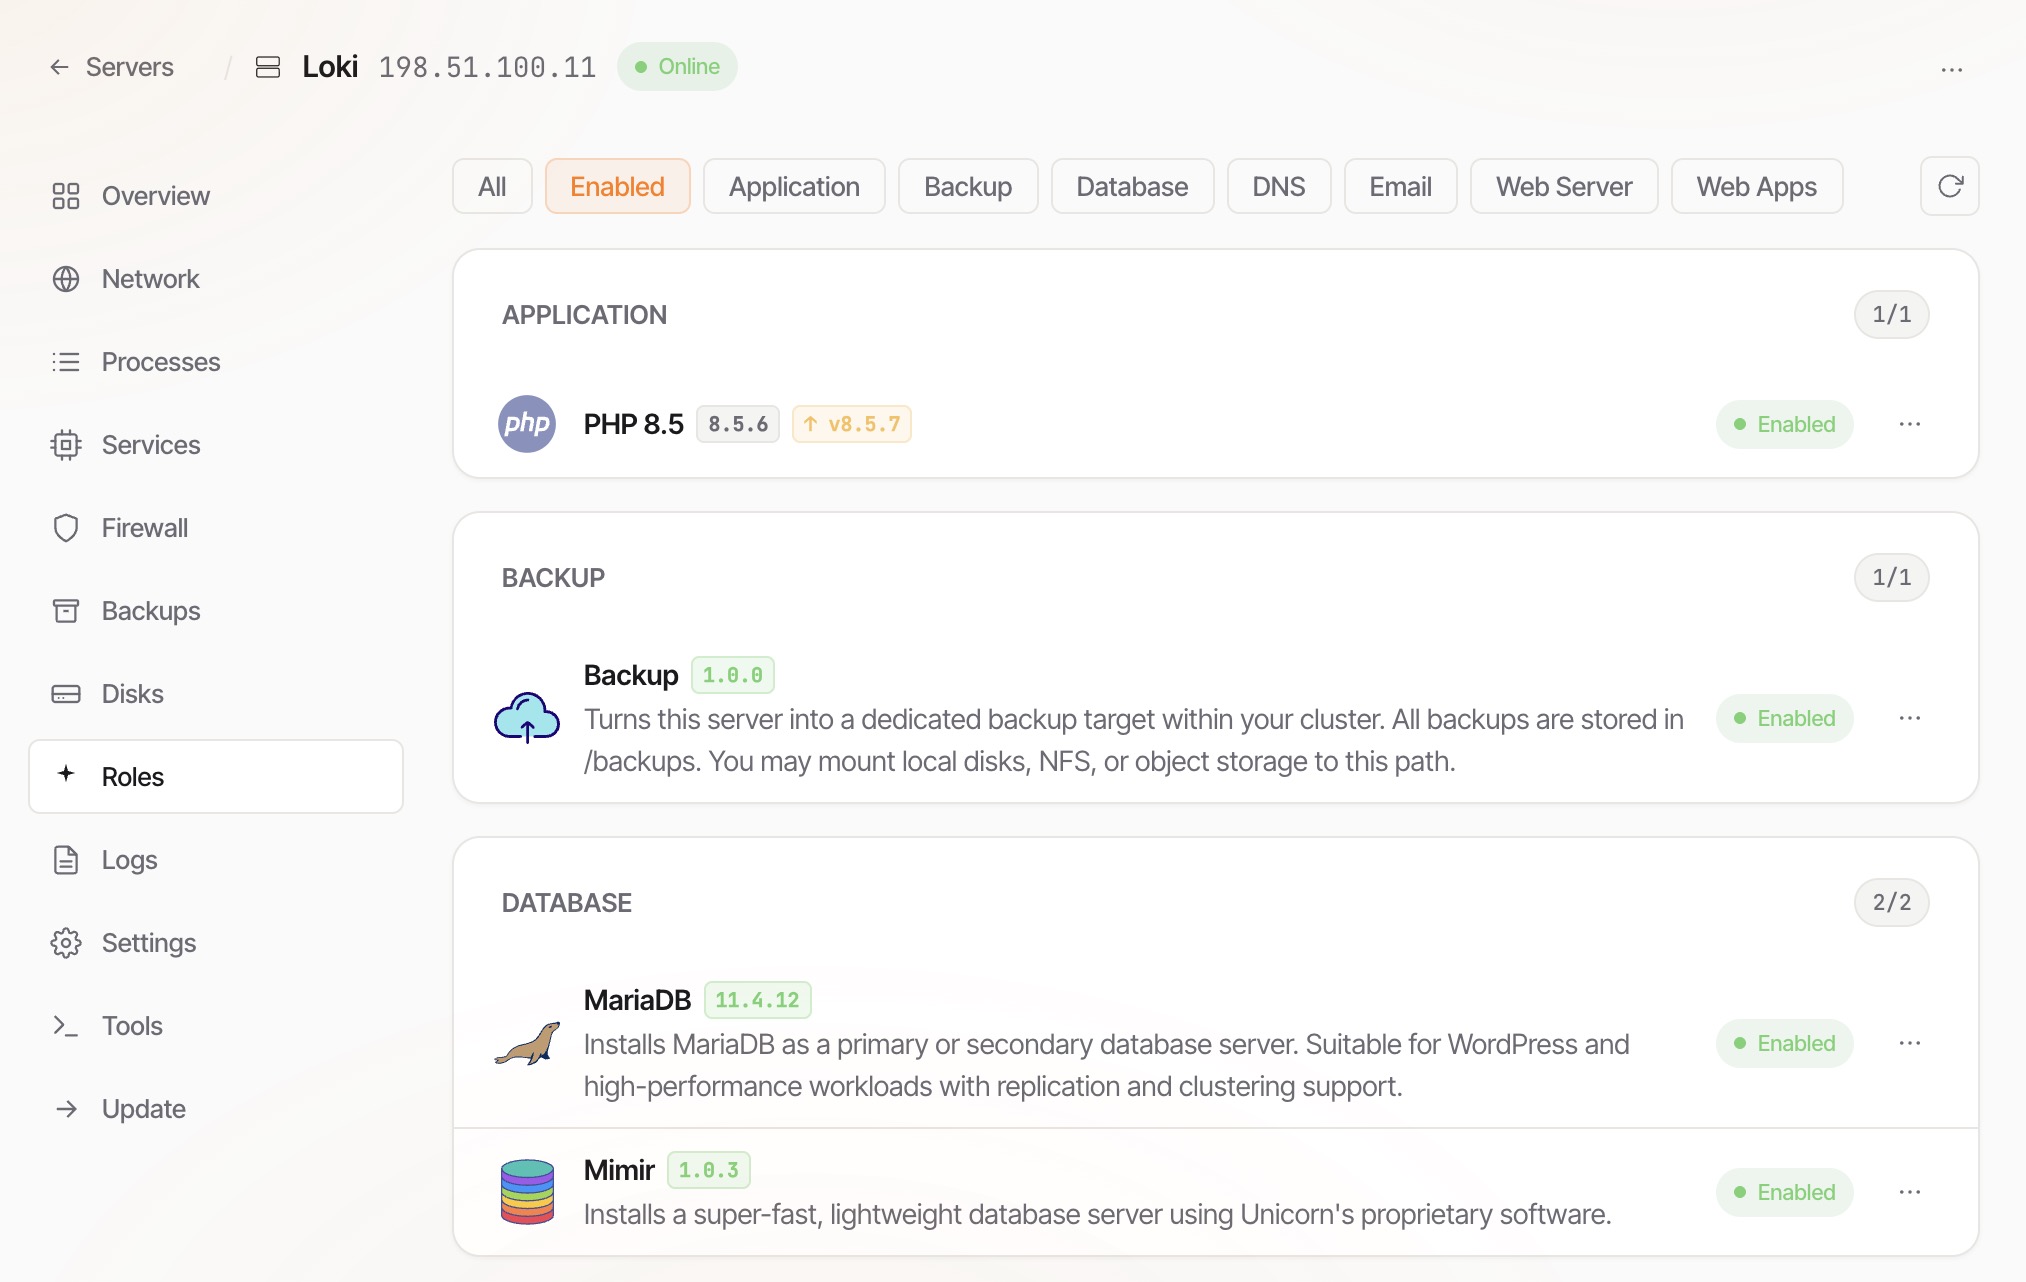
The catalog of installable services (roles) for this server: MariaDB, MySQL, PostgreSQL, various PHP versions, Apache, NGINX, the Hermes mail suite, Heimdall DNS, backup targets, and so on. Each row shows whether the role is installed on this server, which version is running, and whether an update is available.
Enable a role by clicking Install on its row; the panel builds and starts the necessary containers in the background and streams the progress live. Update pulls the latest version of a role that's already installed. Disable removes the service but leaves any stored data on disk so re-enabling it later restores the state you had. Some roles won't offer to install if they conflict with something already running.
Logs
Live view of the log files this server produces: panel activity, cron runs, per-service logs for every enabled role, the Shield WAF's inotify tail and so on. Pick a log from the dropdown.
The most useful logs when troubleshooting: the panel's commands log for anything the operator has done recently, and any per-service log when a specific role is misbehaving.
Settings
Placeholder for future per-server settings (SSH access keys, host-level tuning). Not wired up yet; leave this tab alone for now.
Tools
One-off maintenance actions that don't fit under Roles or Update but that a server admin occasionally needs to reach for. Each tool is a card with a short description of what it does and a button to run it.
Typical tools include: rebuild every tenant container from current panel settings; recompute cached disk usage and quota numbers after a bulk import; refresh the trusted-IP lists for Cloudflare and BunnyCDN so client IPs are recorded correctly at the proxy; prune orphaned container images to reclaim disk. Which tools are visible depends on which roles are enabled on the server.
Update
The panel-upgrade surface for this specific server. Shows the version this server is currently running and the latest version available upstream. Clicking Update triggers the same upgrade sequence unicorn upgrade runs on the command line (download the release, verify the license, extract, walk per-version scripts, restart services) and streams the live output into the page so you can see each step complete.
The Update page respects the panel's license state. A valid license lets the download proceed; a rejected or expired license fails at the download step with an explanation. Nothing about the server's data is touched until the release has been verified and extracted, so a failed upgrade attempt leaves the server on its previous working version.
Overview
The Backups screen lists the backups available across your fleet and lets you restore or download them.
- For Owners, they will see every backup.
- For Customers, they will only see what they have either created or been assigned.
Backups are stored on any server with the Backup role at /backups, which can be a partition, network mount, or external storage.
Overview
Security is managed by Fail2Ban and UFW. UPCP has integrated common custom jails to help protect the server from bots and other malicious users.
You can ban and unban IP addresses, view IP address information (by clicking on the IP), and view which jails are banning the most IP addresses.
Fail2Ban
With UPCP, our Fail2Ban actions have been refactored to enable quick ban/unban actions.
Ban an IP address
To ban an IP address, simply type the IP address in the box provided and click the button labeled Ban. A confirmation screen will pop up with the result of this action.
Unban an IP address
To unban an IP address, simply type the IP address in the box provided and click the button labeled Unban. A confirmation screen will pop up with the result of this action.
Adding your own jail
Unicorn Panel will automatically notice when a new jail has been added and add it to the control panel. From there, you can unban the IP addresses.
To rename the jail to a nicer, friendlier name, update _config.php and add the following:
$_CONFIG['Firewall']['f2b_to_names'] = [
    'jail-name' => 'Friendly Jail Name'
];
Overview
When something is not working as expected, this section collects the checks and commands that resolve the most common issues.
unicorn cron check-common-server-issues to grep through the logs and surface the most frequent problems automatically.Common Commands
We've listed here a few common commands that we think you'll find helpful when administering your servers.
UPCP Proxy
unicorn proxy test- will test the configuration for the proxyunicorn proxy restart- will restart the containerunicorn proxy reload- will reload NGINX inside the container
Podman / Containers
unicorn podman list-containers- will list all containers and their current status (running, stopped, etc)unicorn podman restart-containers- will restart all website containers-
unicorn podman recreate-container <UID>- will re-create the container of the website's UIDRecreating containers is generally safe; however, please use this command with caution.
NGINX
unicorn nginx test- will test the configuration for NGINXunicorn nginx restart- will restart the containerunicorn nginx reload- will reload NGINX inside the container
Apache
unicorn apache test- will test the configuration for Apacheunicorn apache restart- will restart the containerunicorn apache reload- will reload Apache inside the container
PHP
unicorn php test- will test the configuration for every single PHP container
UPCP
unicorn cp reload <web|app|cron>- will reload either web, app, or cron of the control panel.unicorn root reset-admin-password- will reset the password of the very first user (ID=1).unicorn root fix-permissions- Resets ownership + modes across the whole /opt/upcp tree, refreshes the unicorn binary and the SSH shim, and re-applies the OpenSSL / cron symlinks.unicorn podman recreate-container <uid>- Rebuilds one tenant's container from the panel's stored settings (mounts, resource limits, image).unicorn podman recreate-containers- Same but fleet-wide; every tenant container on the host gets rebuilt. Slow; only run during a maintenance window.unicorn podman restart-containers- Cycles every tenant container without rebuilding.unicorn websites fix-permissions <uid>- Resets file ownership inside one tenant's home directory.unicorn tools prune-images- Removes dangling and orphaned podman images.unicorn tools recalculate-disk- Re-scans every tenant's disk usage and updates the panel's cached figures.unicorn tools recalculate-quotas- Re-applies filesystem quotas from panel state.unicorn tools update-cdn-ips- Refreshes the trusted-IP list for Cloudflare and BunnyCDN so the reverse proxy uses the correct client IP.unicorn shield unban <IP>- Removes an IP from the ban list.unicorn shield ban <IP>- Manually bans an IP.